
+ Ryan Lott (of Son Lux) teaches how to build custom virtual instruments for sound design and scoring in Designing Sample-Based Instruments.
The ability to move up and down the neck of a guitar and understand what your available notes are in any given fret, is something that many guitarists struggle with well into their careers. It takes an effort to commit oneself to learning where all of the notes are and the patterns they create, but that doesn’t mean it has to be difficult to pick up this skill.
In this article, we will look at an easy method to remembering the note names in every fret on the guitar.
The Basics
Let’s take it back a notch. You don’t have to memorize every single note on every string in every fret; that’s because of how the guitar is tuned and organized. We know that if we play open strings on the guitar, we will get the following notes:
- 6th string: E (low)
- 5th string: A
- 4th string: D
- 3rd string: G
- 2nd string: B
- 1st string: e (high)
Additionally, we know that each fret will raise the intonation by a half-step. So for example, if we play just the 6th string and move up one fret at a time, progressively we’ll get the following notes:
- Open (Fret 0): E
- Fret 1: F
- Fret 2: F#
- Fret 3: G
- Fret 4: G#
- Fret 5: A
- And so on…
If you learned how to tune your guitar to itself when you first started learning the guitar, you’ll remember that the note in Fret 5 corresponds to the note of the open string on the next string down. The only exception is the 3rd string, where in order to get the same note as the 2nd string open, we need to play Fret 4. This is due to how the guitar is mostly tuned in intervals of a perfect fourth, except for the 2nd string, which is tuned a major third above the 3rd string (G to B is a major third).
Let’s store this information for now, because it will be helpful later.
Reference Points
If we can remember the note names in the Fret 5, as well as the open strings (Fret 0), we’ve already got two places on the guitar to serve as familiar “home bases.” That’s a pretty good start! Now let’s create even more reference points with very little extra effort. We’ll start by looking at the 6th and 5th strings.
The points of reference are circled in red in the below image. Look at how the open string (Fret 0) and Fret 12 feature the same notes, but an octave above. The note of A appears three times so we can already see there’s a relationship between Fret 5 on the 6th string, and Fret 12 on the 5th string as well. We’ll explore this further as well.
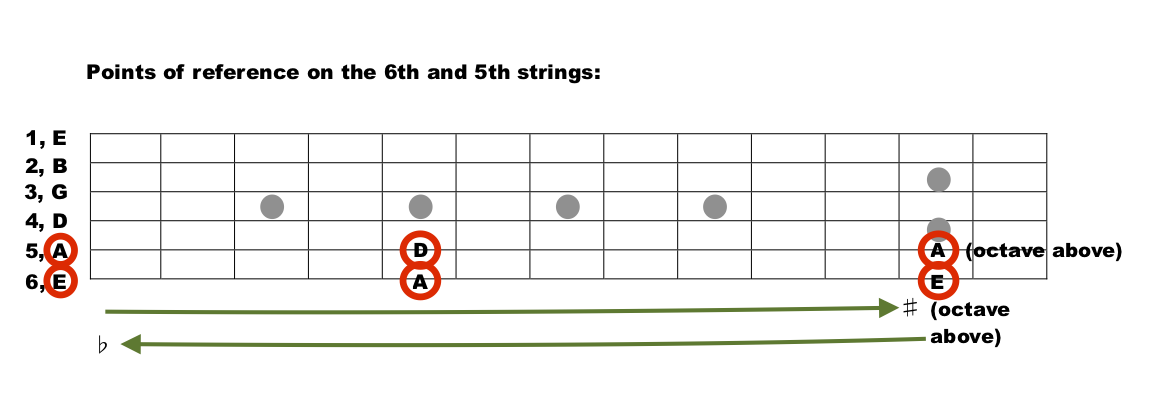
Now we only need to work out the names of all the other notes on these strings.
In order to do so, we must rely on what we said before — moving fret by fret towards the body of the guitar will give us sharps (♯). On the 6th string, for example, we will get: E, F, F#, G, G#, A, A#, B, C, C#, D, D#, E), and then moving back towards the open strings we’ll get flats (♭), producing: E, E♭, D, D♭, C, B, B♭, A, A♭, G, G♭, F, E.
*Note that between E and F, and B and C, there are no flats or sharps, by convention.
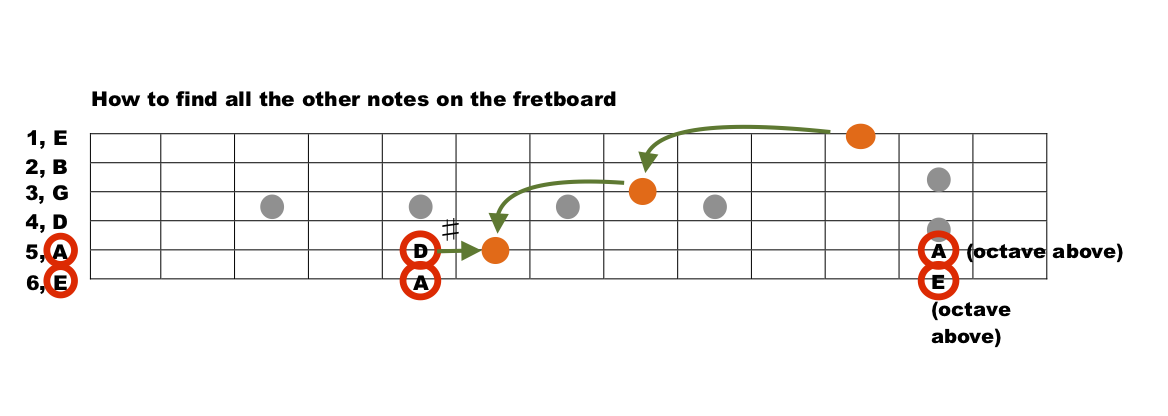
This method will make it much easier and quicker to identify notes. For example:

If we want to find out the names of the orange notes, we can do it this way.
- 5th string, Fret 8: The nearest reference point is Fret 5 on the same string. It has to be equivalent to the open 4th string which means it’s D + three half steps. Fret 5 (D), Fret 6 (D#), Fret 7 (E), so Fret 8 must be F.
- 6th string, Fret 11: The nearest reference point is the Fret 12 octave, E. We will move back towards the headstock, so we will follow the sequence of flat notes. Fret 12 (E), so Fret 11 must be E♭.
This method might at first seem complicated, but your eyes are quicker than your fingers, so having reference points to refer to all around the guitar fretboard is a great first step towards familiarity.
Another approach that works for some players is to use the C major scale on those two strings (6th and 5th) to map out the other notes as referential to them. If your aptitude for memorization is quite high, this would be quicker.

Octave Equivalence
To find all the other notes on the fretboard, we will need a little stretch further. It only takes skipping one string and moving two frets towards the headstock of the guitar to find the same note an octave below (and vice versa obviously). For example:
To find out which note is in Fret 8 on the 3rd string, we need to route it back to the same note an octave below on the 5th string. In order to do so, we move two frets back and skip one string (follow the green arrow). The resulting note is in Fret 6 on the 5th string, so D#/E♭.
The same note, one octave up, appears in Fret 11 on the 1st string, but in order to get back to the previous D#/E♭, we have to skip one string and go back three frets this time (follow the top-right green arrow). This happens every time we cross the 2nd string, because of the tuning alteration. Obviously, we could have used another reference point, the note E an octave up, which appears in Fret 12 of the 1st string, but it helps to understand the relationship between the strings that cross the 2nd string.
All of the notes above Fret 12 on any string are just repetitions of the same notes, an octave above (for example, Fret 14 on the 6th string is an F#, an octave above the same note on Fret 2 on the same string). Therefore, we can simply subtract 12 from the fret number and proceed repeating the same process we have discussed until now.
The fretboard is a magical matrix, once you know the rules of how it works, you have all of the information available in terms of how to use it.
Don’t stop here!
Continue learning with hundreds of lessons on songwriting, mixing, recording and production, composing, beat making, and more on Soundfly, with artist-led courses by Kimbra, Com Truise, Jlin, Ryan Lott, and the acclaimed Kiefer: Keys, Chords, & Beats.