+ This lesson is presented courtesy of The Pocket Queen’s course on Soundfly, Moving at Your Own Tempo. Sign up and learn how to harness your inner groove and your outer authenticity.
In The Pocket Queen’s Soundfly course, Moving at Your Own Tempo, she spends a bit of time breaking down the drums she plays and the elements of her kit, before moving into her stylistic drumming and groove techniques.
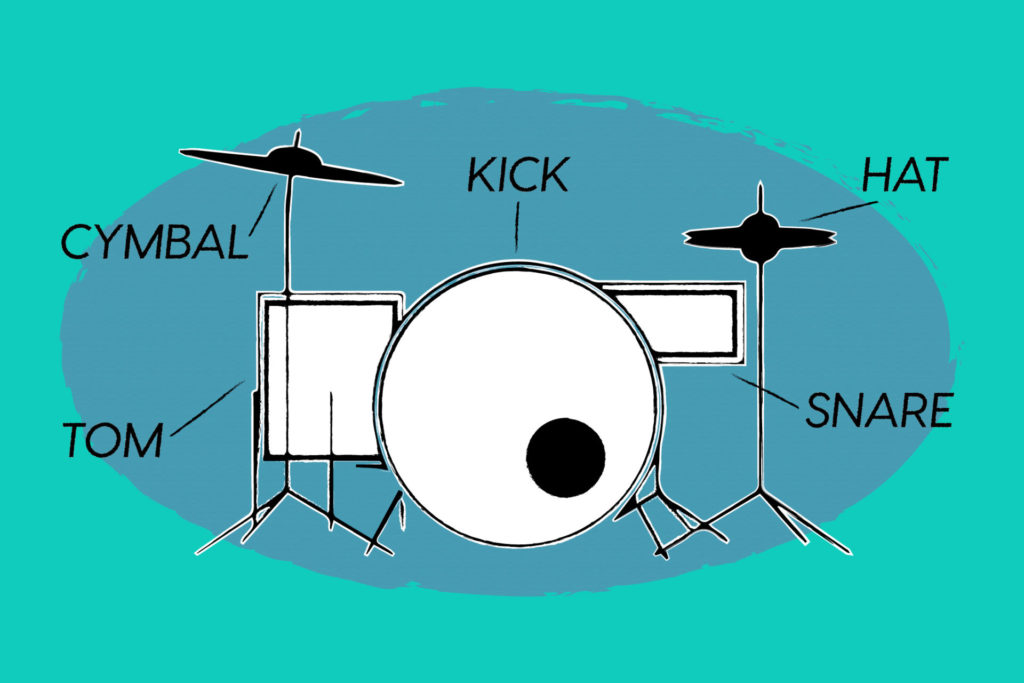
But for those new to drumming, let’s go over the basic individual components of a standard drum kit here.
Bass Drum
Also referred to as the “kick drum,” this is the big drum that sits on the ground facing an audience, perhaps with an artist’s name emblazoned across the resonant drumhead.
Played with a foot pedal, bass drums provide that “boom” we all know and love, and something about a repetitive pattern here makes people want to dance.
Common diameter sizes vary from 18″– 22″. For a massive rock sound that shakes the room, however, you can find kicks with a diameters of 24″ or even 26″. On the other end, some jazz drummers are known to use bass drums with diameters as small as 16″ or 18″.

+ Read more on Flypaper: “A Brief-ish History of the Drum Kit”
Snare Drum
Often thought of as the center-piece of the drum kit, the snare drum provides the corresponding “crack” to compliment the “boom” of the kick drum. Its name comes from the thin wires strung across the resonant head of the drum. Snares are commonly made of metal and the wires provide an iconic crisp, militaristic sound that can be heard everywhere from classical concert percussion to heavy metal.
Notably, the “traditional grip” (rather than “matched grip,” more on this later) for holding drumsticks was developed at a time when soldiers marched down a battlefield while playing snare drums. Soldiers could not march with a drum flatly in front of them, so the drum had to be slung over the shoulder and tilted to the side.
To accommodate the angle of the tilted drum, the traditional grip was utilized. To this day, many people still play with the “traditional grip” on both the drum set and in the context of concert percussion.

Tom-Tom(s)
Simpler than snare drums in design, these drums are traditionally placed over the bass drum by means of a mounting system. Also called “rack toms,” they provide a clear, open tone and have limitless applications.
The most common way to secure toms is with a metal bar which inserts directly into a mount on top of the bass drum.
Like all drums, there are many sizing options for toms in regard to both diameter and depth. Standard diameters are between 10″ and 12″. A deeper tom will have more of that brash 80’s boom with lots of resonance, while a shallower tom will have shorter sustain and a more focused tone.
Most commonly, a drummer will have one or two rack toms on their kit. It’s worth noting though: There’s no limit to how many toms a drummer can have. Some drummers enjoy four or more (though they likely have roadies setting up their kits or don’t need to move them often). There are also drummers who utilize no rack toms at all. This can be to make space for more cymbals or a sample pad, or simply for a more minimal aesthetic.
+ Read more on Flypaper: “Groove vs Chops: What’s the Difference in Drumming?”
Floor Tom
Floor toms are larger than rack toms, but otherwise pretty similar. Because of their size, commonly between 14″ and 18″ in diameter, floors toms are lower in pitch.
A floor tom will sit on the floor by means of three metal legs attached to brackets on the shell of the drum, which can be adjusted to bring it higher or lower to the ground. Like rack toms, floor toms are relatively simple in design when compared to snare drums. They can basically be considered an extension of their smaller relatives.
In fact, when people say “toms,” they’re usually referring to rack toms and floor toms together.

Hi-Hat
The descendent of early iterations like the “sock cymbal” and “low-boy,” the modern hi-hat is a set of two cymbals, placed on a spring-loaded stand attached to a foot pedal.
Due to its design, the hi-hat is the only piece of the drum set commonly played with both the foot and the hands. Because of how the stand functions, a drummer can adjust the space between the two cymbals using their foot. This provides the option for the cymbals to create a closed, tight sound, or an open, splashy sound and everything in between.
In most modern music, the hi-hat is used as the main timekeeper when playing grooves between the bass drum and snare drum.

+ Read more on Flypaper: “4 Tips for DIY Drum Recording”
Crash
Suspended on a stand above the drums, the crash cymbal’s name provides a few clues about its character. At a basic level, it’s designed to emphasize a moment. It’s common to hit a crash cymbal (usually together with the bass drum) at the beginning of a section of music — for example, at the top of a chorus.
The crash projects through the mix and is typically splashier and thinner than a standard ride cymbal. Common sizes for a crash cymbal range between 16″ and 18″, but they can be found as small as 14″ and as large as 20″.
Ride
Larger and thicker than a crash cymbal, this is the other suspended cymbal often found on a drum set. Much like the hi-hat, the ride cymbal is commonly used as a timekeeper. Because the cymbal is not being choked however, as the drummer “rides” on it to keep time, it creates a wash-like sound that takes up more sonic space than a closed hi-hat.
Because it’s thicker and larger than a crash cymbal, there’s less “splash” and “projection” comparatively. Most commonly, these cymbals are between 20″ and 22″, but can be found as small as 18″ (often marketed as a combination crash/ride), all the way up to 24″ and beyond.

As mentioned earlier, we’ll take a look at the specific pieces of PQ’s own kit inside her course. If you’d like to learn more about drum kit components in general, this resource from Yamaha is a good place to start.

Pick one of your favorite drummers and look into the drums they play.
Watch a few performances and maybe even check to see if there are specs on their website. Take note about the following:
- How many toms do they typically use?
- What kind of cymbals?
- How does the gear they’ve chosen impact their sound?
Keep on Grooving…
Continue your learning with hundreds of lessons on songwriting, mixing, recording and production, composing, beat making, and more on Soundfly, with artist-led courses by Kimbra, Com Truise, Jlin, Kiefer, RJD2, and our new The Pocket Queen: Moving at Your Own Tempo.