
+ Learning to record and mix at home? Check out Soundfly’s acclaimed online courses on mixing, production, and beat making — Subscribe for unlimited access.
Signal phase plays a huge role in the quality of any audio that you handle. Despite that fact, it can manifest only very subtly and be hard to detect. An undetected phase problem will zap the power out of a mix; whereas a mix with well-considered phase relationships is easier to handle and the resulting sound will be stronger, crisper, and will print well on any physical media.
If you’re just a beginner at recording and doing things at home, great — in this article, we’ll go over phase issues like phase cancellation, why those issues are important to look out for, and how to deal with them. And if you’re a seasoned engineer, there might be some information here that you can brush up on.
Let’s get physical!
We all know that sound is a wave. The curves and spikes of our friend the “waveform” are a graphic representation of that wave’s action, traveling physically through air. If I clap my hands and record it into my DAW, the peaks and troughs on the screen represent the fluctuating changes in air pressure that cause the sensory phenomenon we call sound. These ripples of pressure in the air make our eardrums vibrate, so we can hear that sound.
The microphone that recorded my clapping hands is mimicking the action of our ears, registering the peaks and troughs through a physical diaphragm and converting these movements into an electrical signal. (*By the way, we have a whole article about how microphones work!)
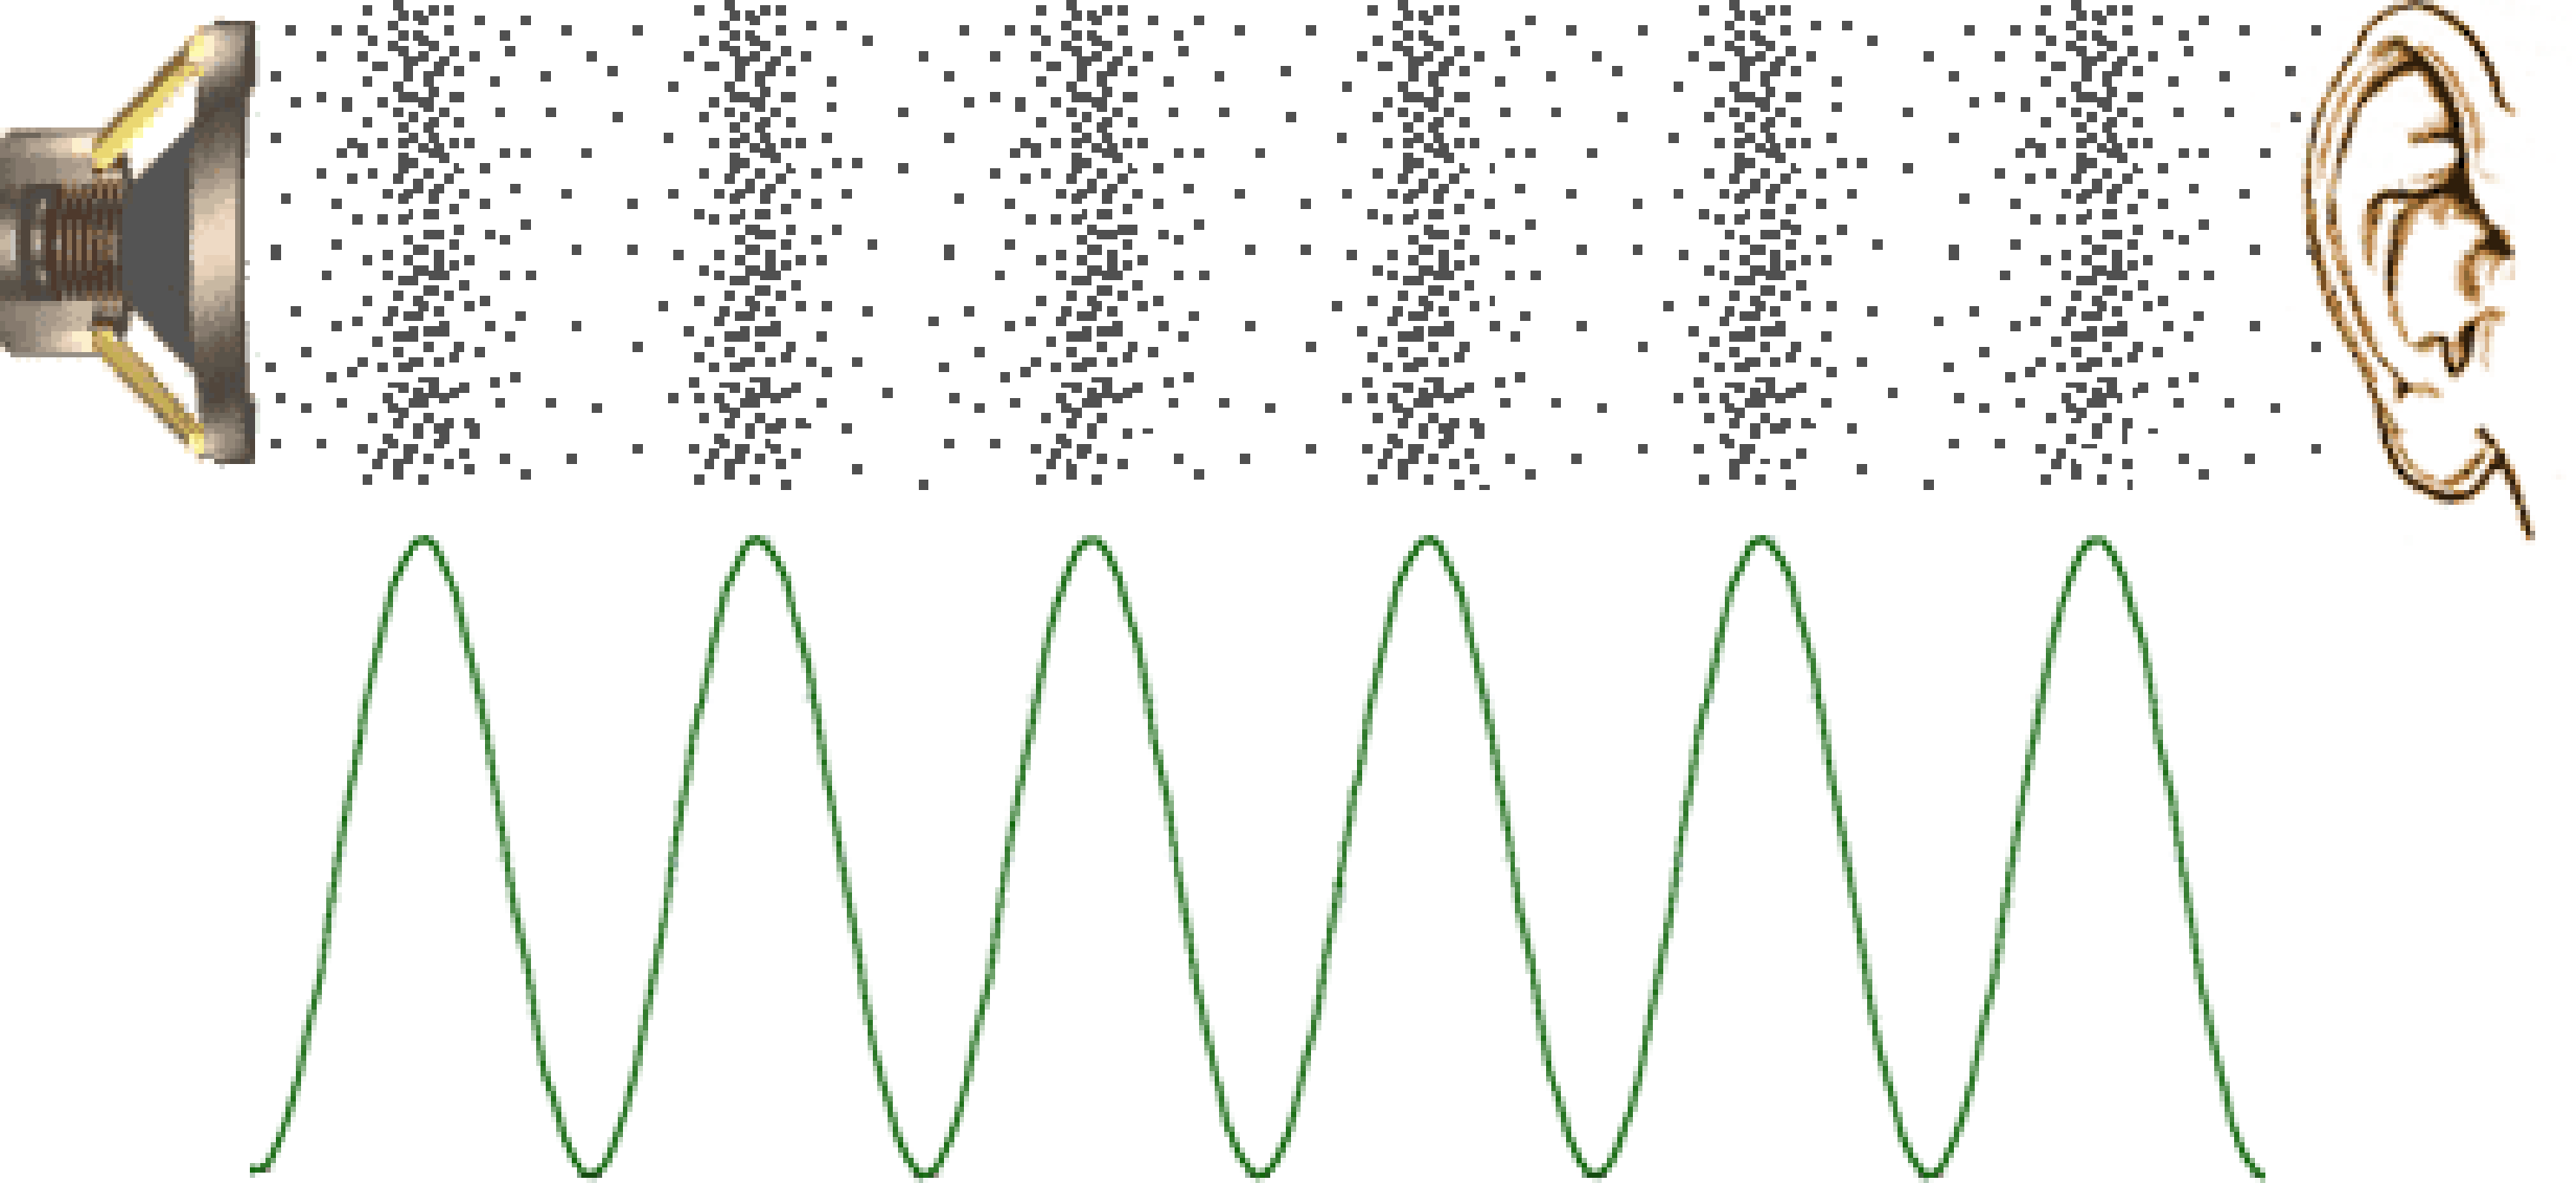
But to begin with, let’s approach these phenomena with a sound much simpler than a hand clap — a sinusoidal (or sine) wave. If we depict it as a waveform (like in the above graphic), we’ll see a signal that passes smoothly from peak to trough and back again with beautiful, equal curves on either end.
Flippin’ Out
Let’s say that we ran two of these sine waves simultaneously. We’d find that the total amplitude would be the sum of the two identical sine waves. So far, so good. But what if we were to “flip” the waveform, so that what was a peak is now a trough, and vice versa? What we get is… silence.
If two signals that are mirror-images of one another are combined, they attenuate each other. This is often called “phase cancellation” (which in truth is a bit imprecise, but will do for now). You can demonstrate this cancellation easily in your DAW by bringing up two identical tracks and then flipping the phase of one by hitting the polarity switch, usually rendered with a symbol resembling “Ø.”
In the diagram below, the left side demonstrates how two in-phase waves sum to an amplified resulting signal. The right side demonstrates two precisely out-of-phase waves are attenuated to silence.
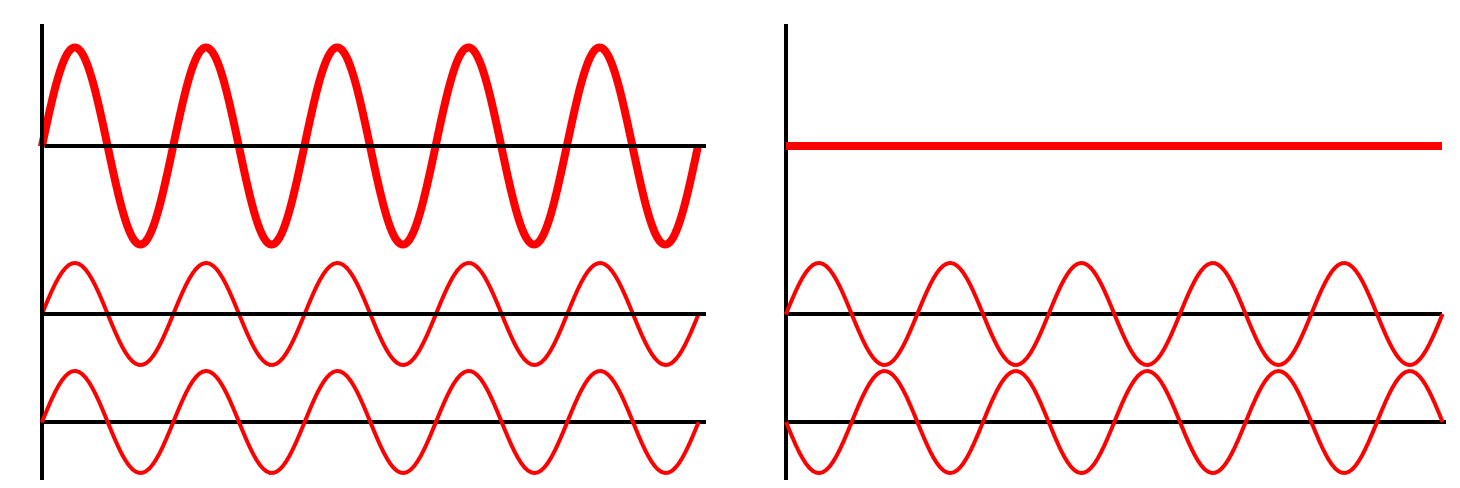
This test that you can perform at home is important for two reasons. Firstly, it demonstrates how, when we talk about phase, we’re describing the relative relationship between the peaks and troughs of different waveforms and how they affect the cumulative volume.
Secondly, the phase flip demonstrated above is one of the most common ways an (aspiring) audio engineer will relate to phase. Because simply inverting the phase of a signal can make so much of a difference to how it interacts with other signals, this functionality is built into a lot of audio equipment and is a cornerstone of good recording and mixing practice.
+ Learn production, composition, songwriting, theory, arranging, mixing, and more — whenever you want and wherever you are. Subscribe for unlimited access!
360° Panorama
Okay, to really get your head around phase, we need to move beyond the on/off perspective we just outlined. Phase is quite literally a relationship of degrees. In other words, our “out of phase” sine wave has a 180° phase relationship to its mirrored counterpart. Were we to gently move our duplicate sine wave through all degree positions in the phase relationship, we’d encounter different degrees of cancellation, and therefore different degrees of amplification and attenuation — from silence to peak volume and everything in between.
You can see this in the below animation. Our two sines are green and blue, with the red line describing their sum.
This more complex view of phase interaction is more applicable to the real-world scenarios we encounter as musicians and producers. You might be struggling to record a drum kit with multiple mics and losing that precious oomph in the process. Your studio monitors could start sounding a bit odd, because each side is interfering destructively with the other while their sound travels through the air. You may find that a certain parallel processing hack or sample replacement makes your sound thinner rather than awesome-er.
All are typical phase problems, involving complex signals and interference patterns. With a bit of math at your back, the key is to know how to listen for them and how to fix them.
Profound Effects
The last important aspect of phase concerns signal processing. And no, I’m not really talking about the guitar pedal effect called “phaser” — if you’re using a lot of plugins, each one that you introduce into your mix will affect the phase. Each instance of digital processing adds latency to the signal, even if only a few hundredths of a second. Many DAWs and plugin manufacturers attempt various compensations for this, but regardless, it’s important to be aware that it’s always going be there, and in some cases, unavoidably so.
Phase also operates more deeply within the architecture of signal processing, itself. A vintage analog EQ unit uses capacitors and inductors to shift the phase of the signal passing through it. And the same goes for most digital equalizers, many of which are designed to model the distinct and desirable characteristics of those good ol’ analog boxes. There are linear phase EQs available digitally that do not function using phase shifting, but they are a relatively special case.
The most important thing to bear in mind is that when you’re working with a mix, you’re dealing with a multitude of complex and interconnected phase relationships. EQ that kick drum and you are changing its phase relationship to other sounds appearing in the mix. Hopefully it’s not audible (or at least still sounds good), but it is there.

Moving away from the theoretical and into the practical, here are some tips you can use to identify and fix phase issues in the mix.
1) Place mics with the 3:1 rule.
As we’ve established, one of the first places that phase issues can crop up is with multi-signal recordings. Common culprits include drum sets, or acoustic guitar setups. When two very similar (or even identical) signals with a delay of < 20ms are added together, they produce a phenomenon called comb-filtering. This is a hollow, sweeping kind of sound, similar to a jet airplane or traffic passing by. Although it’s exaggerated and used for musical purposes in flange effects, it’s generally unpleasant and should be avoided.
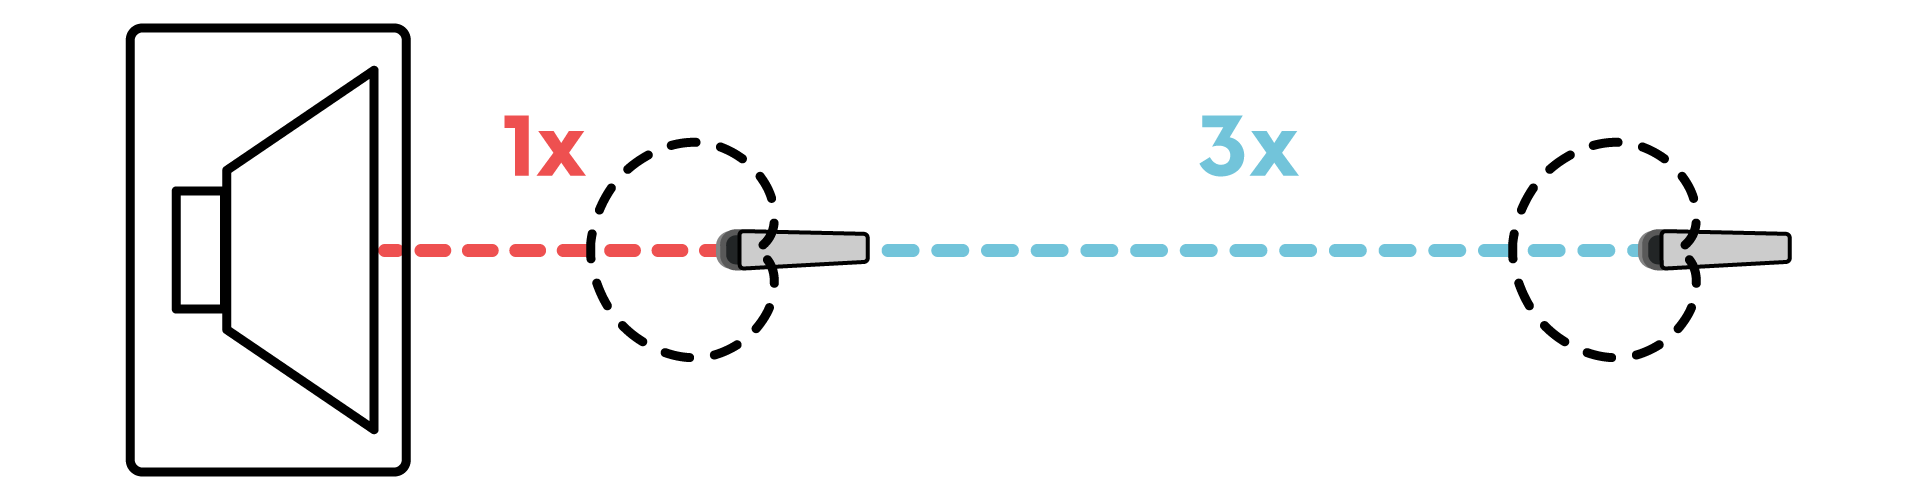 Avoid this by following the 3:1 rule, which stipulates that the distance between multiple mics should be at least three times the distance between the close mic and the source. For example, if you have a close mic 8″ from the sound hole of your acoustic guitar, your ambient mic should be at least 24″ away from the other mic, or the same sound source. The big change in amplitude between the two signals will mitigate the comb filtering, and you can accentuate this by angling the mics in different directions (provided it sounds good).
2) Flip and nudge.
Let’s say that you’re mixing a project and it’s arrived to you with phase issues built-in. You have a natural snare recording, but when you turn up the accompanying trigger track, it sounds awful. Usually it’s the above comb-filtering and/or a disturbing lack of low end. You can start by flipping the phase button, and see if that gets you where you need to be. Alternatively, you can zoom in on the waveforms and see what’s up.
Is one waveform going up when the other is going down? Then that’s probably the culprit. Modern DAWs and plugin manufacturers have numerous solutions to “nudge” tracks in either direction, so experiment with what you have.
3) Watch your low end and test it in mono.
Imagine you have a synth bass line that’s a combination of a sine and a saw wave instrument. You like the vibe, but when you turn them both up you aren’t feeling the fatness. That’s likely because the low frequencies of the combined signal are suffering from destructive interference.
Because of their long, curvy waveforms, low frequencies experience phase attenuation more profoundly than other areas of the spectrum. You may want to high-pass your square wave so that it gives the bass line that extra grit without stepping on the feet of your sine’s big clear lows. Additionally, many producers like to make low-end seem fatter by using stereo widening effects. Use these carefully as the phase interactions between the low end of each stereo side can cause destructive interference. Use the mono/stereo switch on your DAW’s master track to check whether your low end survives when everything’s running through the center channel.
In summing up (ha!), phase is not just a potential problem in audio engineering. It’s actually one of the essential components of sound alteration. We’ve only touched on some of the most basic theory and techniques here. It will serve a budding engineer well to dive even deeper.
Want to get all of Soundfly’s premium online courses for a low monthly cost?
Subscribe to get unlimited access to all of our course content, an invitation to join our members-only Slack community forum, exclusive perks from partner brands, and massive discounts on personalized mentor sessions for guided learning. Learn what you want, whenever you want, with total freedom.