+ This exclusive lesson is presented courtesy of Ryan Lott’s course, Designing Sample-Based Instruments. Sign up to inject a new dose of creativity into your music with custom-built virtual instruments.
In Ryan Lott’s course on Soundfly, we’ve encounter a lot of Kontakt’s functionality, as seen through the creative eyes of Ryan himself. It’s a versatile piece of software that Ryan makes use of in a variety of ways to make his unique music.
Here’s a quick and dirty review of some of the windows and parameters Ryan tends to utilize the most. Hopefully, once you get used to Kontakt’s interface, you’ll also start to get more comfortable tweaking the knobs we haven’t mentioned to see what else you can unlock!
And definitely make sure to check out our widely-acclaimed online course with Ryan Lott (of Son Lux) as he walks through his creative sampling, sound design, and composing course, Designing Sample-Based Instruments, exclusively on Soundfly.
Tuning and the Mapping Editor
We look at two ways to tune a sample in Kontakt, which is a necessary part of making sure the instruments you build work well with other parts in your songs and arrangements.
One way to tune the instrument is by using the tuning dial near the top right corner of the screen. If you turn the dial, you can tune the instrument by semitones. You can also double click just below the word “Tune” and input your adjustments that way. This will even allow you to tune the instrument by microintervals (distances smaller than a semitone).

This strategy feels kind of like tuning a guitar, and is super useful if you’re not sure about the pitch of the original sample. In fact, Kontakt will even play a reference pitch for you if you click the tuning fork icon in the upper right corner of the window.

You can also choose to change the mapping of your sample on the keyboard so that it lines up with different notes using the Mapping Editor. This is a great option if you already know the original pitch of your sample.
For instance, if you know your sample is a B2, then you can map it to that pitch on the keyboard by setting the Root to B2 and away you go. This is especially useful if you’re making drastic changes, as the first option will only allow you to change the tuning by a maximum of 36 semitones in either direction.

That’s all we really use the Mapping Editor for in the course, but you can definitely do a lot more with it. You can learn more about that in Kontakt’s user manual here.
Source, Group Insert FX, and Amplifier
To go into Edit Mode, click on the icon that looks like a wrench in the upper left corner of the screen.

Right away, you’ll see what’s called the Source Module. This is where you can change the sample playback mode. Among other things, it’s also where you can set the sample to play in reverse.

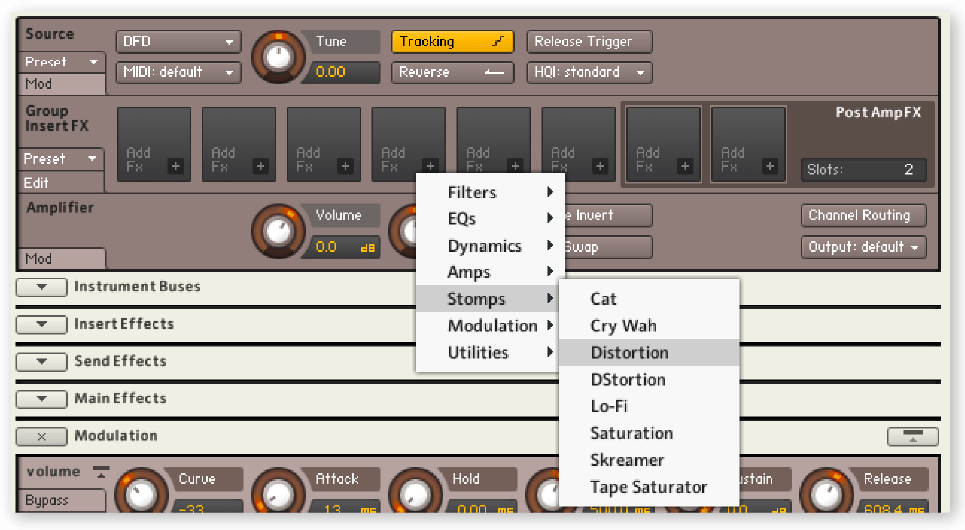
Next you’ll see the Group Insert FX area. In his course, Ryan uses it frequently to add filters to instruments.

Of course, there’s a lot more you can do here. There are eight boxes for different FX, and when you click on the “+” symbol in a box, you’ll see a bunch of options for different processors you can bring to bear on your sound. Feel free to experiment.
Finally, we have the Amplifier Module, which adjusts the volume and stereo panorama of the signal before it enters the Instrument level.

The Wave Editor
The Wave Editor allows us to play with the audio file of our sample in more detail. We can use this to view the waveform of a sample, trim it, change the area in focus, loop the sample, and otherwise get super-granular with how we treat and work with our audio files.

In the Wave Editor, the yellow box is the area being looped. Ryan makes great use of this functionality, moving back and forth between sections of the waveform to choose the best sample start and end spots.
The green line, on the other hand, is your loop start point, and the orange line is the loop end point — more tools we’ll be using more of shortly.

You may notice that there are additional tabs along the bottom of this window next to the Sample Loop tab. These give you even more functionality like syncing your sample or cropping it. You can definitely edit your sample in the DAW before you even create your instrument — but these give you another way to tweak and adjust your sample and its waveform.

ADSR in Kontakt
When an instrument is unfurled in Kontakt, we see a host of little sections below it representing the signal flow. We’ve already looked at the top modules. Then, if we skip all the way down to the bottom, we see the controls for attack, decay, sustain, and release.
This is very similar to the sort of envelope parameters you’d encounter on a synth, and you can use them similarly. Dialing up the attack will make a note enter more gradually; dialing up the release will let it hang after you stop playing.

Saving Your Instrument
One more thing that’s pretty important is saving your custom instrument. There’s a little disk icon up in the Control Panel at the very top of the Kontakt interface that you can use to save your instrument, which makes it easy to find and load it next time you want to use it. When saving, it gives you a few options for your format.

If you’re new to Kontakt, we hope you’re starting to feel more confident in the software! If you’re not using Kontakt, take a moment and explore your sampler of choice to make sure you understand how it handles the same functions presented in this lesson.
Don’t stop here!
Continue learning with hundreds of lessons on songwriting, mixing, recording and production, composing, beat making, and more on Soundfly, with artist-led courses by Kimbra, Com Truise, Jlin, Kiefer, and the new Ryan Lott: Designing Sample-Based Instruments.