+ Producers, Synth Heads and Sci-Fi Nerds, our new course with synthwave pioneer, Com Truise: Mid-Fi Synthwave Slow-Motion Funk, is out now!
Reverb is awesome. Reverb is good. Reverb is necessary.
But it’s also the number one thing that makes mixes muddy and noisy — if you don’t wrangle it right. By now you certainly know about the Abbey Road trick and its cousins. That’s an amazing way to clean things up in the ‘verb.
However, there’s another trick that’s not talked about as often (or at least it didn’t used to be): using sidechain compression on the verb. Let’s talk about it now.
“Ducking”
If you’re a big electronica geek (and who isn’t, right?), when you hear “sidechain” you probably think about the pumping, rhythmic sensation you can create with a nice drone pad and a sidechain tied to a kick drum or something. That’s awesome, but the original use for sidechain compression is ducking. Its most common use in music is to duck the bass just a little when the kick hits, so the kick can shine through.
That’s the idea behind sidechaining reverbs. It can be done with any instrument, but the obvious choice is vocals. In a nutshell, you’ll apply sidechain compression to the vocal reverb, with the vocal itself as the input. The result will be a vocal that stands out from the mix a bit better, sounds intimate and clear, but also benefits from the verb the way you would expect.
This is a great way to achieve the modern sound of pop vocals where they’re somehow dry but also awash, somehow swirling around your head but also infiltrating your soul.
In other words, we’re ducking the verb to give the vocal some space, then the reverb can come in and fill the holes with awesome sauce. Let’s look at how to do it. (This won’t take long.)
+ Enjoy access to Soundfly’s suite of artist-led music learning content for only $12/month or $96/year with our new lower price membership. Join today!

How to Sidechain the Reverb
Let’s not hem and haw. Here’s a step-by-step for sidechaining the reverb to the vocal.
- Set up a buss for the reverb, with your preferred reverb plugin dialed up — you can “Abbey Road it up” or not.
- Set up a send from the vocal to the reverb buss and dial in the levels to taste, in the context of the whole mix.
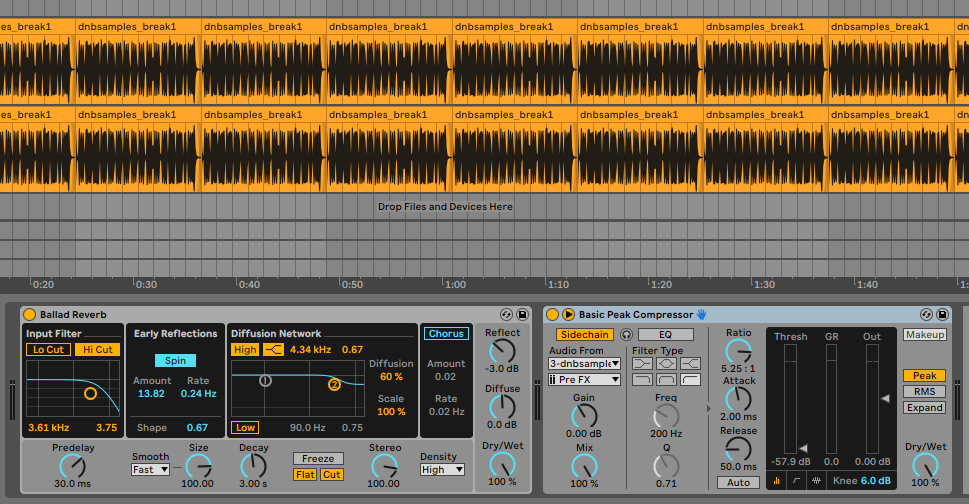
- Add a sidechainable compressor to the reverb buss, after the reverb plugin.
- Set the input to be the dry vocal (so that the compressor responds to the vocal, not the reverb).
- Dial in your compressor settings. This will vary based on the song’s tempo and density, your taste, the phase of the moon, etc – but here’s a good starting point to try:
- Threshold: Set the threshold so that the compressor starts to engage when the dry vocal is singing. The threshold level should be just above the level of the dry vocal. You can adjust this to taste, but typically, a threshold between -20 dB and -10 dB is a good starting point.
- Ratio: Use a relatively high ratio to create a noticeable reduction in reverb when the dry vocal is active. A ratio between 4:1 and 8:1 is common for sidechain compression on reverb. The higher the ratio, the more pronounced the effect will be.
- Attack: Set a relatively fast attack time to allow the compressor to respond quickly when the dry vocal starts. A typical starting point could be around 10-30 milliseconds. Adjust this to taste; a faster attack will make the reverb duck more aggressively.
- Release: The release time determines how quickly the compressor recovers after the dry vocal stops. A release time between 100 milliseconds and 300 milliseconds is usually a good starting point. Adjust it to match the rhythm and style of the song.
- Make-up Gain: After setting the compression settings, adjust the makeup gain to bring up the level of the reverb during the gaps in the dry vocal. Ensure that the reverb is still audible but doesn’t overpower the dry vocal when it’s singing.
- Listen through the whole mix and adjust as needed. The goal is to find a balance where the reverb complements the dry vocal without becoming distracting or muddy. IE: the whole entire goal of reverb.
+ Read more on Flypaper: “How Convolution Reverb Can Level Up Your Sound Design.”
Now Go Do It
That’s it. That’s sidechaining a vocal reverb. You do this with other stuff too. Guitar, piano, sensory percussion, whatever. Just remember that the result will be to give the instrument more clarity and a little separation from the verb. That’s not always what you want, so it’s not recommended to sidechain every reverb.
Now go do this and have fun and mix songs and be awesome! Go!
Don’t stop here!
Continue learning with hundreds of lessons on songwriting, mixing, recording and production, composing, beat making, and more on Soundfly, with artist-led courses by Kimbra, Jlin, Kiefer, RJD2, Ryan Lott, and of course, Com Truise: Mid-Fi Synthwave Slow-Motion Funk.