+ This lesson is excerpted from Soundfly’s course, Advanced Synths and Patch Design for Producers. To access the rest of this lesson, plus hundreds more videos and tutorials on production, songwriting, composing, mixing and more, subscribe here.
The ’80s inspired synth pop anthem, the Weeknd’s “Blinding Lights” is chock full of great synth sounds (as well as some Beethovean harmonies!). Take a listen:
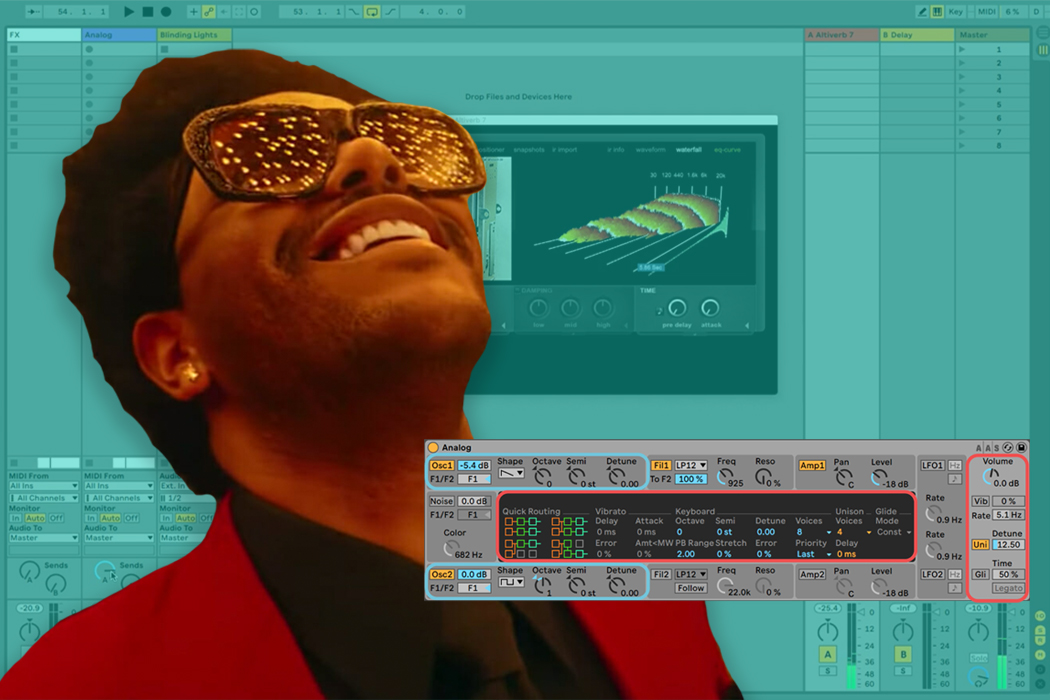
In this lesson, we’ll focus on building that lead sound using Ableton’s Analog synth (available in Suite).
Let’s get started, here’s a patch rebuild video lesson instructed by Soundfly resident synthesist and production guru, John Hull, taken directly from our Advanced Synths and Patch Design for Producers course.
Composition Notes
Lead sounds can play a couple of roles. It can be a soloist, such as this great synth solo at 2:45 in “Night By Night” by Chromeo.
In the case of “Blinding Lights,” the synth also performs a soloist function, but it’s specifically echoing many of the notes and rhythms of the chorus vocal melody.

Download: Blinding Lights Lead MIDI 85.50 BPM
Since it appears before the first verse, it’s a nod towards what’s to come later in the composition, so when we hear the chorus melody, we’re like, “Oh! I know this already!”

In this sense, a lead is functionally just helping to dig that portion of the melody or hook a little deeper, solidifying it for the listener. Later in the track, it shows up in a kind of post-chorus breakdown role and gets repeated three times during the outro.
They really want you to remember this melody!
Patch Notes
For this patch, we’re using Ableton’s Analog — a creatively named synth bundled with Live Suite. (*To learn more on how to use Ableton Live to create all types of music, check out Soundfly’s course, Intro to Music Production in Ableton Live.)
Voicing
As usual, let’s start with the voicing/global settings. We can hear those overlapping notes in the melody, so it’s likely a polyphonic synth. In this scenario, we set the voices to eight.

It also sounds a little more wobbly than a single solo voice, almost like a section of violin-y trumpets. That tips us off to some kind of unison or chorus effect. To achieve this, we set the unison to four.
Tip: If you’re working with Analog, click within the volume panel and the central display will update to show the synth’s voicing settings.
Oscillators
Oscillator 1 is likely a sawtooth wave. The sound is still somewhat rich, and not too thin.
Oscillator 2 makes us think pulse wave. There’s a kind of Game Boy-ish hollowness to part of the sound, so if we try making this a pulse wave, it sounds mostly right. Adjusting the pulse width and tuning this oscillator an octave higher will also make a difference in the timbre that brings this more in line with the original.

Filter
For the filter, there’s a softening to the high-end, but it’s not very active. 24db/octave is a little intense. If we switch to 12, we get that gentler roll-off.
One other cool feature of this particular filter is the different “Drives.” Here, the sym3 sounds a little beefier in a nice way.
Modulation
There’s not a lot of movement on the filter, just a little bit of top-end punctuation that sounds like a bit of filter decay. So let’s get close to maxing out the sustain and adjust the release to sound similar.

For the amp envelope, try a slight attack, medium decay, no sustain, and medium release.

Post-Processing
Finally, let’s treat the sound a little to give it some grit and sheen, almost like a lead vocal. To achieve the width of the original, we’ve utilized Soundtoys Little MicroShift — an incredible utility for widening synths, vocals, and all kinds of things in a vintage-sounding way.
The built-in chorus effects within Logic Pro and Ableton Live work great for this as well!

For this track, we’re using Live’s Saturator and Redux to add some creative distortion.
The mix setting on Saturator allows us to create a really heavily saturated texture, then blend in just a bit of it to give the sound some teeth. Next, Redux helps give the sound even more of that fizzy ’80s retro character.

And finally, some space. We’ve utilized two sends: one targeting Altiverb’s EMT 140 plate reverb, and the other pointing to Live’s stock Delay plug-in. These give the sound a little more depth and vibe.

Think you’ve got it? Try it out!

Think of a song with an obvious vocal melody, and try to play that vocal melody using a lead synth patch. Come up with a patch that:
- Uses the same notes as the melody you’re thinking of,
- Has a bit of “chorus” effect on it via unisons,
- Is treated with some reverb and creative distortion.
Have fun with it!
Want even more?
Continue learning about synthesis and patch design with Soundfly’s exciting new course, Advanced Synths and Patch Design for Producers. Preview the course for free, and subscribe for access here.