+ Learning about synthesis? Preview Soundfly’s definitive new online course, Advanced Synths and Patch Design for Producers, for free and subscribe for access.
Some of my most memorable experiences creating music have involved transforming one sound into something totally different. Sometimes, this involved taking that sound apart and looking at it through a new (and microscopic) lens — this is where granular synthesis comes in.
Granular synthesis can refer to a number of techniques that adjust and reorder small segments of a longer sound to produce a unique output, usually using raw audio as the input. Think of a “grain” as one of these small segments, a “sample of a sample” that’s usually between 10-50 milliseconds in duration (but by no means limited to it).
By operating on a more microscopic time scale, granular synthesis becomes this powerful tool for time-stretching and pitch-shifting audio. Waves’ UltraPitch, Celemony’s Melodyne, and Ableton Live’s warping functionality all employ granular techniques to great effect. However, its creative possibilities can extend much further.
From a pan to a pad
To get a better sense of just how powerful granular synthesis can be, let’s try and transform an unconventional audio sample into something much more musical. I’ve selected Robert Henke’s Granulator II Max for Live plugin as the engine for our journey because it’s set up in a very similar way to Ableton Live’s stock Sampler plugin, packs a huge punch, and (best of all) is free.
Here’s a short musical arrangement I created using only granular synthesis. You might also be surprised to find out that the source audio for this entire piece is nothing more than a two-second hit of a frying pan. That’s the magic of granulation — you can transform an ordinary object from your kitchen into an immersive soundscape.
So, let’s walk through how this sound came to be, step-by-step. The first thing we’ll do after dropping this sample into Granulator is take a look at some key parameters and understand how they shape playback. Make sure to hook up this track to your keyboard or fill up a MIDI clip with some notes beforehand.
Grain
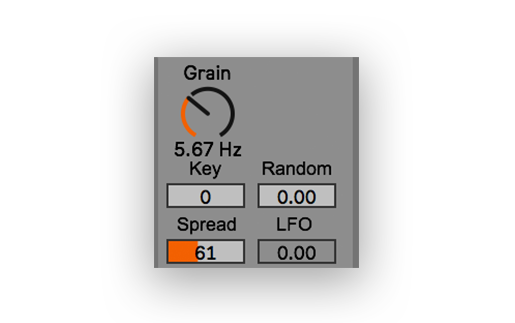
This parameter controls both how often audio grains are being triggered and how long those grains are. As you slowly turn up the Grain frequency, you can both see and hear the zone of playback shrink and the rate of playback increase. Higher values begin to approach the glitchy and frantic, and something like 130 Hz lets you essentially turn the sample into its own single-oscillator synth with a defined pitch.
Since we’re going for something a bit smoother here, I’m going to leave the Grain set pretty low, at around 6 Hz. I’ve also added around 60 points of Spread, which creates slightly different grain sizes for the left and right channels and gives everything a wider, more stereo feel.
File Position
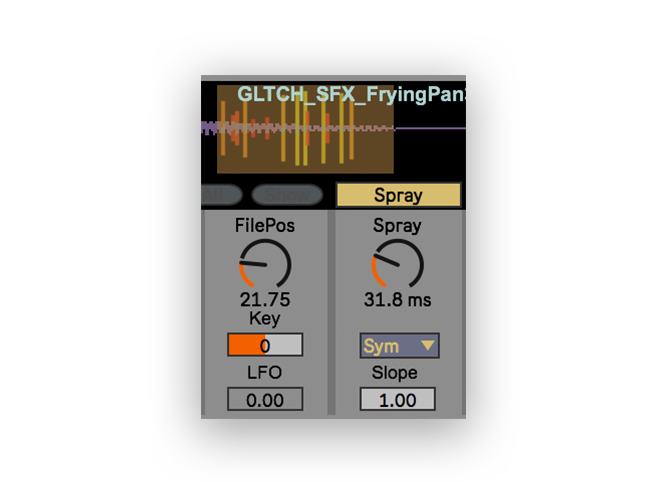
These next two parameters are incredibly fun to use and vital for getting that organic pad sound. File Position controls where each grain will start playing from, which is why you can hear the initial transient (the metallic hit of that frying pan) when it’s set to zero. By moving the position forward, this transient fades away and we’re left with more of the sample’s decay tail, which is made up of all the resonating sounds from after the frying pan was hit. I’ve set the File Position to around 22 to capture the smoothest parts of the sample.
+ Learn more on Soundfly: Check out our free online course with beat maker Andrew Huang, Making Music From Everyday Items, to see how he builds an entire track out of sounds generated by his kitchen pot.
Spray
Now here’s where it really gets interesting. Spray introduces some good old randomness into the mix by varying the File Position parameter from earlier — start turning the knob and notice how the vertical playback lines in the Granulator begin to trigger outside of the orange boundaries defined by the Grain parameter. I was pretty conservative with this for my own sound, setting it to only 32 ms, but you can really have some fun here by increasing it way past that point in order to pick up little features from all across an input sample (you can even assign an LFO to control it). Seriously, it’s a blast.
Envelopes, filters, and more
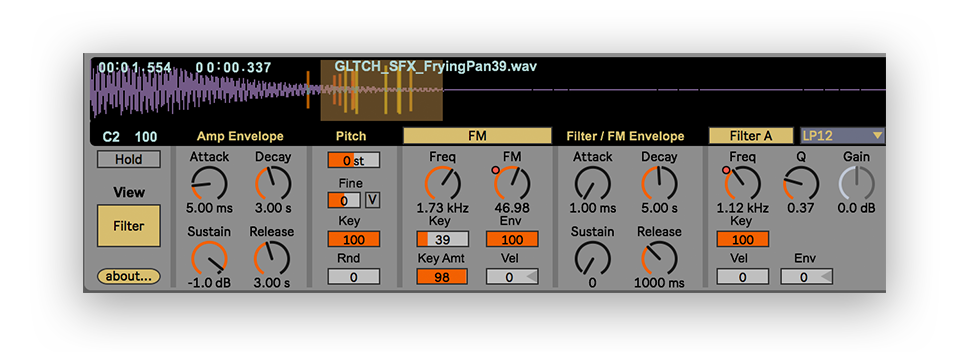
This pad is starting to come together, but we’ll hit up a few more knobs and buttons to get it nicely polished and dynamic-sounding. Click on the light blue Grain button at the left of the plugin window to change over to Filter view. Here, we can actually adjust the amplitude envelope of each grain to make things even smoother by increasing the Attack, Decay, and Release values. I’ve also added some frequency modulation, applied a low-pass filter, and increased the decay value of the Filter/FM Envelope to tone down the harshness of the frequency modulation after each new note.
I automated both the frequency of the lowpass filter and the FM value to make my final arrangement more dynamic — assigning parameters like these (as well as all the ones I’ve touched on so far) to macro knobs that you can control on the fly will make exploring new sounds incredibly fun and tactile.
No grain, no gain
And there you have it: an ethereal, evolving pad made using granular synthesis and an unassuming foley one-shot. There are infinite possibilities for sound design using this technique, and the sky’s the limit when it comes to what audio you can throw in, from recorded vocals to rainfall.
So go ahead – make it grain.
Continue learning with hundreds more lessons on mixing, DIY home audio production, electronic music recording, beat making, and so much more, with Soundfly’s in-depth online courses, like The Art of Hip-Hop Production, Modern Mix Techniques, and of course Advanced Synths & Patch Design (to name just a few). Subscribe for unlimited access here.
—
 Matteo Malinverno is a New York-based music producer currently working on the Content team at Splice.
