Bruno Mars has made a career off tribute after tribute to artists and sounds of the past. While his success is undeniable, his approach to utilizing classic sounds and stylings is often touted as merely that of a copycat. Still, he always manages to deliver party beats with a clever contemporary twist and a wink of the eye to tell the rest of us that he knows exactly what he’s doing. He’s the artist some of us love to hate, but far more of us just love him, and with good reason.
Bruno’s latest jam, “24k Magic” is a hyper-funky single reminiscent of MJ’s golden age with Quincy Jones, and front and center is a dirty, tasty synth bass line with a bombastic Moog tone and slick riffs. Let’s check out how to recreate that big bass synth sound, and nail that funky feel.
The verse and chorus have the same basic sound, with a couple subtle variations, so let’s nail what they have in common, first. To illustrate this patch, we’ll be using the free softsynth Helm (which we also feature in our series of free courses, Demystifying Synths).
(Scroll to the bottom of the page for downloadable sheet music for “24k Magic.”)
The Synth Patch
Step 1 — Oscillators
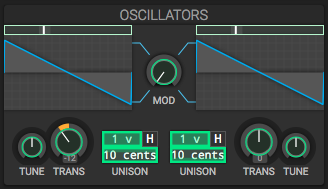
This is a thick dual-oscillator tone that, to my ear, sounds like that of the classic Minimoog (I have yet to confirm what synth was actually used, so feel free to hip us to any insider knowledge you may have in the comments!). To get this tone, we’ll need to set both our oscillators to a sawtooth waveform, with one tuned an octave below the other.
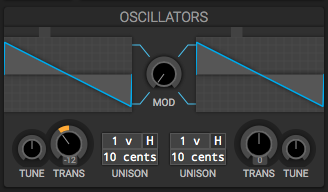
On Helm, our oscillators fall on the left side of the synth, towards the top. We can click and drag the sliders at the top of each waveform image to select our sawtooth waves.
Step 2 — Filter
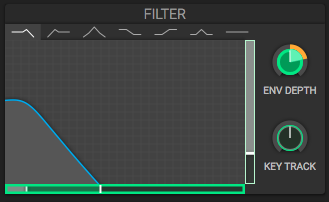
The articulations of this patch all come from the filter, so we’ll need to start shaping this sound by setting up a low-pass filter, and adding some resonance to it. We’ll take the frequency way down, so we can allow it to open up with an envelope later on.
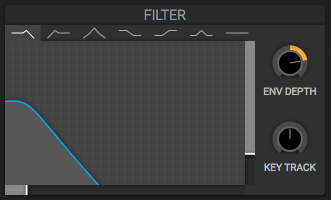
In Helm, the filter is set right in the center of the synth as a big X-Y graph. We can click and drag the sliders on the bottom and right of the graph to edit our frequency and resonance, respectively, or just click and drag directly in the graph to edit both at once.
Step 3 — Envelopes
There are two envelopes to establish for this synth patch. The first is the amplitude envelope (sitting far left on Helm), which controls the volume of our sound over time, and is already set to our desired parameters — immediate attack, full sustain (rendering decay moot), and a slight, almost negligible release to add a more organic effect.
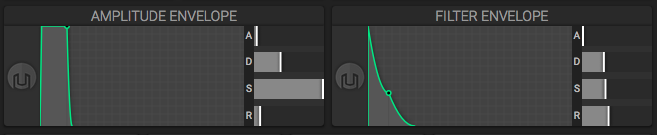
The second, as we mentioned, is the filter envelope. This controls the frequency of our low-pass filter over time, and helps give our bass the “meow” attack that stands out with each new note. The attack should be immediate, allowing the filter to open up right away and begin decaying right away. With a moderate decay, we can achieve this “meow” articulation that sounds so classic, when combined with a moderate sustain and release time.
On Helm, the last thing we need to do is increase the envelope depth (often noted as “Envelope Amount”), to allow our filter envelope to affect the filter’s cutoff frequency.
Step 4 — Voicings
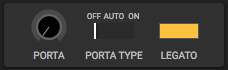
To fully achieve the articulation of “24k Magic,” we’ll need to visit two more settings of the oscillators’ behavior. The first is the number of voices, which determines the number of notes we can play at once. Since we’re dealing with a mono, single-voice part, we want to set this to “1.”
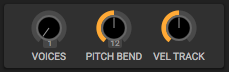
Also be sure to turn the pitch bend range up to “12” so you have enough range to get some slick slides in.
The final adjustment we’ll need to make is to turn on “Legato.” Without legato, each time we play a note, our envelopes will run their course, regardless of whether we have more than one note held down or not. But in order to get some of those smooth transitions, or slurs, between notes of this line, we need those envelopes to continue between two notes seamlessly.
Turning on legato allows us to do exactly this, by playing one note, and holding it down until after we’ve pushed down another key.
That’s it! That’s the whole patch. Mess around with some lines using this patch and get to know the sound of it before we move on to tackling the heavy “24k Magic” groove.
Having trouble getting the patch just right? Download our version here and see how exactly how we made it.
The Groove
The song opens with a massive chorus of vocoded soul vocals reminiscent of 2Pac’s “California Love,” but the beat and honest start of the song really drops in at 0:25. Let’s revisit:
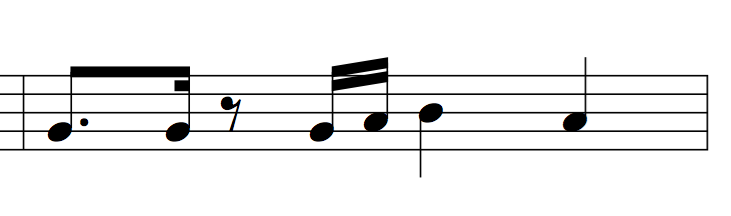
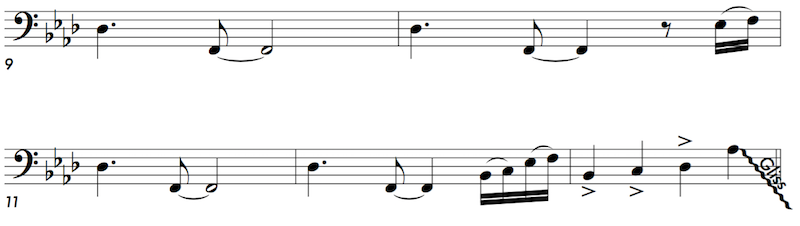
The song starts with a pumped-up four-beat blast into the downbeat, with a pickup from the bass diving an octave on beat 4. To my ears, we would best perform this dive bomb by starting with the pitch bend wheel all the way up (a full octave, if your settings are just right), playing that low F1, and dropping the pitch evenly over the course of that fourth beat back to its middle setting of no pitch adjustment.
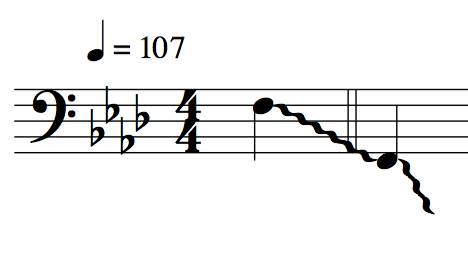
Notice that the low F of each full phrase (every two bars) dips towards the end of the first beat — also with the pitch bend wheel — so we’ll need to re-articulate that low F on beat 1 of the first bar.
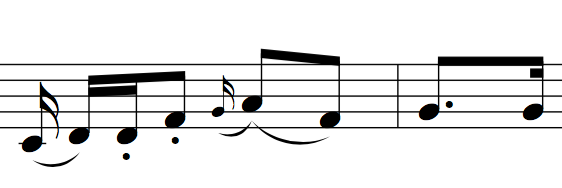
The second phrase comes in on the “a” (pronounced “uhh”) of beat 2 — the fourth sixteenth note of that bar. A low E♭ slips into a low F on beat 3 (the first instance of many where our legato setting will come in handy), followed by quick staccato punches on the same F and an A♭ on the following two sixteenths, respectively. Make sure those two notes are really separate so they punch with the filter envelope. (Also note that, sometimes, those first two notes are separate staccato notes, including the very first time, but more often than not they’re slurred.)
On beat 4, a grace-note B♭ drives quickly upwards into an eighth-note C, dipping into an eighth-note A♭ in the same articulation (read: slurred), so that all three notes are tied together in one legato articulation. Beat 1 of bar 2 boasts a sharp dotted eighth followed by a very staccato sixteenth on the “a” of 1, both on B♭s. That concludes the first internal verse phrase.
The second phrase imitates the first as a variation on a theme, but set over the IV– chord, instead of I–. This time an A♭ swoops up into a C, punches another quick C, and lands on a firm, full eighth-note A♭. A tight but essential sixteenth-note rest bridges this short phrase with its conclusion — the punch of a staccato B♭ down to a low, eighth-note E♭ to loop back around.
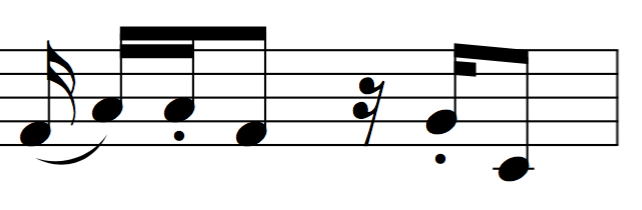
See if you can nail this whole two-bar phrase, plus the pickup bar.

This phrase then repeats. It then comes around a third time, mimicking all the way through to the third beat of bar 6 of the full verse part. At that point a couple of quarter-note accentuated chords enter, on a D♭ and a C, on beats 3 and 4, respectively.
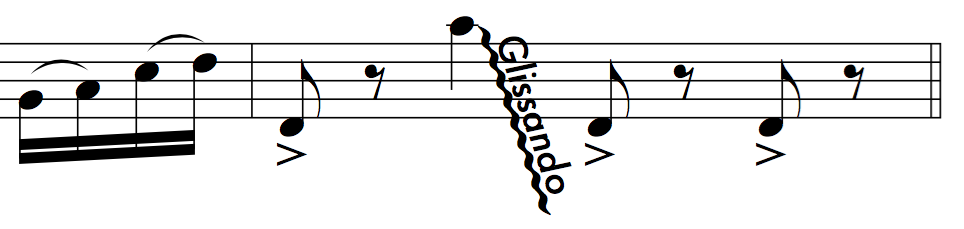
The fourth and final repetition of the two-bar phrase varies starting on beat 4 of the first bar, with a B♭ slurring into a C followed by a high E♭ slurred into a high F — all sixteenth notes. This lands on a big fat low F on beat 1, followed by a long octave-and-a-half glissando on beat 2, from the C above the staff all the way back down to that low F. We throw this dive bomb by simply running the fingers quickly from that C down all the white keys to the low F. Following that are two more heavily accented low Fs, played as slightly staccato eighths on beats 3 and 4.
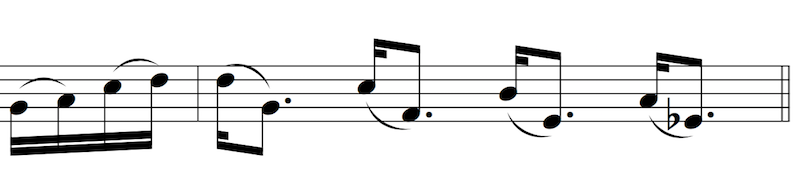
The song then spaces out into a dreamy, dark pre-chorus section. On the recording, this is clearly a punched-in section produced with a significantly different sonic space for the bass — some chorusing to make the sound super wide, no more filter envelope, and maybe even some reverb. Let’s look at how we can achieve those effects in real time within Helm.
Back to the Synth
By clicking a helmet icon in Helm, we can then click and drag on any green highlighted parameter to modulate it with the source “helmet” we clicked. My Akai MPK is set to send CC1 out of the first rotary knob, so I know I can use it to modulate things controlled by the mod wheel.
There are three areas we want to modulate in Helm to get our desired effect. First, we need to dial back the envelope depth to zero — no more stabby attacks.

Second, we need to open up the filter some to compensate for the lack of envelope.
Third, we need to get some of the space going. Let’s add some internal voices to both oscillators, by dragging up on their voice settings. Let’s also raise the tuning of one oscillator by 25 cents, and lower the other by 25 cents, to get a big chorusing effect.
It’s possible you’ll also want to increase the volume of the pre-chorus patch’s modulation a little bit, to make sure it stands apart.
For Helm, that about reaches the limit of what we can do to achieve the fullness of the sound — for the wideness, we’ll have to turn to another plugin or delay effect. But still, nailing that texture really helps separate the two song sections. If you have a synth with a nice wide chorus effect, like the Arturia Mini V (or a real Minimoog!), try that out. Now, with these effects mapped to our mod wheel, all we have to do is raise the mod level for the pre-choruses, and lower it back down for the verses and choruses. Simple!
Let’s take a look at the whole pre-chorus section notation, now that we have our patch fully sculpted.
Looks pretty simple, right? A big ol’ dotted-quarter D♭, followed by a low F to fill out bar 1. Then the same phrase in bar 2, just ending in a little legato flick of the wrist in the final eighth note. Bar 3 repeats bar 1, and bar 4 nearly duplicates bar 2 but expands on it to fill out all of beat 4, and the five-bar pre-chorus rounds out with the same quarter-note accents that started the whole song — a very acutely planned turnaround, which is one more art that Mars has refined and perfected over the years. I’d recommend lowering the mod wheel back down as those final accents occur to transition back to the verse tone.
Diving into the bridge, we’ll switch back to our deep pre-chorus patch. The floor falls out under us by a huge rest on beat one and then the entrance of a half-time feel. When the bass enters, you’re essentially rolling those four 32nd notes as almost a glissando up to the C. A funky rest breaks up the beat until we land heavily on beat 4 with a grace note A♭ leaning into that B♭. In the next bar, we play two similarly quick sixteenth-note gestures, starting on the “and” of beat 2.

The bridge phrase repeats three times, then builds simply but elegantly back into the ending double chorus.

That’s it! The only thing to watch out for is the accented phrase between the two choruses within the double chorus.
There are some definite variations in the exact performance here and there, and I encourage you to explore the full transcription to learn all of the deep intricacies of this truly groovy bass line!
Download the full notation and happy playing!