+ Learning to record and mix at home? Check out Soundfly’s acclaimed online courses on mixing, production, and beat making — Subscribe for unlimited access.
You spend tons of time trying to reduce noise in your mixes.
It makes sense. The cleanest signal possible ensures each element in your mix cuts through for maximum impact. But tirelessly trying to get the cleanest signal overlooks a powerful creative tool in music… you guessed it, noise.
Adding noise to your mix in a skillful way will open a whole world of creative possibilities. When used right, it can add texture and depth to your tracks, and completely change the tone of your music. The key is knowing how, and when, to use it. In this guide I’ll walk you through some of the common types of noise and how to use them creatively for a more interesting mix.
What Is Noise in Music?
This is a pretty philosophical question. There’s a ton of possible answers here. But to put it simply, noise is any sound that doesn’t have a “musical quality” to it. Noise is often unpitched and indistinct.
A key difference in what we consider “music” and what what we consider “noise” is the frequency content each exhibits. Sounds that are considered “musical” have recognizable and separate frequencies. The frequencies of white noise are present across a wide range and with equal intensities making distinct frequencies difficult to detect.
Using Noise
So why add all that nasty noise? Good question.
As a musician, one of the biggest challenges you face is making your tracks sound full. Writing a great synth line is one thing, but taking that line and achieving depth and texture through mixing and audio effects presents a whole other challenge. Taking different types of noise and mixing them with elements of your track can add depth to your mix based on how those frequencies clash or blend across the spectrum.
By mixing traditionally “musical” sounds with the broad range of frequencies noise offers, you’re left with an all-around fuller, textured mix. Like all elements of a mix, finding the right balance for noise-centric elements and the rest of your mix will take a little creative EQing and processing.
But to get you started, here are the most useful types of noise and some key ways to use them to fill out your tracks.
+ Learn production, composition, songwriting, theory, arranging, mixing, and more — whenever you want and wherever you are. Subscribe for unlimited access!

White Noise as an Instrument
White noise is a random signal that has the same amplitude (flat) across the entire frequency spectrum; radio static is a great example. White noise is probably the most common type of noise used in music — especially electronic music. Because white noise has equal strength across frequencies, it can add texture and depth to your mix and interact with your instruments in interesting ways.
Not all mixes will need the white noise layer, but tracks that feature elements like wall-of-sound guitars, slowly decaying pads, or brilliant synth leads can all react very well to the addition of a white noise layer.
Here are a few ways to use white noise to get you started. I’ll be using tools in Ableton Live to illustrate, but the concepts will be similar regardless of which DAW you use.
3 Ways to Use White Noise Creatively
Layer With White Noise
Layering white noise on top of melodic elements such as synth or basslines in your track will give them some added grittiness when mixed right. Here’s how:
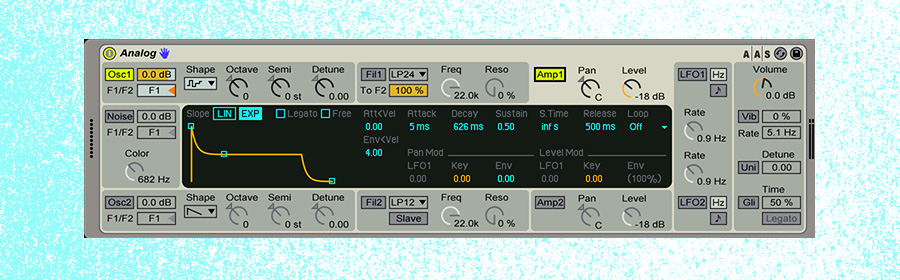
- Once you’ve arranged your synth or bassline, copy the MIDI clip to a new channel and drop in the default Analog instrument.
- Change the waveform to white noise and turn off the second oscillator to make your synth generate a white noise signal.
- Adjust the decay in the synth’s envelope to match your original MIDI information’s length and attack.
Once you’re happy with the results, group your original synth sound and noise channel together, giving your synth some bite and your track an overall heavier feel.
Use White Noise as a Background Layer
White noise works extremely well as a quick and easy way to add texture and depth to your track as a background layer. Your DAW should already have some great samples of white noise you can use. Start by creating a separate audio channel for your white noise sample and drop it in. Adjust your parameters to place your white noise layer where you want it in your stereo image.
Your noise could be present throughout the whole track, or cut in and out in parts where you’d like some added texture. Apply your white noise in moderation; make sure it’s not drowning out any other elements of your track by testing it in the context of your whole mix.
Hot tip: Use mix automation to record some slow, gradual gain adjustments in the white noise layer. It will add some movement and a narrative arc to your mix.
Filter White Noise Input Signals to Create Unique Soundscapes
A great way to understand and practice EQing is to use white noise as your signal input. Because white noise is present across the whole frequency spectrum, practicing how to isolate certain frequencies is simple. But who says you have to stop with just practicing your EQing?
Filtering white noise creatively can produce interesting soundscapes that work as atmosphere in your tracks that might be lacking some depth. Here’s how to do it:
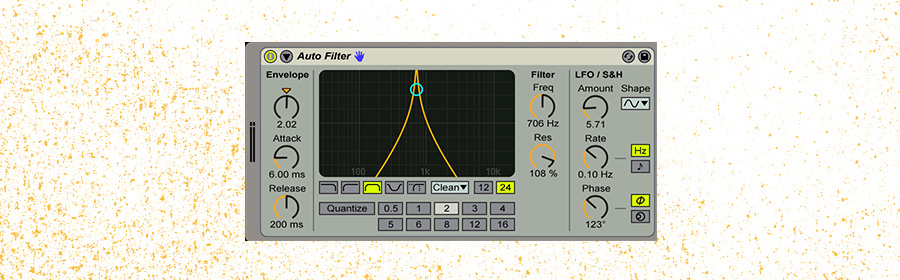
- Use your DAW’s default Auto Filter on an audio track that has a white noise sample or generator on the channel.
- Adjust the filter type and modulate the Resonance and LFO for endless sound possibilities.
Hot tip: A Bandpass filter with high resonance and a bit of LFO creates a really eerie, sirens-off-in-the-distance kind of sound.
Crackle
Crackle in music is a sound most commonly associated with wear or dust on vinyl records. Crackle is a noise you’ll probably want to use somewhat sparingly in your mixes. If you use it too much, it can distract from more rhythmic or groovy sections of your songs and make it sound as if things are not synced up properly.
How to Add Crackle
In your DAW’s audio effects panel, the Vinyl Distortion panel offers a lot of cool built-in noise options — one certainly being crackle. Drag the effect out onto your audio channel with the sound you’d like to add the crackle to. To customize it, you can adjust both the Tracing Model and the Pinch. Even though the controls look the same, adjusting these parameters will create very different effects on your sound.

Subtle:
The Tracing Model will add subtle but harmonic distortion to your input signal. It simulates wear or dust on a vinyl record. The position of the yellow circle on the X-axis will affect the frequency of the harmonic. Adjusting the Drive will increase or decrease the intensity of the distortion. A great use of subtle crackle is to soften those harsh, higher frequencies.
Harsh:
Adjusting the Pinch adds a much more drastic effect by adding odd harmonics to the input signal. The result is often rich harmonic distortion.
The most interesting feature of this effect is the Hard and Soft boxes. The Hard mode sounds much more like standard vinyl record distortion, but the Soft mode is meant to mimic a dub plate (or acetate). Use a more harsh crackle, like the distortion created with Pinch, when you want to add a lot of texture to a particular element of your track. Run a crackle sample through some reverb to get a ghostly, cavernous feel for your noise layer.
Hiss
Hiss occurs with electronic devices when the electrons stray from their intended path. The lost electrons manipulate the output signal voltage, which creates a hissing noise. When used right, it can liven up percussion, leads, or samples that need an extra push to stand out.
Again, you’ll want to use hiss sparingly. It’s a dominant sound that can take over a track if not used carefully. However, adding hiss to the percussive elements of your track — like snares or hats, or even your kick — can fill out their sound and give stale samples some new life.
Using hiss as tails for your percussion is a great place to start. Layer a hiss sample with a length slightly longer than your percussive sound. It will add to your percussive elements in a way that goes beyond simply turning up the built-in decay knob in your DAW.
How to Add Hiss
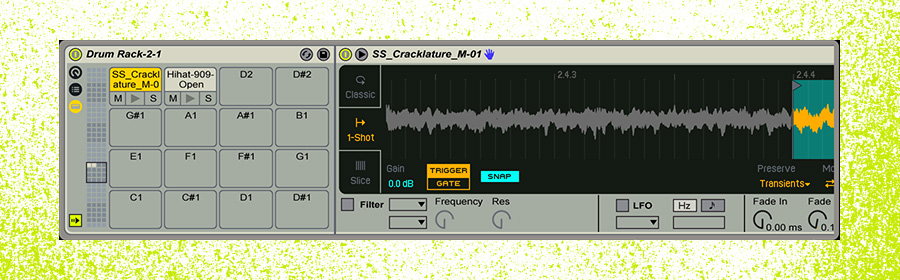
An interesting and creative way to do this is by taking samples of hissing sounds and turning them into drum sounds via your DAW’s drum rack.
Drag the hiss samples you’d like to use into a drum rack and edit their loop length to correspond to your drum sounds. Keep the sounds either the same length as the element your working with or, as previously mentioned, slightly longer to add a tail/decay. When the sounds are played together, the hissing sound will elevate your drums and make your patterns stand apart from the same old stock samples everyone is using.
Noise Now
Noise in your mix doesn’t always have to be bad. Creative techniques to add “non-musical” elements to your track can make them stand out, and add interesting texture and depth to your stereo image.
Plus, they’re a great starting point to create some seriously experimental sounds — perfect for when that preset just won’t do.
Want to get all of Soundfly’s premium online courses for a low monthly cost?
Subscribe to get unlimited access to all of our course content, an invitation to join our members-only Slack community forum, exclusive perks from partner brands, and massive discounts on personalized mentor sessions for guided learning. Learn what you want, whenever you want, with total freedom.
—
 Jaclyn Kendall is a DJ and producer who loves heavy-hitting kick drums and 140+ BPM.