+ Welcome to Soundfly! We help curious musicians meet their goals with creative online courses. Whatever you want to learn, whenever you need to learn it. Subscribe now to start learning on the ’Fly.
Things can get a little baffling when you’re nearing the end of a long mix. But mix automation can help…
Maybe your EQ, compression, and send effects are all dialed in to perfection, but the mix still isn’t working. Or maybe there’s no movement and everything is just a bit too static. The solution to your mid-mix blues is to introduce musical interaction between all your tracks. But how do you do it when it seems like you’ve already done so much?
The answer is mix automation.
Automation will help you nail those important final steps in the perfect mix. But automation is a huge topic. Where do you start? In this article, you’ll learn what automation is and how to use it to improve your mixes.
What is mix automation?
Mix automation is the process of recording adjustments to parameters across the timeline of a mix. Automation can be applied to several parameters of your mix, but the most common are gain and effects.
Mix automation and its applications
To get the level of precision that you’re used to hearing in pop music, most modern mixes rely heavily on automation. The most common goal of automation is to make changes to a track’s volume, but almost every parameter you can think of can be automated.
In the analog era, engineers would literally play the mix on the faders as it was recorded to tape in real time. But to make the process more precise and repeatable, mix console designers developed motorized faders that could be programmed to make the changes automatically. Today’s DAW automation is an extension of those ideas, but with many more possibilities.
In a pro mix, automation is very often used to compliment compression. Ducking the fader a dB or two in a critical moment is much more transparent and musical than lowering the compressor’s threshold for the whole track just to catch one errant peak. That’s why it’s so common for engineers to painstakingly automate every syllable in a pop lead vocal to get the maximum impact of each word — it works. Here’s everything you need to know to get started right with your own mix automation.
Mix automation basics
Mix automation in your DAW is the tool that makes your Ableton Live session look like someone drew all over it with MS Paint.
For example, automation lets you record:
- Dramatic sweeps of a filter’s resonance and cutoff frequency
- The rate and feedback of your time-based effects
- The depth or wet/dry mix of a modulation effect
- And many other useful parameters
Automation view: seeing your changes
In addition to the basic waveform and MIDI views on your DAW, there’s also a per-track overlay view for automation data. The examples in this article show Ableton views, but the concept is similar in most DAWs. By engaging the track’s automation view, you’re no longer editing the actual audio. Instead, you’re making changes to the track’s automation.
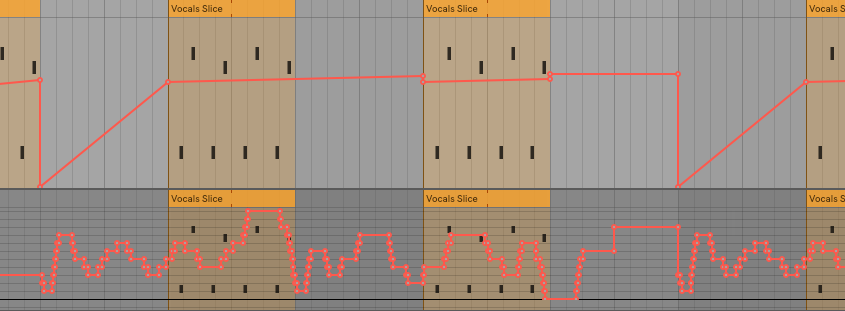
The automation overlay will show you the automation for the parameter you selected. The normal default parameter is your track’s fader volume. If you haven’t entered any automation, you’ll see a straight line at the level of the fader in the mixer. As you assign and automate other parameters, you’ll have the option to select additional automation overlays for each. The automation data itself consists of “breakpoints” connected by lines that indicate the slope of the change on the timeline.
How to write automation
The simplest way to get started with automation is to mimic how it was originally done in the analog era.
If you have a control surface with faders for your DAW, engage the write, touch, or latch modes on the desired tracks and make adjustments to the faders in real time during playback. Your DAW will record the changes you make to the automation timeline. If you don’t use a control surface, you can still use this technique by dragging the fader with the mouse, though this can get pretty frustrating unless you’re a mouse wiz.
This method produces a breakpoint at every instance of change. The more dynamic your automation changes are, the more breakpoints you’ll see on your automation timeline.
Automation modes
Different parameters will need certain automation modes depending on where they fit in your mix. Here’s a rundown of the common automation modes:
- Auto Off: Bypasses all automation.
- Auto Read: The standard mode for playing back automation data. No automation will be recorded from the fader, but the track will follow whatever has already been written.
- Auto Touch: Changes to the automation data won’t be recorded until the fader is moved. When you stop moving the fader, the track will go back to following.
- Auto Latch: Similar to the touch mode, although in this case, when you stop moving the fader, automation will continue to record at its last position and overwrite previous data.
- Auto Write: All changes to the fader position will be recorded and previous automation data will be overwritten. This mode is normally used to create your first pass of automation. Make sure to change one of the other modes after you’ve written in automation with this mode. Otherwise, anytime you press play on the transport, the data will be overwritten!
Editing your automation breakpoints
Live input is great for recording automation during your playback. But for finer adjustments on your automation curves, you can simply click to create breakpoints on the automation timeline and drag them to the correct values to create your automation curve.
Drawing automation
The other option is to “draw” using your DAW’s pencil tool. The different modes of the pencil tool allow you to quickly input data in a variety of ways:
- The Freehand tool lets you draw the data directly onto the track. Similar to recording the movement of the fader, the freehand mode will produce many breakpoints to represent the changes that you’ve drawn in.
- The Line tool allows you to click and drag to create linear changes. This can be faster than creating breakpoints individually and moving them.
- The Square and Triangle options allow you to quickly input repeating patterns. In grid mode this can be used to quickly make patterned, tempo-synced changes.
- The Random tool creates random changes that can be useful for some applications.
Start by automating something basic and easily noticeable. It helps to be able to see the faders moving up and down to get a sense of how your automation curve is playing out in the track.
+ Learn production, composition, songwriting, theory, arranging, mixing, and more — whenever you want and wherever you are. Subscribe for unlimited access!
Other applications of automation
Mix automation is all about experimenting. Here are some ideas to get you started. Use them to find your own automation tricks.
Adjust your gain to fit your gate settings
Using a noise gate/expander is a great way to reduce hi-hat bleed in the snare top mic. But during quieter sections in the song, a drummer might play a quieter passage on the snare (rimshots, for example) that are not loud enough to pass through the gate.
The solution? Automate the gate’s threshold to account for the quieter passage, or automate the plugin to bypass altogether.
Skip the bus; automate instead
Automating several gain changes in a track while still being able to make overall level changes later on is a great way to stay flexible with your mix. Instead of creating additional buses, insert your DAW’s utility plugin (Trim in Pro Tools or Gain in Logic) and automate its gain control instead of using the fader. This also allows you to control where the gain changes occur in the insert chain, should you need to for any reason.
Automate your sends
Another interesting place to consider automation is send effects. For example, try automating the amount of signal sent to a reverb to control the ambience without changing the overall level of reverb in your mix.
If you’re using delay on a lead vocal, automation will help you avoid delay reflection, which distracts the listener during phrases where they conflict. The opposite is true, too — dramatically automating a ramping up of the wet mix on your reverb or the feedback of your delay can punctuate a climactic moment in your track.
Automatic with your automations
Having total control of your tracks is critically important in the last half of the mix process. We all want that perfectly polished end result where it seems like nothing is out of place. Automation is a key technique that pro engineers use to get their mixes sounding great. Smart automation lets you add movement and musicality to your mixes long after your recording is done.
Now that you have a handle on it, go experiment! Find your favorite way to draw in automation, your favorite parameters to tweak, and that critical finishing touch every mix needs.
Want to get all of Soundfly’s premium online courses for a low monthly cost?
Subscribe to get unlimited access to all of our course content, an invitation to join our members-only Slack community forum, exclusive perks from partner brands, and massive discounts on personalized mentor sessions for guided learning. Learn what you want, whenever you want, with total freedom.
—
Michael Hahn is an engineer and producer at Autoland and member of the swirling indie rock trio Slight.
