

+ Master the tools and techniques of producing pro-level electronic music and audio in Ableton Live with Soundfly’s course, Intro to Music Production in Ableton Live.
This post will provide a few ideas about common organizational techniques and pitfalls with some of the new features in Ableton Live 10. I’ll try to highlight three things to do, and three counterparts to not do.
And since Ableton is releasing the all-new Live 11 suite soon, we’ve just launched an all new online course that teaches you all of the tools to get started making pro-level music and audio using Ableton Live 10 and 11. Check out Intro to Music Production in Ableton Live here to learn more.
1. Groups Within Groups
DO: Smash CMD+G.
Let’s go straight for the red meat. Live users have been clamoring for “groups within groups” for as long as I can remember. Now, finally, in the tenth iteration of Ableton’s game-changing flagship product, users can group their tracks to their heart’s content by spamming the Command+G function.

All joking aside, this is a seriously useful feature. Groups within groups are great for getting more granular with your organizational workflow, especially when performing tasks like mixing layered vocals or drums. Ever wanted to have an “ad libs” group within your vocal bus? How about a “cymbals” group for your drum bus? It’s finally here. The future is now.
DO NOT: Forget about your groups when bouncing stems.
Groups are great; however, there is one very important situation where users must take heed. When bouncing stems for an engineer, keep in mind your group structure. Failure to ungroup your buses or the “All Individual Tracks” option will lead to confusing stem bounces.
If you’ve got tons of grouped tracks, Live will not intelligently collate them as you bounce. In plain English, when you bounce out stems, Live will export the group stem, as well as each individual track, without any indication as to which is which. This can produce all kinds of nasty results when the stems are played back all together, including phase and level issues, because the individual stems are summed as part of the group and then also played back on top of the group bus!
I’ve wasted plenty of clients’ money during engineering sessions trying to figure out which tracks belonged to which groups. Consider taking the time to delete any exported stems that you don’t wish to give to your engineer: They should be able to drag and drop the stems into their DAW without having to do any guesswork. At a minimum, make sure to name your groups so you can decide whether you want to give the engineer the buses with your group processing for more convenience or the individual stems for greater control.

2. Collections
Live’s GUI has always been beautiful in its own way. I’ll never understand why that mystifying gray matrix of squares and rectangles held, and holds, such allure. That said, Live’s visual design cannot be construed as particularly colorful. That changes (slightly) with the addition of Collections, a fun way to tag elements in Live with a color for easy access.
You can associate plugins, samples, files, audio effects, Max patches, and pretty much anything else you can see in Live with a color/number combination.
DO: Color code and favorite your frequently used samples.
Use this new functionality to your advantage! Being able to access your collections will be a game changer, and the best part is that there are no rules about how you categorize. Try grouping by instrument, by genre, by mood, or by your own level of faculty with whatever you’re tagging. Don’t forget your hotkeys!
You don’t need to click or drag to apply a tag, simply highlight it in Ableton’s browser and type 1, 2, 3, 4, 5, 6, or 7. You can also rename colors to fit your organizational scheme, as I’ve done here:
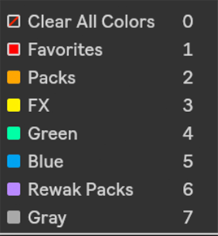
DO NOT: Get lazy and just add every sample pack you’ve ever downloaded.
It’s so easy to tag samples now that you might find yourself going a little bit overboard. But if every sample in your library is tagged as a favorite, you’ve created nothing except for a separate link to your full library. Take this process slowly and enjoy discovering the beautiful sounds of your sample library, selecting only the cream of the crop to make your favorites collection. It’s also not a bad idea to pare down the selection every once in a while, removing the favorite tag from samples that you rarely use.
3. Automation Mode
I remember dreading getting papers back in high school. My heart would sink as I looked at my beautiful project, now drenched in these awful red lines like a murder scene. Ironically, that’s basically how my Ableton projects looked before the introduction of Automation Mode, a new feature that will hide your precisely-crafted breakpoint envelopes when you’re not editing them.
Using Automation Mode to your advantage will help keep your project nice and clean, and your fragile psyche intact!
DO: Show automation in new lane.
Now that it’s easy to hide automation when you don’t need it, there’s no reason not to have a separate automation lane for each parameter that you want to automate. Instead of searching through the Device Chooser and Automation Control drop-downs for the exact parameter you want, blow out each parameter you automate into a new lane and hide it once you’re done automating. That way, you don’t need to go searching for the right parameter if you want to make a quick tweak. Plus, you can see multiple automated parameters without looking into each one individually.
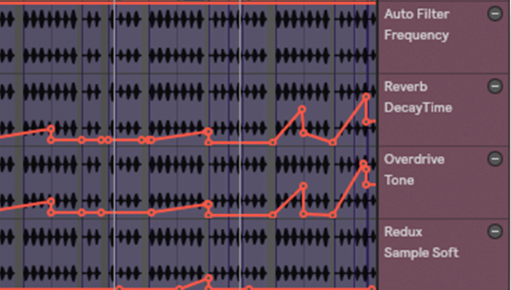
For bonus points, right click on a parameter when you automate it and click “Show Automation in New Lane” to immediately create an automation lane for the selected parameter.
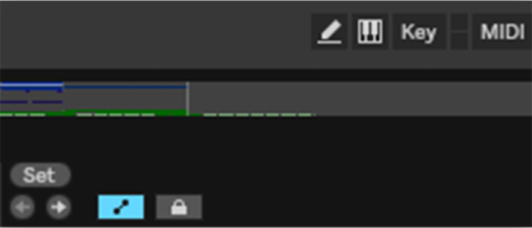
DO NOT: Get thrown off by keyboard hotkeys “A” and “M.”
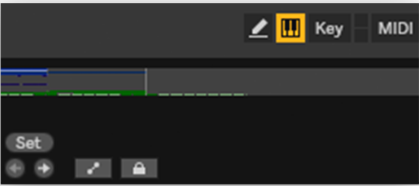
Automation Mode’s new functionality is a powerful tool for effective visual organization, but it can be disorienting, as well. Since migrating to Live 10, I’ve found myself looking for automation lanes with Automation Mode hidden out of habit. This can be very frustrating, especially when you consider the new hotkey for using your computer’s MIDI keyboard.
If you’re like me, sometimes you just want to use the keyboard that’s already touching your fingers to tap out a simple pattern. In Live 9, you’d use “CMD+Shift+K” to toggle whether you wanted your computer keyboard to send MIDI messages. In Live 10, though, “M” is the hotkey that will accomplish this task. If you’re toggling both your Computer MIDI Keyboard and Automation Mode frequently, you might find yourself wanting to enable Automation Mode by pressing “A,” then running into confusion when you realize you’re sending a MIDI note.
If this keeps happening to you, make sure to be mindful of your current Automation Mode and Computer Keyboard states. I’ve illustrated the relevant indicators in the screenshots below:
Hopefully, these three organizational tactics will help you keep your projects looking good and increase your productivity.
Continue learning with hundreds more lessons on mixing, songwriting, home audio production, electronic music recording, beat making, and much more, with Soundfly’s in-depth online courses, including Modern Mix Techniques, The Art of Hip-Hop Production, and Intro to Music Production in Ableton Live.
Subscribe to get unlimited access here.
—
 Max Rewak is a record producer, audio engineer, and music writer, based in New York and currently working in Sounds content at Splice.