+ Master the tools and techniques of producing pro-level electronic music and audio in Ableton Live with Soundfly’s course, Intro to Music Production in Ableton Live.
One of the dullest parts of production, but one of the most important for properly finishing a track, is preparing to mix it. If and when people think of music production as a sexy and glamorous job, they are certainly not thinking of the time spent getting a track set up for a mix. In terms of excitement, this can rank up there with clipping toe nails, but like the aforementioned activity, it’s important to do it well to avoid some much bigger problems later on.
Essentially, I see production and mixing as utilizing two different parts of the brain. Production is a creative process where you want to let the ideas and inspiration flow. Mixing, on the other hand, is a practice that’s heavy on organization and more logical decision making. This isn’t to say that there’s no creativity in a mix — obviously, there is.
There’s a good reason why many producers (including myself) prefer that others mix their productions, even if they’re excellent mixers, because it can often help the project to have someone else add their ears and sensibility to the music. Another way to divide the process, which I often do, is do a mix in a completely different DAW, say the production in Ableton Live and the mix in Logic Pro.
This is not because of some magic sonic quality of the DAW. Although I may get flack from the denizens of Gearslutz.com, I believe that mixing skills are 99% of the sound of the mix, and maybe the DAW contributes less than 1%.
After all, can the vast majority of humans (including myself) really tell what DAW a track was mixed it? It is simply that it forces me to start with a totally different mind state.
In today’s world of laptop production, it’s pretty common that you end up doing both the production and mixing — in the same DAW. So here are five tips to help you get your track ready to mix and make your mixing flow more easily and quickly.
A bit of housekeeping: Soundfly’s got an all new online course that teaches you all of the tools to get started making pro-level music and audio using Ableton Live, one of the most versatile DAWs out there. Check out Intro to Music Production in Ableton Live here or sign up for our email list to stay up to date with new courses and offers.
1. Label and organize your tracks
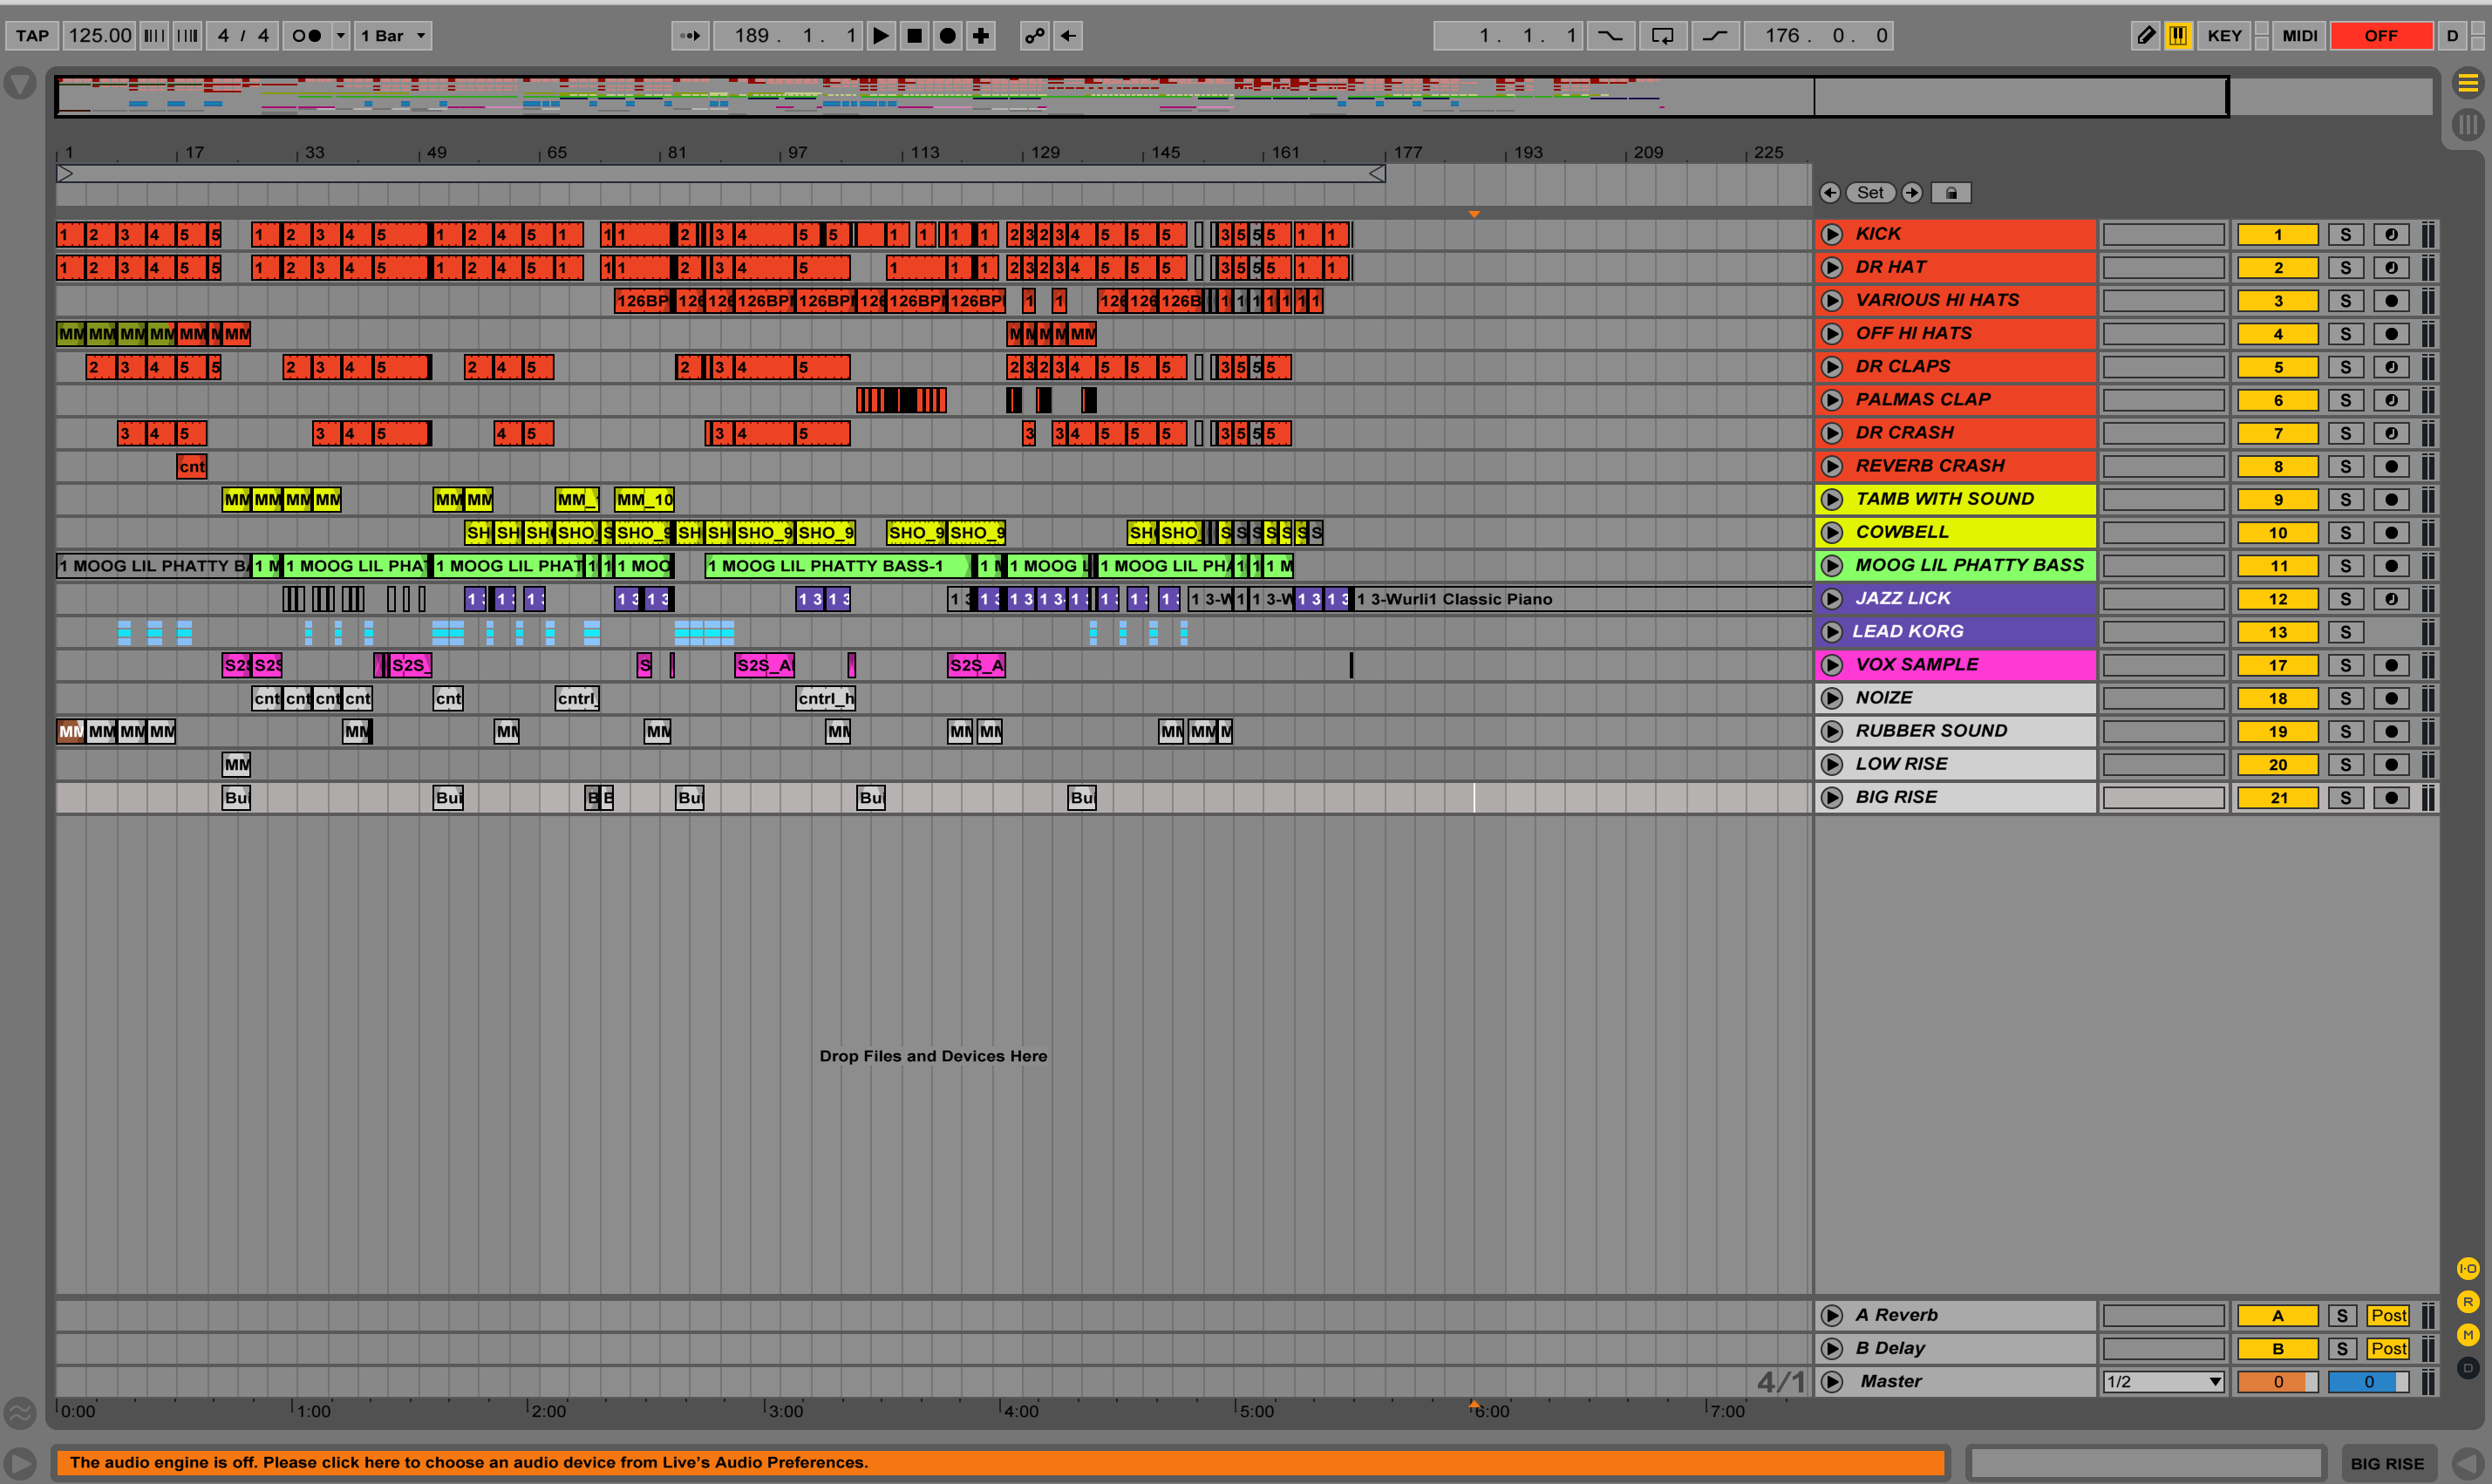
The most basic part of the mix prep process is labeling every single track that is in your production. Here’s a shot of what an organized set in Ableton Live looks like.
You should never leave any track looking like this track below that says “22 Operator” – without a clear name.
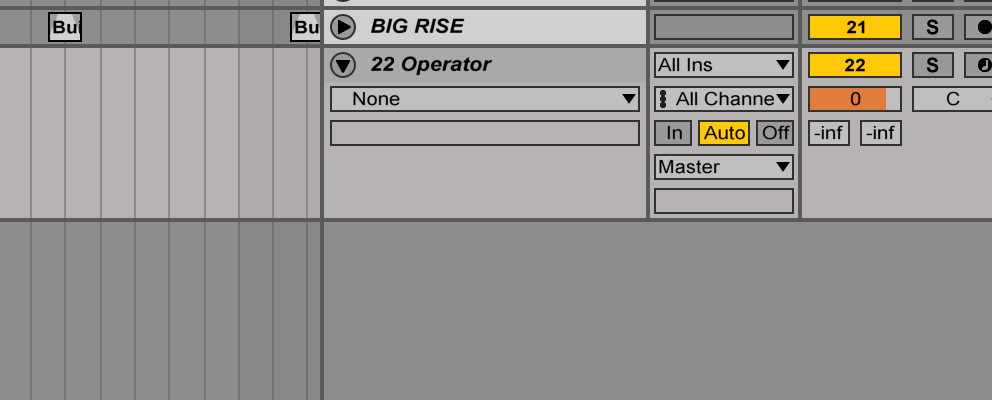
If you have tracks like this, the way you label a track in Ableton live is by using Command-R and giving it a new name. I would also strongly encourage you to color-code your tracks. You do this by right clicking (Control-Click for you Mac users) over the name of the track.
For more helpful key commands in Ableton Live, check out this helpful list we’ve compiled!
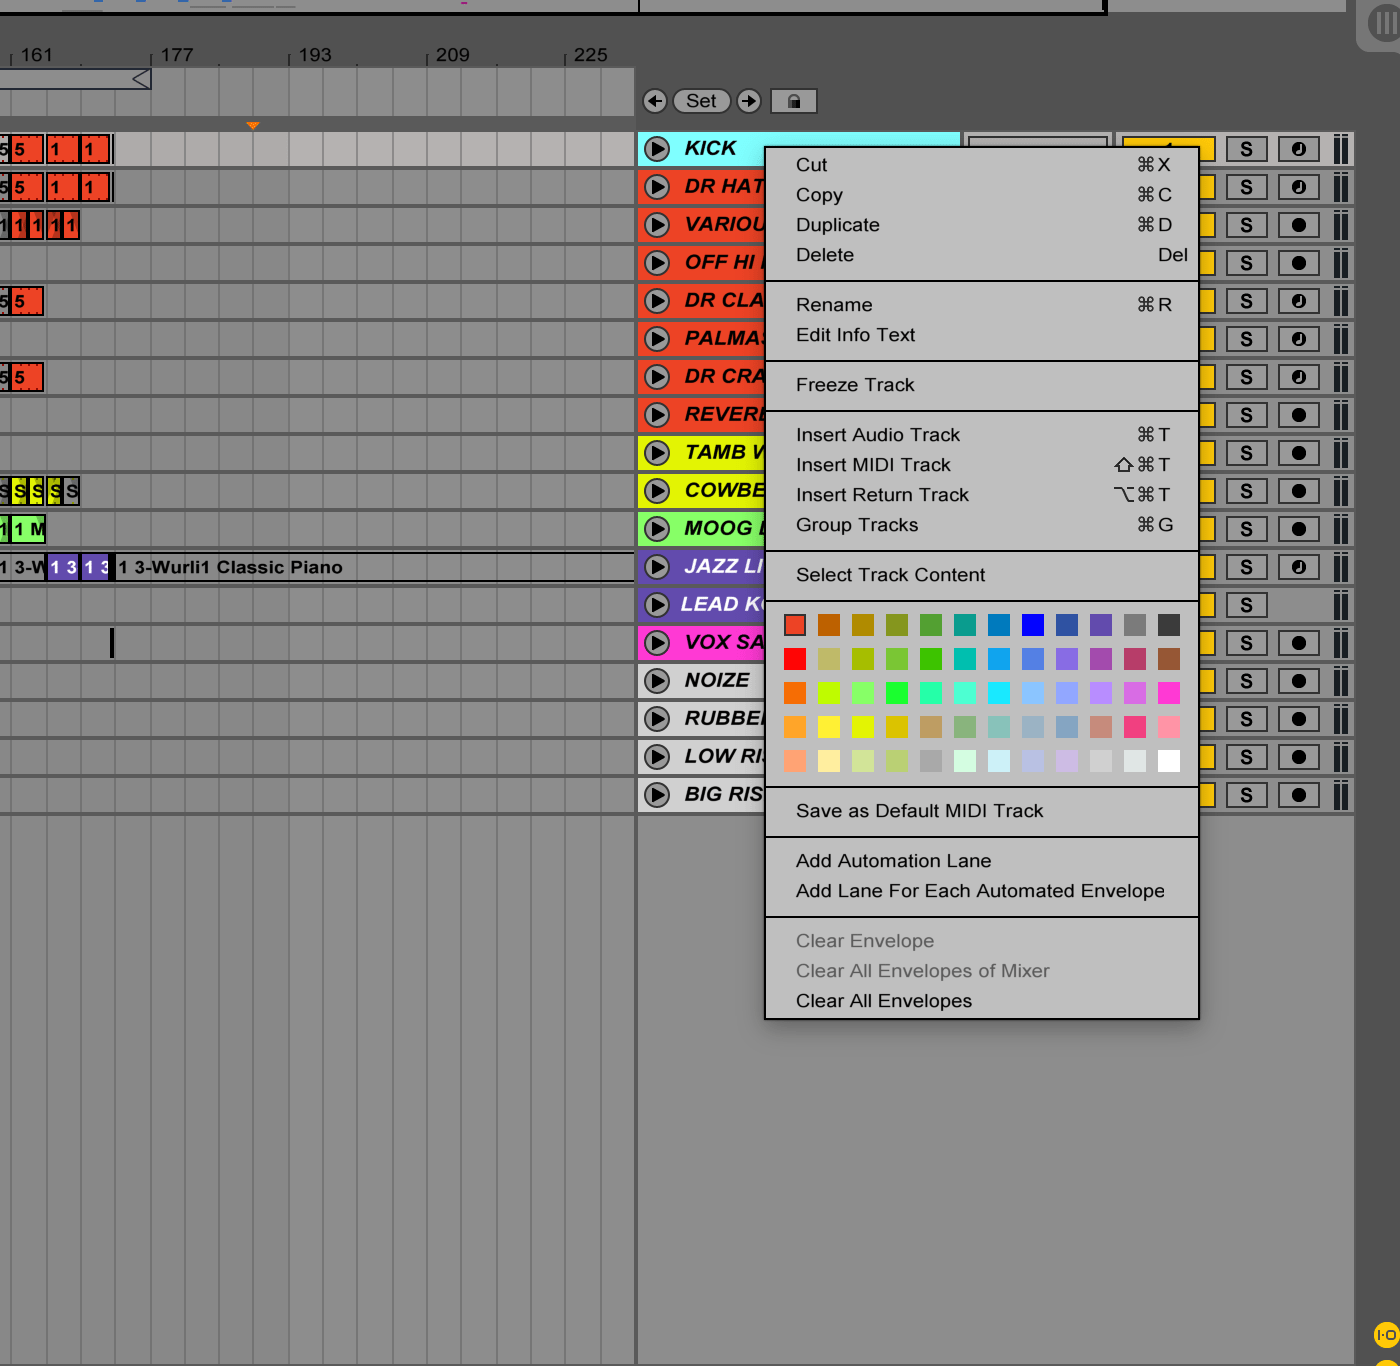
I also like to color-code the clips in arrangement view to be the same color as the track, as you can see from the shot of the organized set. You do this by right clicking on top of the clips and the same info will pop up.
2. Get rid of absolutely anything unnecessary
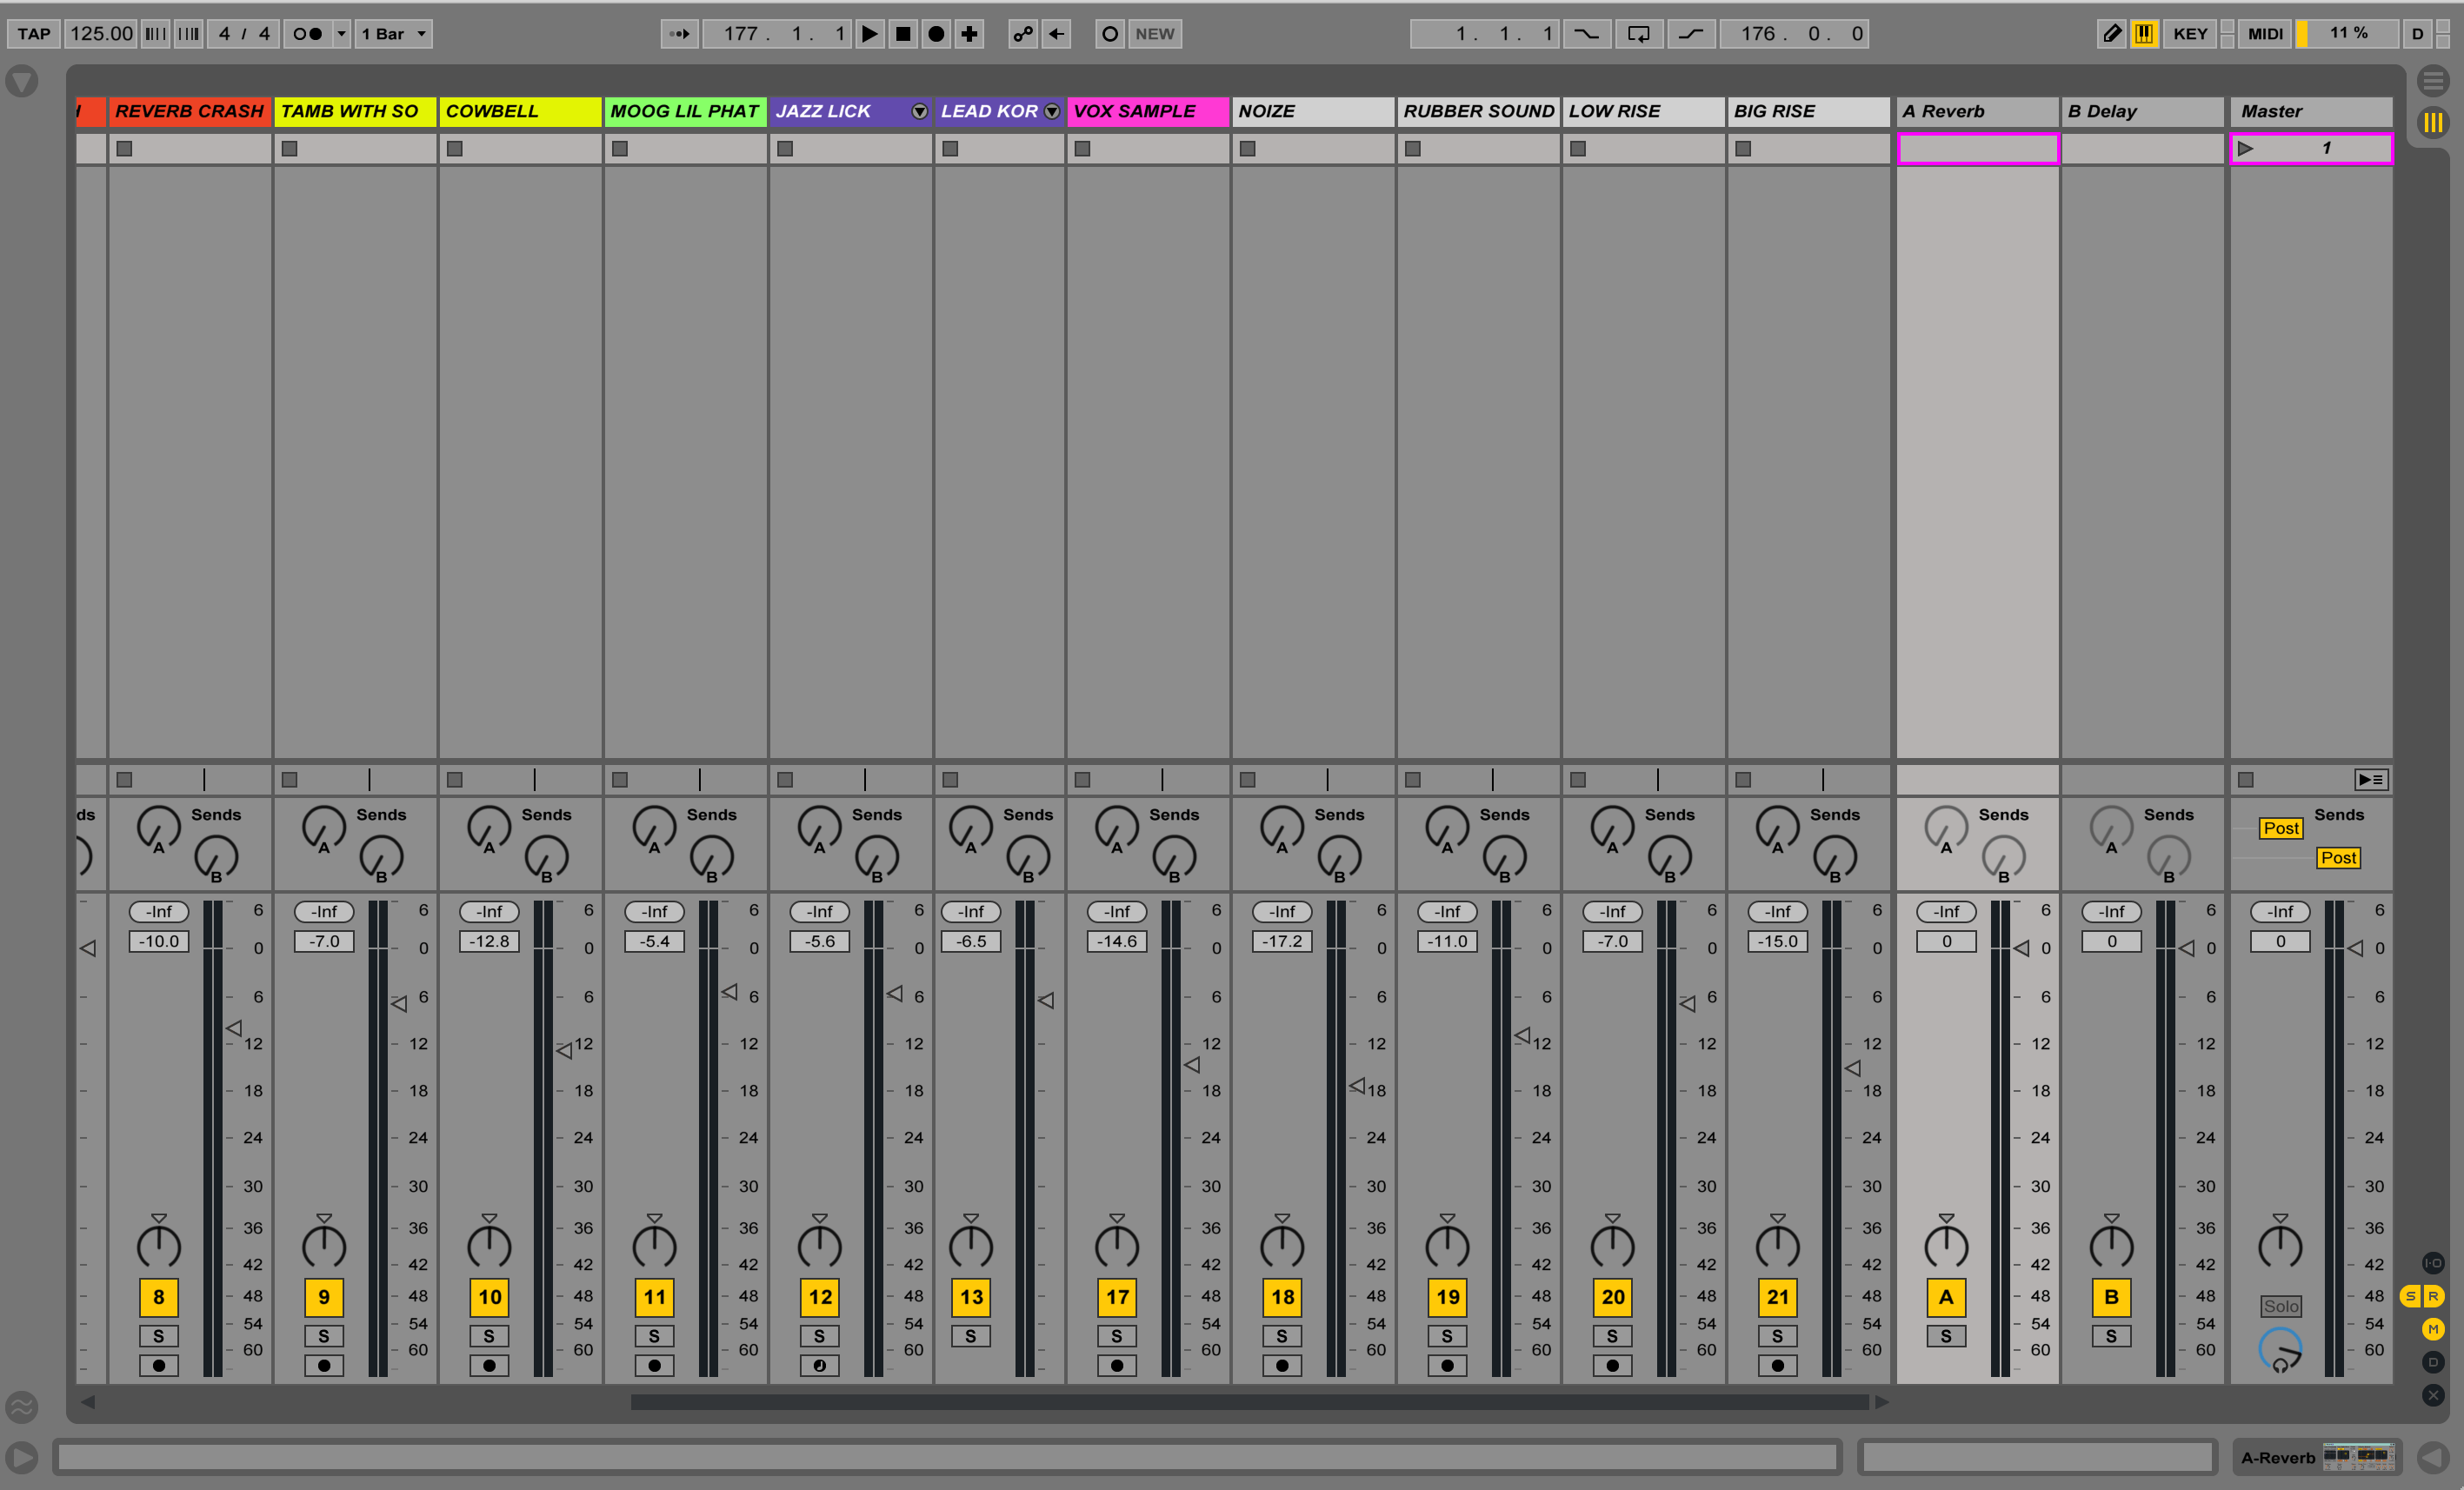
When turning a production set into a mix platform, everything that’s not needed must go. Any track that is muted should be deleted. Also, since in Ableton, the mix console is in session view, I get rid of every clip and scene. This will help you with the CPU, which we’ll talk about more in the next section.
Here’s what session view looks like in one of my mix sessions.
3. Raise the buffer and turn MIDI tracks to audio tracks
One of the really important things with a mix session is that you need to keep a lot of CPU available, especially if you are using external plugins. (I use some fantastic external plugins for mixing, but more about that in other posts). One basic way to do this is to go to the Audio Tab in Live’s Preferences and set the Buffer Size to 1024 or 2048.
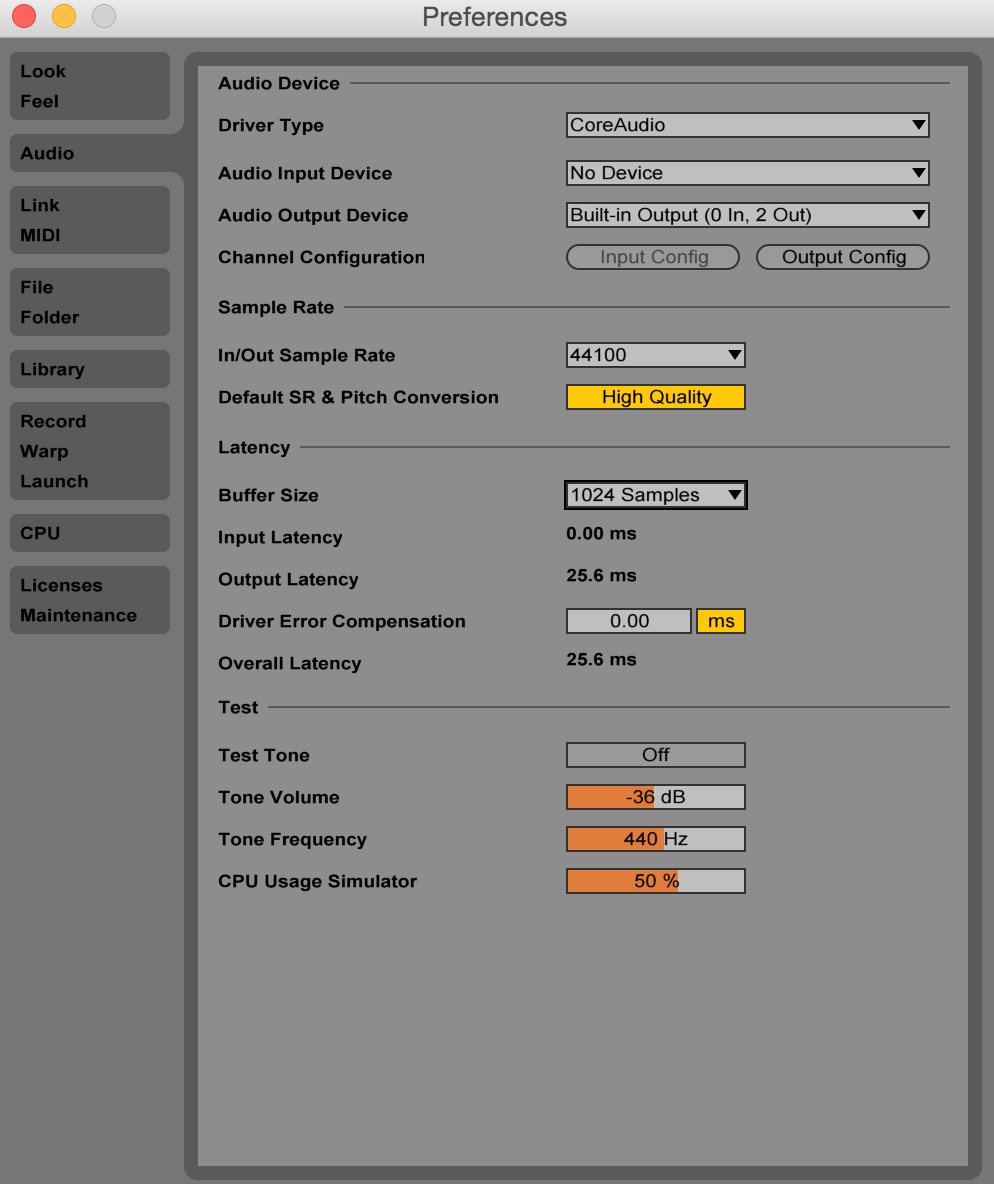
The second and perhaps more important way to do this is to eliminate all of your MIDI tracks. This serves two crucial functions. Firstly, it saves CPU, but perhaps even more importantly, it forces you to stop producing. Yes, it is really important that during the mix; you should not change parts unless absolutely necessary for the song and the arrangement.
Again, you do not want to remain in music-creation mode while focusing on a mix , and working in audio forces away from changes because they become more of a pain in the ass. Of course, you always have the option of returning to an earlier version and flying something in if necessary, but this will take a couple of extra steps.
To turn a MIDI track into audio in Ableton Live you want to do the following:
Right click on the track name in Arrangement View and select “Freeze Track.”
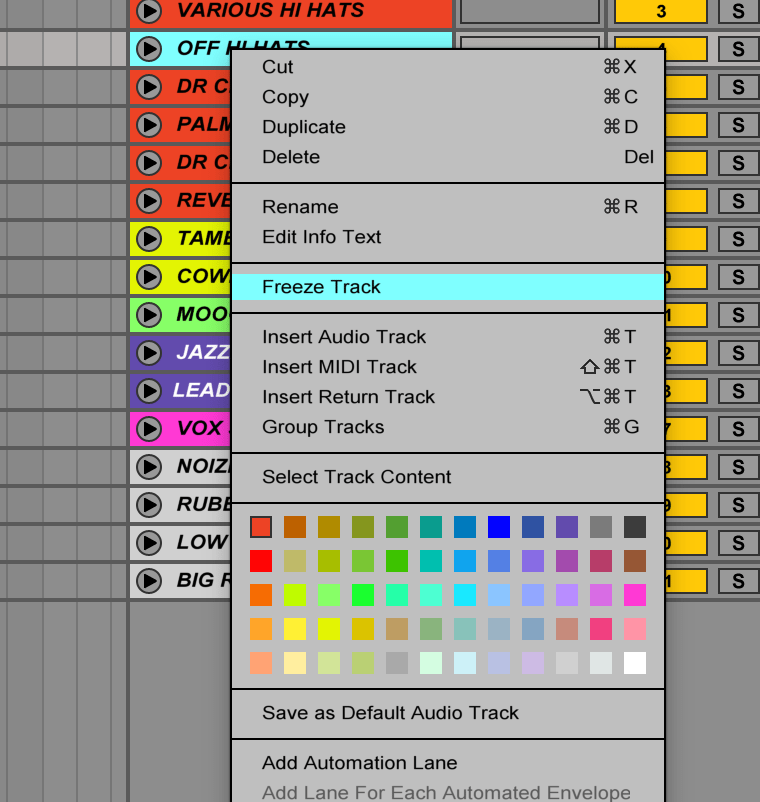
Once you do this, the track turns white. Only then can you right click on it and select “Flatten.”
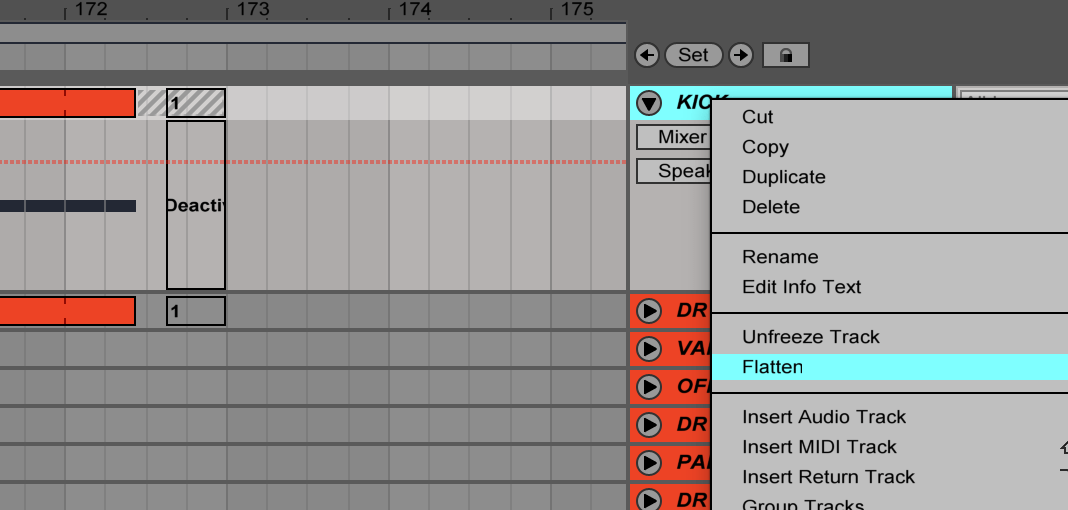
Once you do this, the track will turn to an audio track, as you can see by the wave forms in the clip.
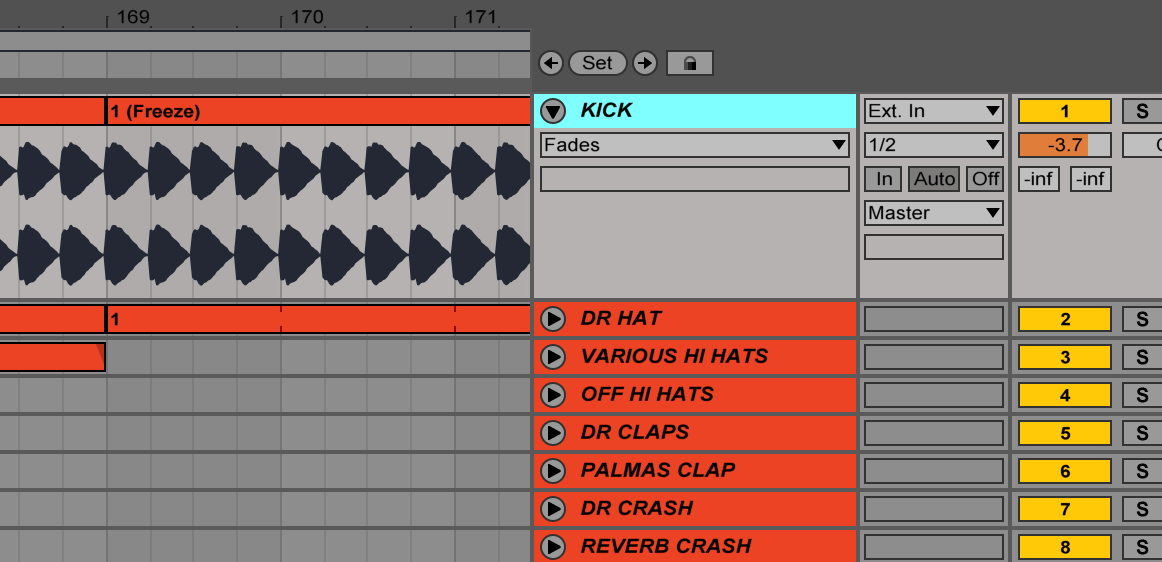
Just a note here. If you do this process, all of your instruments and effects will now disappear as they are written into the audio.
In general, I believe that this is a good thing, but there are times when you want to keep some insert effects in the track so you can tweak the settings in a mix. If that’s the case, a technique I use to preserve them is to Command-C (copy) them, Freeze and Flatten the track, and then Command-V (paste) them back into the track. This can be really useful when dealing with the hitch that you cannot Freeze and Flatten a track with a Side chained Compressor or Gate. Just copy the device, delete it, Freeze and Flatten the track and paste it back in.
4. Add an arrangement track
My colleague at NYU’s Clive Davis Institute of Recorded Music, the legendary mix engineer Bob Power, once told me:
“A mix is a good arrangement.”
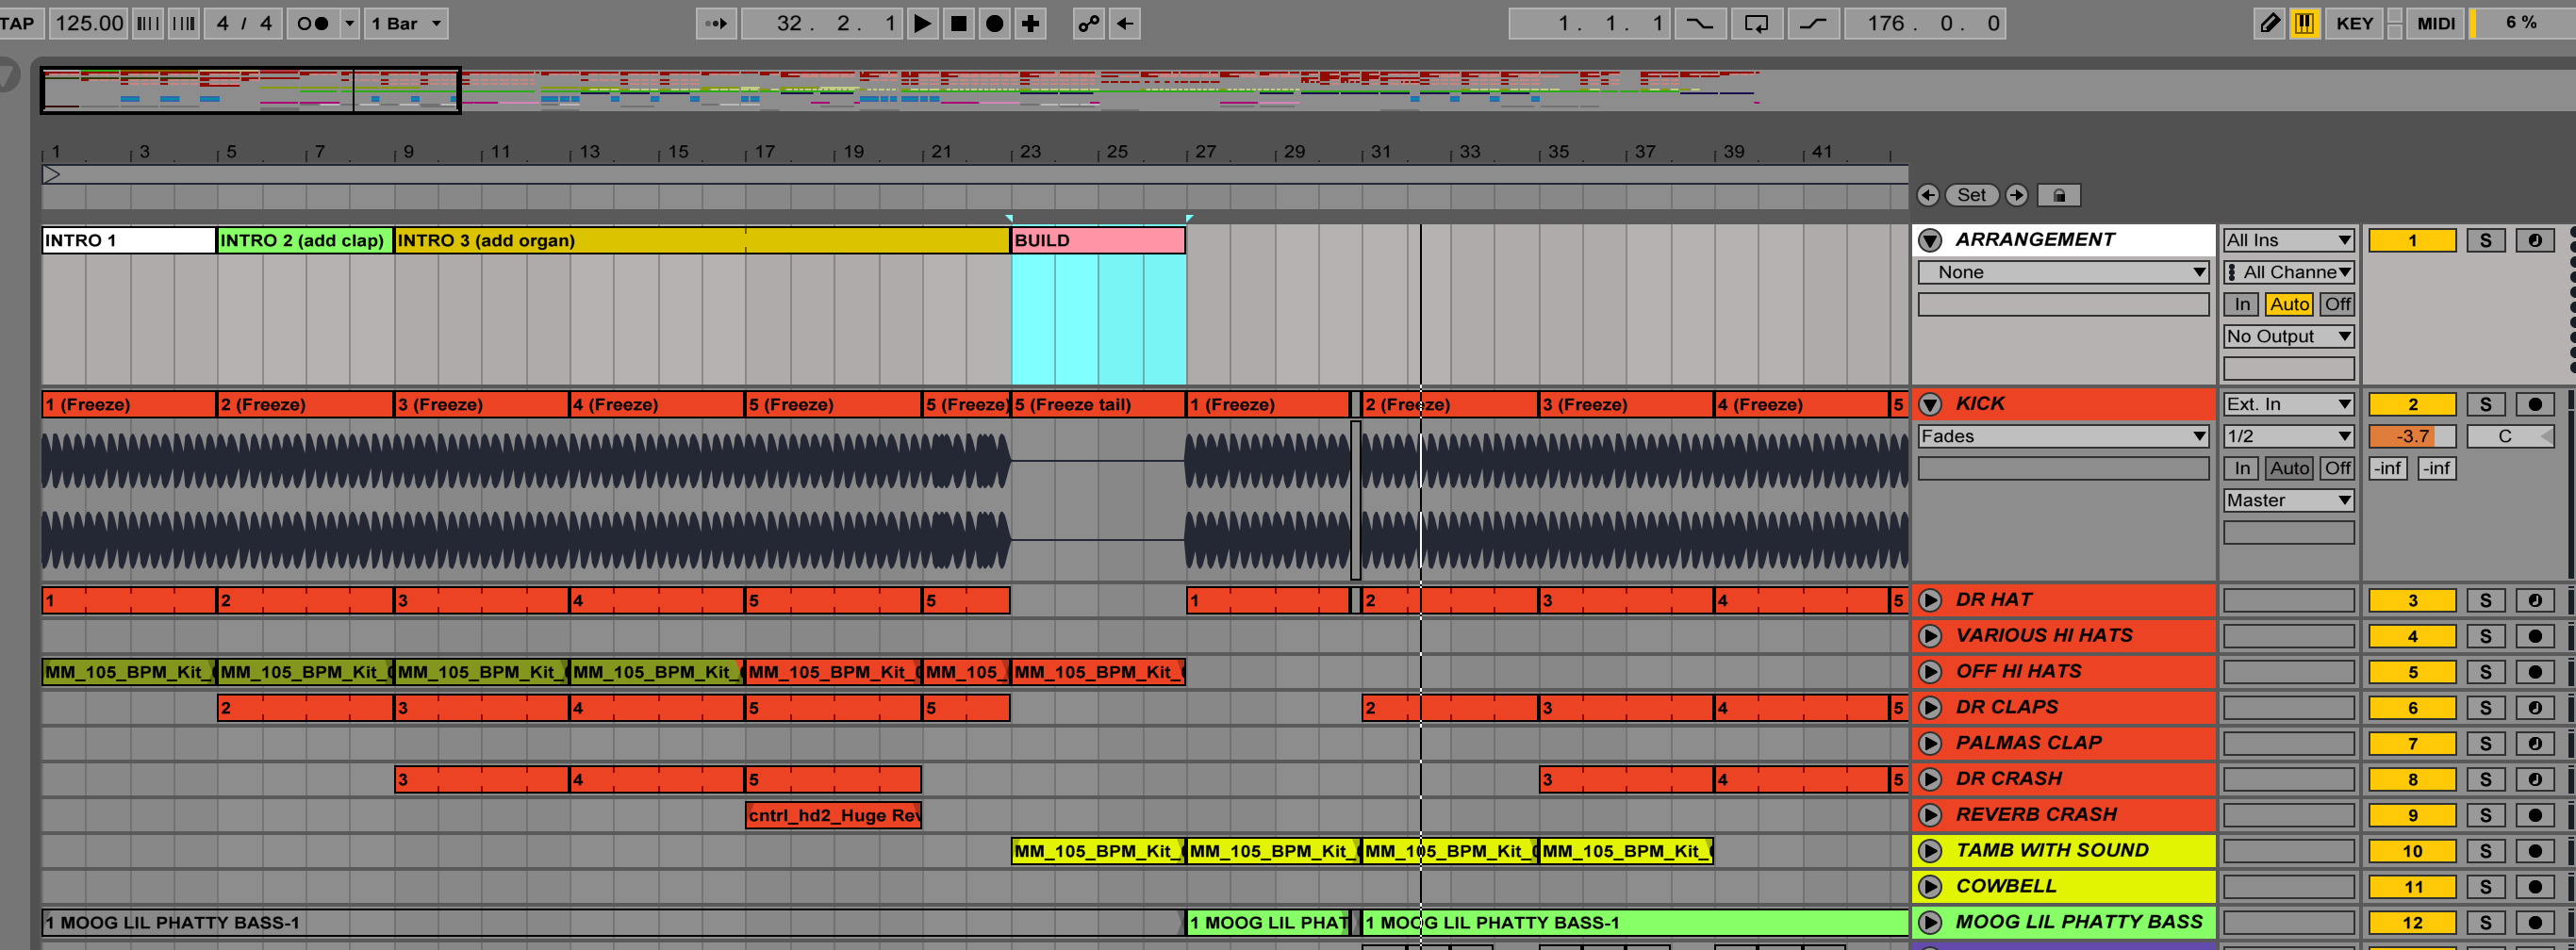
As in so many things, Bob is absolutely right. What you are doing when you mix a track is making sure the production essentially tells a musical story — it rises, falls, and climaxes in certain places. Music, like film, is a time-based art and the listener waits for these moments as payoffs. Therefore, there is absolutely no way you can truly mix a track unless you have an idea of the entire production. One thing I do is add an arrangement track.
An arrangement track is simply a blank MIDI track that sits at the top of the production in arrangement view. Part of the preparation to mix is mapping out the song in this track using blank MIDI clips. To do this, simply select the bars of a section within the MIDI track and use Shift-Command M to make a MIDI clip. Then use Command-R to rename it.
Now, of course, you can do something similar with Ableton’s Locators which you will find in Ableton’s Create menu under “Add Locator.” I prefer the first method because I can color code the MIDI clips and that allows me to see the arrangement and sections very easily.
5. Set up a reference track
This is one of the most important parts of preparing a mix. These days, many artist/producers do not have access to a perfectly tuned room and state-of-the-art speakers. Therefore, having a reference track is one of the most important things that you can have for your mix. A good reference track is firstly always a WAV of AIF file. Do not use an MP3 or any other compressed file. You want to mix against the highest quality audio you can. Secondly, pick a track in the approximate genre. You obviously don’t want to reference your house track against say Morton Subotnik’s “Silver Apples of the Moon.”
Thirdly, choose your references by producers rather than whether you like the song. I consider Subotnik’s “Silver Apples of the Moon” a groundbreaking work of genius, but if I were mixing a pop track, I would be referencing the hardest-hitting contemporary stuff I could find since top-charting pop often has fantastic production value, even if I’d rather be listening to something else in my free time.
To set up a reference track, I create an audio track below my arrangement track and simply load in my WAV/AIF file. Often, I’ll chop it up and simply loop the heaviest 16 bars since I really don’t need to reference the synth intro or drum outro. Other times I will use one reference for the kick and another for the voice.
The key to using a reference track is the ability to A/B it quickly with your mix. In order to do this, you want to do a couple of things. First, turn the volume down between -6 and -8 dB. Any reference track will be mastered and therefore louder than your mix. This is bad because your ears have a natural tendency to assume that louder sounds “better.” Therefore, your mix and reference track should always be at the same volume.
Secondly, use Ableton’s Key Mapping to set up a quick A/B key. I use Command-K to enter Ableton’s key mapping function and map the period key to the track’s Solo button. With that, I can listen to the reference with the flick of a finger and then by hitting it again get back to my mix.
I hope this is useful as you prep your mix and I look forward to sharing some advanced mix prep techniques as well. Have fun and remember to check out Intro to Music Production in Ableton Live to learn more.
Improve all aspects of your music making on Soundfly.
Subscribe to get unlimited access to all of our course content, an invitation to join our members-only Slack community forum, exclusive perks from partner brands, and massive discounts on personalized mentor sessions for guided learning. Learn what you want, whenever you want, with total freedom.
—
 Dan Freeman (CØm1x) is an artist/producer/Ableton Certified Trainer based in Brooklyn, NY. He’s the director of the Brooklyn Digital Conservatory, a platform that brings some of the best artist-instructors in the US to production schools globally. He directs NYC’s largest Ableton User Group and is on the faculty of New York University’s Clive Davis Institute for Recorded Music.
Dan Freeman is also the host instructor of Soundfly’s Beat Making in Ableton Live course.


