+ Learning to record and mix music? Explore Soundfly’s acclaimed online courses on mixing, production, and songcraft — click to subscribe.
By Kieran Kaye of Full English
Consumer audio is blowing up. The average person is now willing to spend more on audio gear than ever, and at the same time, even basic speaker technology is getting better and better. The combination ultimately equates to more people having home theaters and surround sound systems than ever before.
Other advances in technology make streaming multiple audio channels online easier and quicker, too. Dolby have a codec called Dolby Digital Plus that content services such as Netflix use to stream surround sound with minimal compromise on audio or video quality — simply plug in your home surround sound setup into your smart TV and you’re good to go!
All of these factors together have created a new demand for content to be mixed in 5.1 surround sound. I’m here to answer all your questions about setting up your home studio for 5.1 surround sound mixing, so let’s dig in.
Background
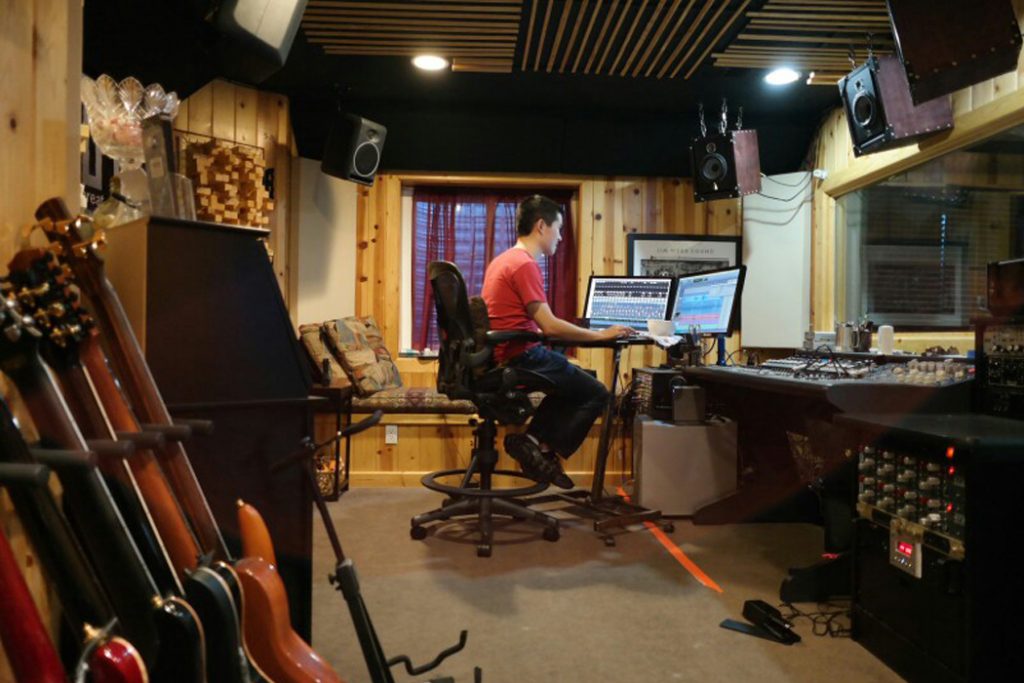
I come from a post-production TV, film, and commercial background. My studio, Full English Post, works almost exclusively on sound design and mixing for various forms of visual content, such as commercials, branded content, and documentaries. I work with 5.1 mixes a lot and adjusting your brain from two channels (stereo) to six (5.1) can seriously mess with your head. Relax, take a breath, it’s not as bad as it seems. Although I’ll touch upon mixing in 5.1, this article is focusing on how to set up your studio so it’s ready for surround sound projects.
Basics
What is 5.1 surround sound? Well, it’s exactly that… sound that surrounds you. The terms “5.1” and “surround sound” are not exclusive though. You may have heard various number combinations being thrown around, including 7.1, 9.2, 5.1.4, etc. — each of which simply relates to the various speaker channel setups. For example, 5.1 means that there are five speaker channels that surround the listener plus one Low Frequency Effects (LFE) channel, which is what the “.1” references. This channel carries the bass information (<120 Hz) to a subwoofer in the speaker setup. So, 9.2 is nine surround speakers and two subs.
The somewhat new immersive audio that is trending right now is Dolby Atmos which has speakers above the listener, in addition to the usual surrounding speakers. In this case, we add a third number that tells us how many overhead speakers there are: 5.1.4 = five surrounds, one sub, four overhead speakers. That said, in my experience, 5.1 is still the most common surround speaker combination you’ll be mixing for.

Speakers
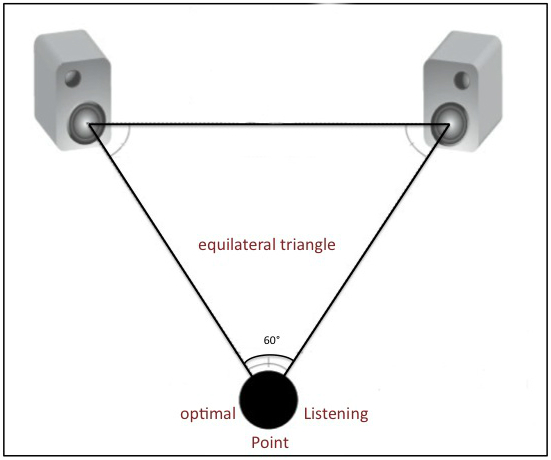
If you already mix in stereo, be it for music or film, you will understand that speaker placement is crucial. Just as in a stereo setup, the Left (L) and Right (R) speakers in a 5.1 setup still need to be positioned at 60 degrees to the listening position in the classic equilateral triangle formation.
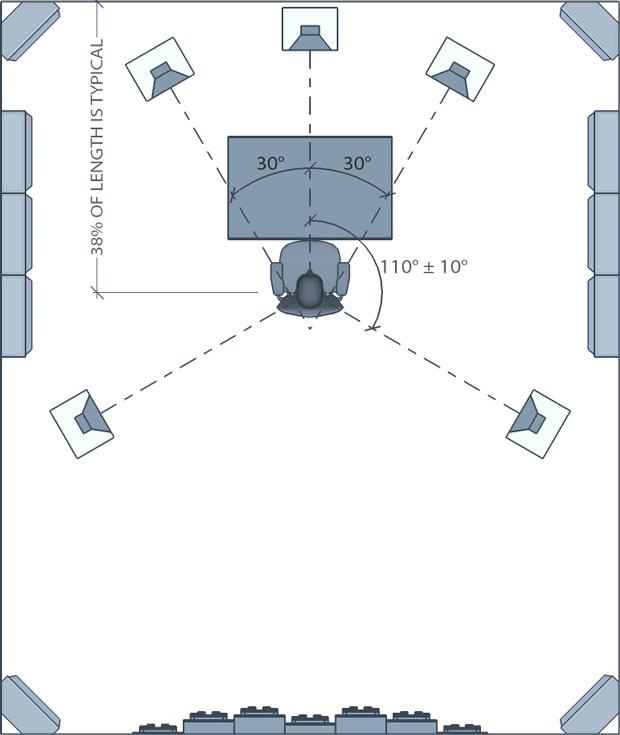
Now we need to add the other speakers: one Center speaker (C) and two Surround speakers. These are known as Left Surround (Ls) and Right Surround (Rs). The Center speaker is placed in between the Left and Right speakers facing the mix position. There’s some varying opinions on the angle at which the surround speakers should be placed, but between 110° and 120° is fine for most applications.
Imagine the mix position being in the center of a circle, and facing forward is 0 degrees. The speakers should be placed as follows:
L = -30°
R = 30°
C = 0°
Ls = -110° (±10°)
Ls = 110° (±10°)
Now we need to place the subwoofer. Since bass frequencies technically have very little directionality, you can place the sub wherever is convenient. I would recommend under your desk facing the mix position.
The choice of speakers is greatly up to the user, but I would recommend getting five identical speakers in order to mix accurately and consistently. It’s not as important that the sub be in the same brand/family; just make sure that it’s not too big or small relative to your surround speakers.
Output from DAW to Speakers
Now we have speakers surrounding us, we need to start sending some signal through them. This requires six discrete outputs from your DAW and interface. This is where the 5.1 home studio can start getting expensive. I’m strictly a Pro Tools person and in the standard version you can only mix in stereo, even if you have a suitable interface with 6+ outputs. In order to start mixing in 5.1, I had to make the pricey upgrade to Pro Tools | HD (now Pro Tools | Ultimate). I know that other DAWs such as Reaper have surround mixing included in their standard software, which is a much cheaper option if you want to go that route.
Let’s now assume you are able to output six channels discretely from your DAW, you will need an interface that not only has six outputs, but ideally has a way to attenuate all six simultaneously. This, again, can break the bank a little when finding a suitable interface and/or speaker management controller. Even if you do have six channels out (some very affordable interfaces do) you will need a separate control for adjusting the overall 5.1 system volume, and that can be a real commitment. Here are some examples of controllers:
- SPL Surround Monitor Controller (849€ or $1,011)
- Dangerous Music Monitor ST ($1,999)
- Grace Design m906 5.1 Reference Monitor Controller ($6,265)
I personally use the Focusrite RED 4Pre interface that has an option for the eight outputs to be simultaneously controlled via the monitor volume control, if you assign it properly (I actually use a BlueSky MediaDesk system for bass management control, see below). The Avid OMNI has a similar built-in monitor management system and saves the need for two separate pieces of gear, plus includes digital trim pots for each output which is very handy for calibrating the system.
Often when you buy a subwoofer, it has six inputs to connect your DAW outputs to and then the five surround speakers all connect into the woofer along with a connected volume remote. This is often referred to as “bass management” where the subwoofer offloads some of the lower frequencies from the surround speakers. At this point I should make it clear that the subwoofer and LFE are not the same thing. While the LFE channel in your mix will be output through the subwoofer, if the mixer chooses to use bass management, the sub will also output the bass information sent to the surround speakers, usually at a crossover frequency of 80Hz.
Dolby states that:
“The difference between the LFE channel and the subwoofer output is that the LFE channel is used to carry additional bass information…while the subwoofer output represents how some or all of the bass information will be reproduced.”
This is why it’s important to calibrate the LFE channel correctly (see calibration below) so that your mix translates on all systems.
Speaker Order
I’ve mentioned where to put your speakers and how to connect them, now I’m going inside the DAW to discuss what goes where within the digital I/O. Each speaker has its own initials and the channel order that they are output to from the DAW is critical. The two most common speaker orders are:
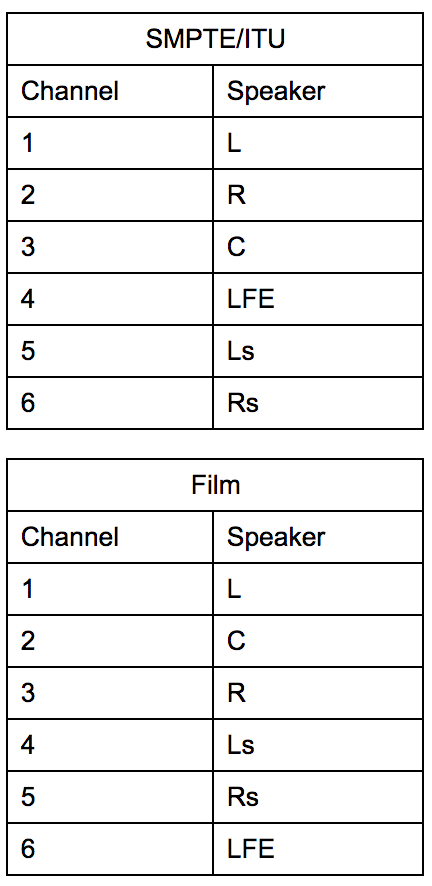
The Film format is more common in Europe and SMPTE/ITU more common in the US.
The reason why this order is so important is because if you are mixing a film in SMPTE order (L, R, C, LFE, Ls, Rs), for example, and are sending the dialogue to the center channel (see mixing below), it will be sent to output 3 from your DAW. If the 5.1 stems are then bounced out and labelled with the Film order (L, C, R, Ls, Rs, LFE), the dialogue will still be coming out of channel 3 but will be labelled as R, not C, which would not translate to another system correctly and would fail quality control when it goes to distribution.
Calibration
Calibrating the speakers simply means adjusting each speaker volume so that at the listening position, all speakers have the same Sound Pressure Level (SPL). Which SPL to calibrate to depends on the room size. The graph below is taken from a seminar I attended with Roger Guerin and is a great starting point for what level to set your speakers to.
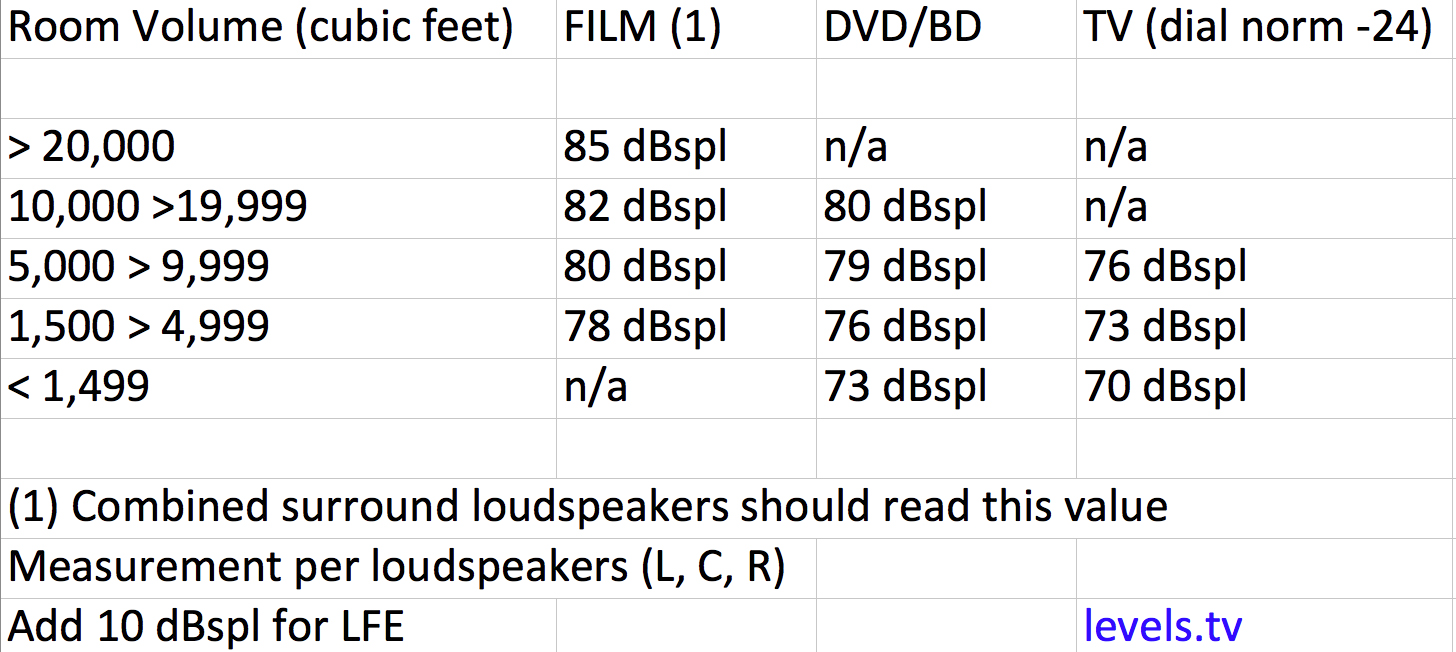
For this stage you’ll need a Real Time Analyzer (RTA) or SPL meter. An SPL meter will need to be set to “C-Weighted” and “Slow.” Set the meter up at ear height at the mix position (about 4’ from the floor). However you have your system set up, each room and speaker is different, so you will need adjust each speaker volume manually so that each one hits the same SPL reading. Via your DAW, route -20dBFS (to allow for head room) of pink noise signal through each speaker channel output individually and adjust each speaker’s volume to hit the desired SPL. The idea is to ensure that all speakers are hitting the mix position at exactly the same time, and at exactly the same level.
The subwoofer should be calibrated to 10dB higher than the five main speakers if using a real-time analyzer (RTA). If you’re using a sound pressure level (SPL) meter, the reading from the sub should be between +4dB and +6dB SPL of whatever the appropriate level is for your room. This is to conform with theater speaker adjustments. Route band-limited pink noise to the LFE channel through your DAW and adjust the sub until you hit the desired SPL number. Dolby states that:
“The LFE channel is calibrated such that each 1/3 octave band between 20 and 80 Hz is 10 dB higher than the equivalent 1/3 octave bands for any of the full-range speakers, assuming that the full-range speaker is ideally flat.”
BlueSky have some detailed instructions and test files to start calibrating your system.
Mixing
As promised, I’ll briefly go over the 5.1 mixing protocols for film and TV. There are certain rules that will put you in a good place if you’re working on any visual content that needs a 5.1 mix.
- Dialogue and voiceover always have to come from the Center speaker. In a cinema, this speaker or array of speakers will usually be behind the screen so that it appears the characters are talking at you.
- Any music tracks should be mostly coming from the front Left and Right speakers, although depending on the content, it can be desirable to put a little bit in the Left and Right Surround speakers with a high pass filter and small delay to give an element of space. Sending some of the low end to the LFE will pack a nice punch, too.
- Ambience and atmosphere sound effects, I find, are quite nice to place fairly evenly in the L,R, Ls, Rs speakers. Spot sound effects and foley are all pretty subjective as to where in the mix they should be placed depending on the content. A helicopter scene would make sense to pan around the listener. Some film mixers will put most foley, footsteps for example, through the center speaker. I tend to use the LFE channel sparingly, but my best advice is to play around with sending different sounds to different speakers. The Waves UM225/226 plugin is a great little toy to stick on an effects or music track and see what works.
Conclusion
In conclusion, setting up a 5.1 home studio may not be particularly cheap, but it’s certainly fun and necessary if you’d like to start offering alternative options for your mixes. It’s increasingly common for music to be mixed in 5.1 now, and can be a fantastically immersive experience for the listener. Have fun with it guys and happy surround sounding!
Improve your music with creativity & curiosity on Soundfly.
Subscribe to our YouTube channel for weekly videos, or join Soundfly’s all-access membership to all of our artist-led online music courses, an invite to join our Discord community forum, exclusive discount perks from partner brands, access to artist Q&As and workshops, and more.
—
Full English is a Brooklyn-based post-production audio facility dedicated to outputting only the highest standard of recording, sound design, and mixing. Owned by British sound designer Kieran Kaye, Full English specializes in audio for all content including commercials, trailers, documentaries and branded content. Offering a boutique experience, working closely with the client from the offline stages to final mix, Full English provides premium quality with a more reasonable price point.