The term “virtual reality” always reminds me of some cheesy ’80s or ’90s movie that involved chunky headsets and dreamed of a future with flying cars and household robots doing everyday chores. The actual reality is that we have self-driving cars (thanks, Tesla), household robots to whom we can ask questions, (“Alexa, stream Total Recall”), and chunky VR headsets.
So, we’re really not that far off. Virtual reality has actually been around for decades, mostly in the gaming world, but with the growth of head-tracking headsets like the Oculus Rift, or even Google Cardboard with your smartphone, it has made the consumer VR experience accessible and more within reach than ever.
+ Learn more with Soundfly: Interested in learning more about pro-audio mixing techniques? We’re launching a new mentor-driven course featuring input from today’s leading sound engineers called Faders Up: Modern Mix Techniques on October 4. Sign up now, and get $200 off the course with the discount code below!
What is VR?
Not so long ago, I was asking this very question. Currently, the “reality” trends are:
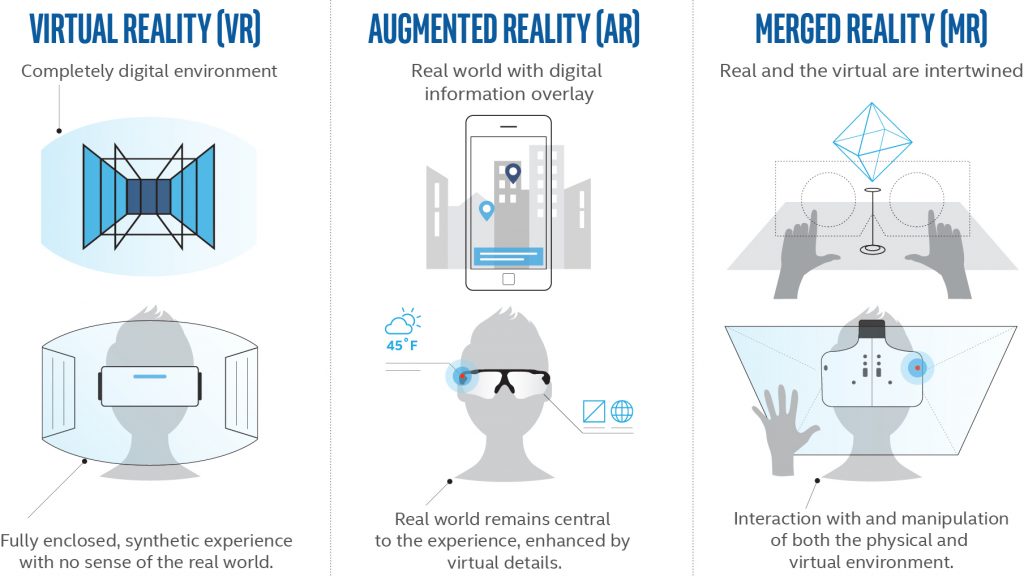
- VR = Virtual Reality — A world that you enter that is not your own. This could be linear or interactive (more on that later).
- AR = Augmented Reality — Remember Pokémon GO? That was augmented reality. Adding something to the real world that isn’t normally there. Google Glass is (was) a good example, as is Yelp Monocle.
- MR = Mixed/Merged Reality — A combination or AR and VR. Your real world still exists but the world around you can be altered and non-real objects could be present.
You may have also seen 360-degree video or immersive video. These are very common on Facebook and Youtube, Vimeo has also just started supporting 360 video, too (though not spatial audio). They are videos where the timeline remains the same (linear) just like any video content but the point-of-view (POV) can be freely adjusted by the user. Technically, 360 video is classed as VR but personally, I feel that having a linear video where the user can only look around and has no interactive experience shouldn’t really be classed as virtual reality.
This article, though, is about 360 video and my experience with sound designing and mixing spatial audio.
What is Spatial Audio?
Without getting too deep into the technical BS just yet, spatial audio, 3D, or 360 audio is a sonic experience where the audio changes with the movement of the viewer’s head or POV. This is why the content that does have spatial audio recommends you listen with headphones. If someone is talking directly in front of you in the video, then you would hear them clearly in both ears. Move your head left and the audio perspective would shift along with the visual and the person talking would be heard mostly in the right ear.
Currently, most 360 content that is out there simply has a normal stereo audio track on it with some music and/or voiceover, and it’s a little boring in my opinion. It doesn’t track head movement, and, therefore, the audio doesn’t move when the user looks around. This is because sound designing and mixing audio in 360 is difficult and time-consuming.
The trouble with most VR content is that it lacks the storytelling qualities that so much normal content possesses these days. Granted, there has to be a learning curve and time for consumers to get used to the idea of seeing a false world all around them, but, currently, 360 filmmakers have this amazing tool at their fingertips and don’t really know what to do with it. Many 360 VR films I see lack story and are just going for the cool factor.
Oh, you can put a 360 camera on a surfboard? Awesome… for the first 10 seconds.
Then I’m bored. This is where I really feel audio can tell the story. For the most part, the viewer looks around for a bit then ends up staring dead ahead, but what if they heard something behind them? You can draw attention with audio cues and start telling the story more interestingly.
Notice the audio remains the same in both ears despite changing the POV.
For the last six months or so, I’ve been trying to get my hands on a VR job and, finally, one of my clients came to me asking if it was something I offered. I immediately jumped on board and stepped up my research about mixing in 360. It turns out there’s not a huge amount of information out there on the subject. I’m involved in a VR collective in Brooklyn that includes various talents from developers to 3D modelers to producers. I’m only one of three audio guys in the group trying to break into the VR industry, and it’s becoming very apparent that it’s still a pretty under-saturated market.
This is good news because it means that myself and all the other awesome people in the group are on the forefront of the technology and exposing the potential that VR has. The bad, yet (somewhat) exciting, news is that I’m in the dark about a lot of the techniques to create this kind of content, and it’s a huge learning curve. I’m writing this to expose my experience of 360 VR in the hopes that others can learn from me and/or share their experiences, too.
+ Read more on Flypaper: “Vinyl: How it Works (and What That Means for You)”
360 Audio Plugins
The main thing that I couldn’t wrap my head around for the longest time was how do I mix in 360 degrees when I have no idea where the user will be looking? In a normal commercial, there is only one POV. Even if the perspective changes from character to character, or scene to scene, there is still only one direction in which the viewer is facing and my mix is determined by that POV. How do I plan to mix something that the viewer may not even be looking at?
For example, in a normal car advert, one of the shots may be the vehicle driving across the screen from left to right. In this scenario, I would add the sound effect of a car driving past and automate the sound so that it follows the car left to right, giving a more realistic audial experience to the viewer.
Take that same shot but film it with a 360 camera, it changes everything. If the viewer decides to turn around as the car drives past, not only is the car sound effect going to need to be a little quieter and more muffled because it’s behind the viewer, it will now need to be automated right to left as it drives past. But wait, WTF? How the heck do I do that??
Luckily for me (and you), app developers are creating more and more apps and plugins that do most the hard work for you. I’m no developer, and the little knowledge I have of coding is only through necessity. That’s why it was a relief to find out that a lot of these developers are designing 360-audio plugins for free in the hopes of becoming the 360-industry-standard format for sound designers to use.
The two developers that caught my eye were G’Audio and FB360. The latter is Facebook’s creation, and they are pouring money into VR, AR, and 360 video. Apparently, Mark Zuckerberg believes this is the future so is sparing no expense when it comes to VR. This is great news. Especially since it means I can get all my knowledge and education of this new technology at the expense of only my time and my diminishing brain cells!
I’ve also been told by several other sound designers that the Ambisonic Toolkit for Reaper is another fantastic free alternative for those that don’t use Pro Tools. Although I don’t use Reaper, the flexibility of the I/O seems amazing if you’re outputting more than two channels, and it’s a much cheaper alternative than Pro Tools HD.
Mixing for 360 Audio
Now, for the fun part: mixing a 360 video and sound designing it so that the user benefits from moving their head. I can’t discuss the project I worked on since it hasn’t been released yet, but I can say that it was a fairly simple VR project to ease my way into. It involved dialogue, voiceover, music, animation, and B-roll cutaways. This meant that I could design scenes where the ambient sound effects, such as room tone, could be all around the viewer and then add specific spot effects or dialogue that could be tracked to the source they were coming from.
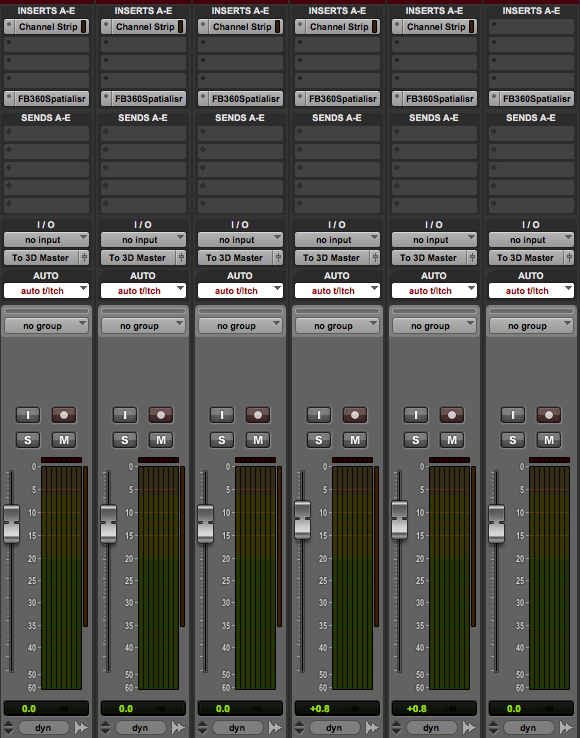
For this project, I decided to use FB360 which requires a Pro Tools HD license. The plugin comes with a few goodies that work in conjunction with each other. The HD is necessary because FB360 uses 7.1 audio tracks with instances of the plugin (Audio 360 Spatialiser) on each track, all routed to a bus with a global plugin (Audio 360 Control) that downmixes to binaural stereo. In the package is a session template which is extremely handy, and I used this as the basis for my mix session. They have stereo headlocked tracks, stereo spatial tracks, mono spatial tracks, and ambisonic tracks already patched and ready to go.
Essentially, you just need to import your sounds onto the relevant tracks and start sound designing.
+ Read more on Flypaper: “How to Choose a DAW: 7 of the Best DAWs for Every Musical Need”
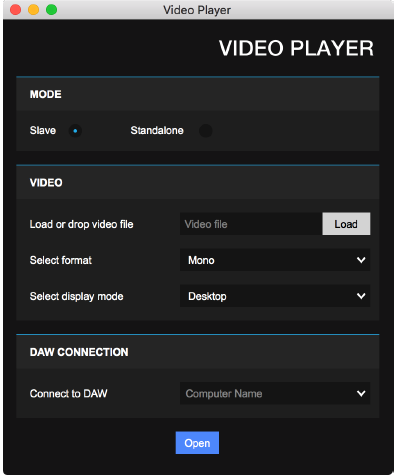
The video is taken care of by the VR Video Player. It works in standalone or slave mode, the latter being synced to your Pro Tools timeline. Load your 360 video into the player, and each track with the Audio 360 Spatialiser on shows a flattened 360 video to work to. Another window will open with the rendered 360 video that enables you to look around with the mouse or VR headset just as the user would. I should add that the video is not on the Pro Tools timeline itself, which meant I had to adjust my workflow a little and add markers for specific cues in the video (scene changes, spot effects, etc.).
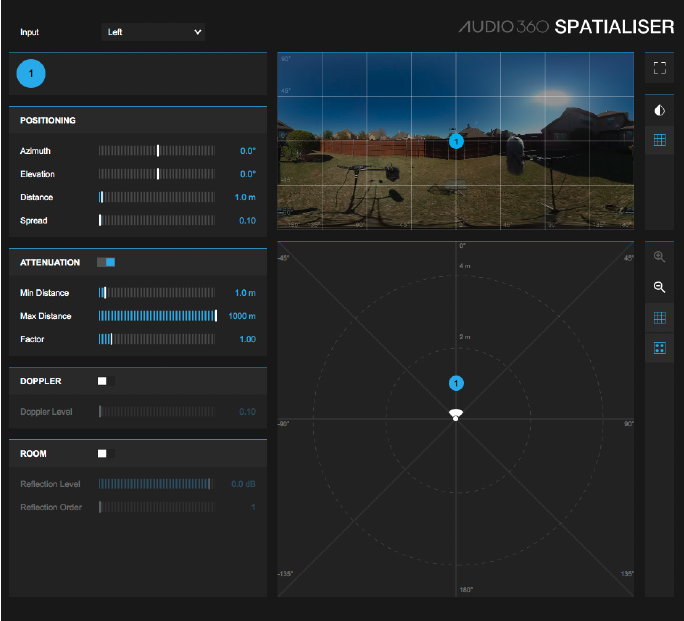
Automating each sound was fairly straightforward. There are several parameters in the Audio 360 Spatialiser plugin to automate, including: Azimuth, Elevation, Distance, and Spread. These are all summarized by blue object icons labeled ‘1’ for mono, ‘1’ / ‘2’ for stereo, etc., making automating sound effects easier. I had footsteps in my mix which I synced up and found the right sounds for before automating, just as I would when sound designing normally.
As the subject came down the stairs, I simply dragged the blue object icon in the window and followed the subject in real-time, automating all the above parameters. Off the bat, this gives a pretty good spatial impression since the flattened image recognizes elevation and distance (to a degree).
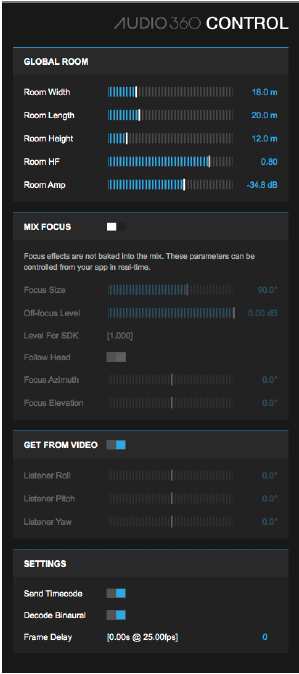
From here, I went in and tweaked the distance, etc. as the subject approached the camera. Playing back through the 360 Video Player then allows you to listen back whilst looking around to see if it sounds real when you’re looking directly at the feet or looking away and so on. There are other ways to make it sound even better by adjusting the room size on the global Audio 360 Control, and, of course, you can add any of your go-to plugins you like before the Spatialiser on each track.
For the ambisonic (B-Format) recordings (which I ended up not using), it’s as simple as loading the 4-track recording onto an ambisonic track within the template session. You need to select whether it’s a FuMa or ambiX and also make sure that the channels are in the right order for the selected format (W, X, Y, Z or W, Y, Z, X). Details for this are in the FB360 Manual that comes in the package.
Overall, the actual mixing and automation were relatively painless, however, this was mostly due to the simplicity of the project I was working on. There were a few bumps I encountered though…
Troubleshooting
Formats
It’s important to point out that I was delivering to both YouTube and Facebook for my client. In 360, this means two completely different ways of mixing. While Facebook accepts a stereo-headlocked track to be added as well as the encoded 8-channel spatial audio mix, YouTube does not. A headlocked track is one that doesn’t change when the user moves their head or POV. This is handy for music and voiceover tracks.
The fact that YouTube only accepts a 4-channel spatial audio encoded audio file (ambiX) means that you have to automate your headlocked tracks manually so that the music and voiceover don’t move when the user looks around. This involved doubling my atmos, music, and voiceover tracks and panning them at the highest and lowest elevations for both the left and right channels.
This was not easy! Until a uniform spatial audio format comes out, it means remixing for different delivery channels which is time-consuming. The Facebook format is Two Big Ears also known as a .tbe file.
Uploading to Facebook and YouTube
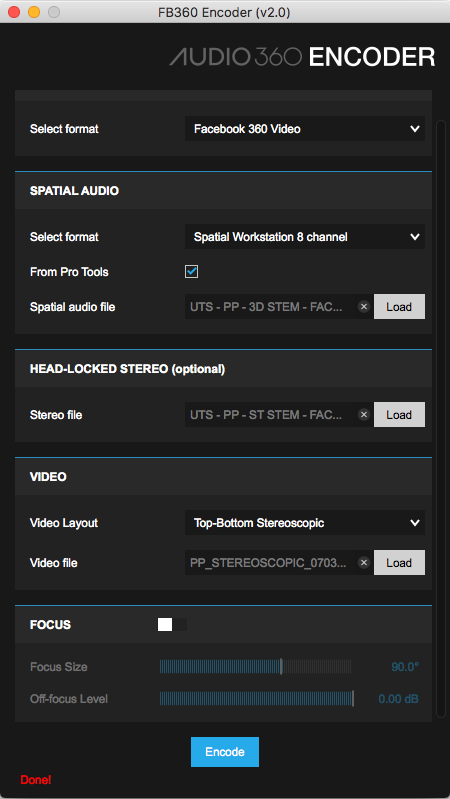
It takes a while to upload and process the videos on Facebook and YouTube. In the FB360 package, there’s an encoding program that has some nice presets for different applications, namely Facebook and YouTube. I had real issues with the YouTube encoding, though. Rather than just adding all the appropriate files to each dialogue box in the encoder (as I did for the Facebook encoding), I painstakingly had to figure out how to firstly encode my 8-channel spatial mix to a 4-channel ambiX file, then encode that ambiX file separately to the video for YouTube. Note that once you upload to YouTube, even after it’s processed and says it’s good to go, the spatial audio can take around an hour before it actually works.
Again, I found this out the hard way and wondered why my spatial mixes weren’t tracking the head movement. They were, I just needed to wait. Patience is a virtue, my friends!
Hungry Plugins
I recently upgraded my Mac but not by a lot so I don’t have a supercomputer but well over what the recommended specs are for Pro Tools HD. It seems that the FB360 plugin along with the video player are quite CPU hungry, or this could have something to do with my graphics card. Playback was generally very sticky and often difficult to mix to. The workaround was to close the video player window, attend to the mix/tweaks/EQ, etc., then reopen the video player window to see how it sounded to video… not ideal!
Summary
Overall, the mix process was less scary than I initially thought. The deliverables are not particularly intuitive right now, and it seems that each different channel and media player has a different format. A universal format is much needed, but this is really early days and no doubt somebody will pull away ahead of the others in the near future. For my next upcoming 360 project, I intend to use the G-Audio plugin and report on the overall functionality and workflow. I know there are also other plugins that aren’t free, such as Ambi Pan and Harpex B, which I’m excited to get my hands on as soon as I have enough 360VR work coming through the door.
If you want spatial audio for your 360 content, don’t hesitate to reach out. Questions in the comments section below, please!
Gain more control over your next mix. To learn more about modern mixing techniques (like EQ, Compression, Level and Pan Setting, Digital Signal Processing, FX Sends, and more) from some of today’s leading engineers, check out Soundfly’s forthcoming Mainstage course, Faders Up. Sign up before September 20, and get $200 (that’s 40%) off with code EARLYBIRD40.
—
 Full English is a Brooklyn-based post-production audio facility dedicated to outputting only the highest standard of recording, sound design, and mixing. Owned by British sound designer Kieran Kaye, Full English specializes in audio for all content including commercials, trailers, documentaries and branded content. Offering a boutique experience, working closely with the client from the offline stages to final mix, Full English provides premium quality with a more reasonable price point.