+ Producers, Synth Heads and Sci-Fi Nerds, our new course with synthwave pioneer, Com Truise: Mid-Fi Synthwave Slow-Motion Funk, is out now!
It’s no longer a secret that the do-it-yourself spirit in audio production has increased dramatically in recent years. Isn’t it cool how much control we have over our own music these days?
If you’re a bedroom producer like me, you’re probably busy creating some fresh, artistic music right now. But you’ve probably realized that music production can often feel more like a science than an art form at times. When it comes to mixing, understanding how waveforms and audio frequencies contribute to the overall sonic picture as they clash or fit together comfortably, can make or break your song.
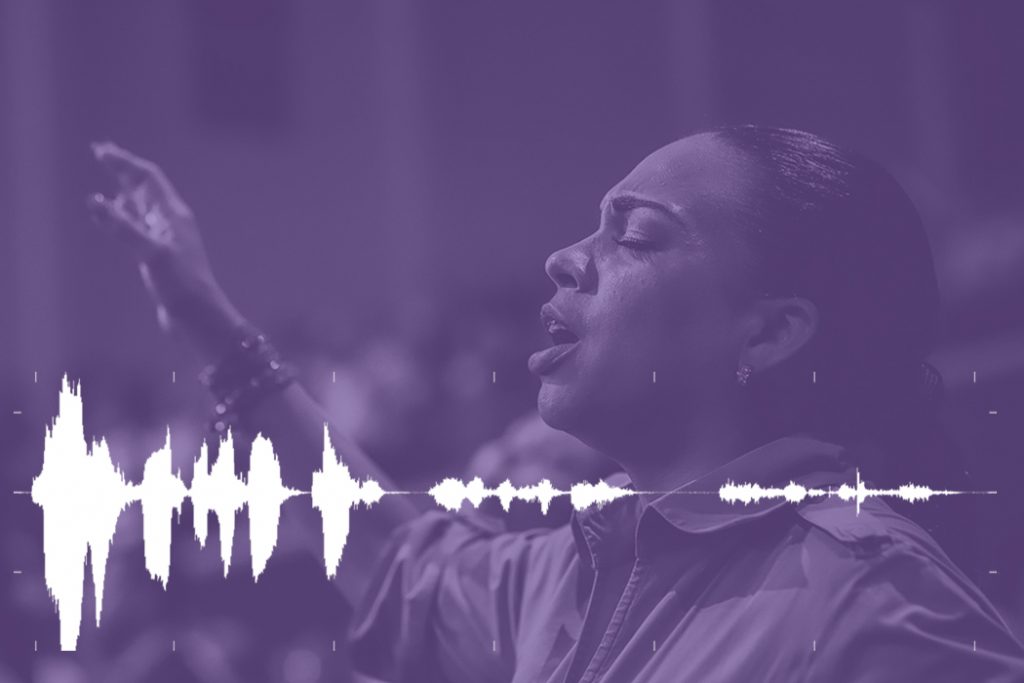
And when it comes to the human voice, the main musical lead of most genres of music today and often the focal point of a great mix, it’s important to understand how those frequencies operate. And that’s where EQ comes in.
I’ve spent hours mixing my own voice in my solo project Unkenny Valleys (and I still get tripped up sometimes), but the more experience I gain while producing, the more I hear brilliance and power come through in my vocal tracks. I also hear that over the years, elements of dullness and muddiness have dropped away. So let’s talk a bit about EQing human vocal frequencies.
If you want more help on producing great-sounding vocals, check out Grammy-winning artist Kimbra’s online course, Kimbra: Vocal Creativity, Arranging, & Production on Soundfly.
+ Enjoy access to Soundfly’s suite of artist-led music learning content for only $12/month or $96/year with our new lower price membership. Join today!

The EQ
To produce a professional song from raw recorded audio tracks, the equalizer (EQ) is one of the most important tools at your disposal. Beside the balancing of larger dynamic ups and downs in volume by a compressor, an EQ is your best friend when it comes to intervening in the frequency spectrum in detail. In this article I’ll use a parametric EQ as many have spectral analyzers that help us visualize the frequency content of sound very precisely.
For a quick primer on EQ, here’s an overview from some of the top engineers in New York City, from our Faders Up I: Modern Mix Techniques course.
Frequency
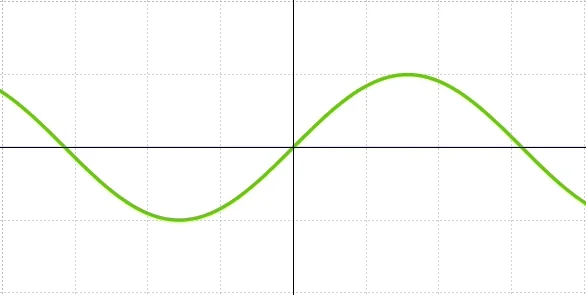
We represent frequency using curved lines, such as the sine wave. When a sinusoidal oscillation extends over one entire second, we refer to it as one Hertz (1 Hz). The higher the frequency, the more waves we would see per second, so the number of Hertz goes up.
Frequencies of the Human Voice
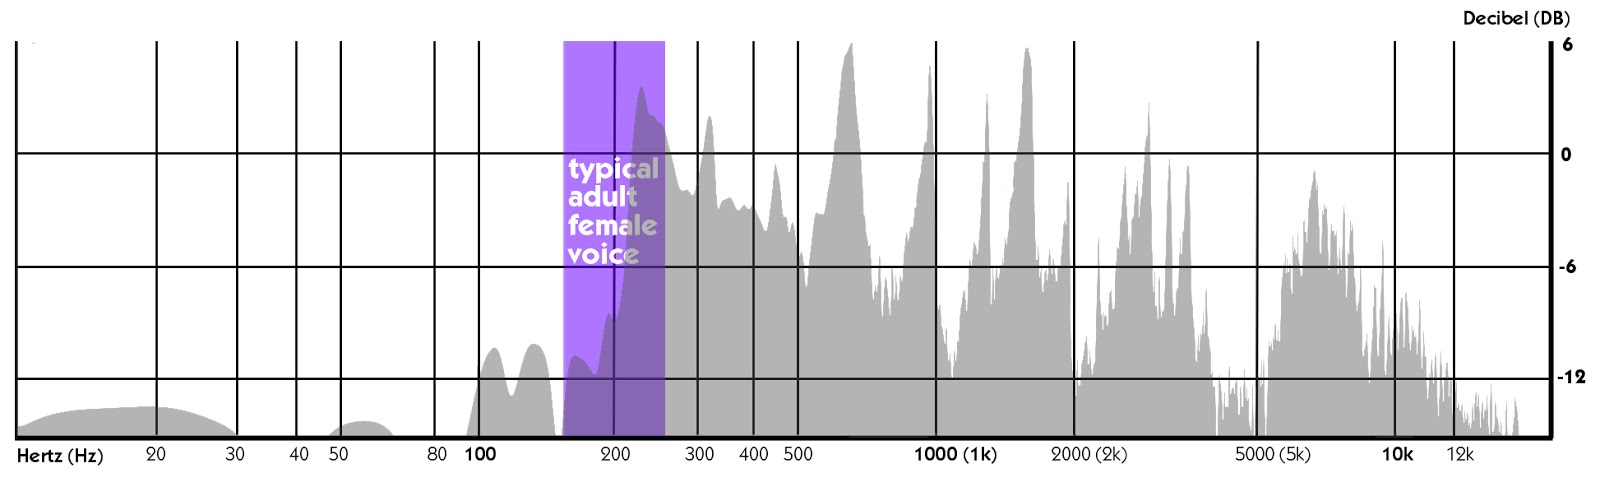
When equalizing vocals, we should keep in mind that the average length of the vocal cords between women and men tends to differ.
In women, at about 15 millimetres, they are on average about 5 millimetres shorter than men’s vocal cords. As a result, they vibrate comparatively faster per second than men’s do, resulting in a higher-frequency sound. Conversely, longer vocal cords lead to longer wave movements per second and thus produce a deeper sound.
The Frequencies We Can Hear
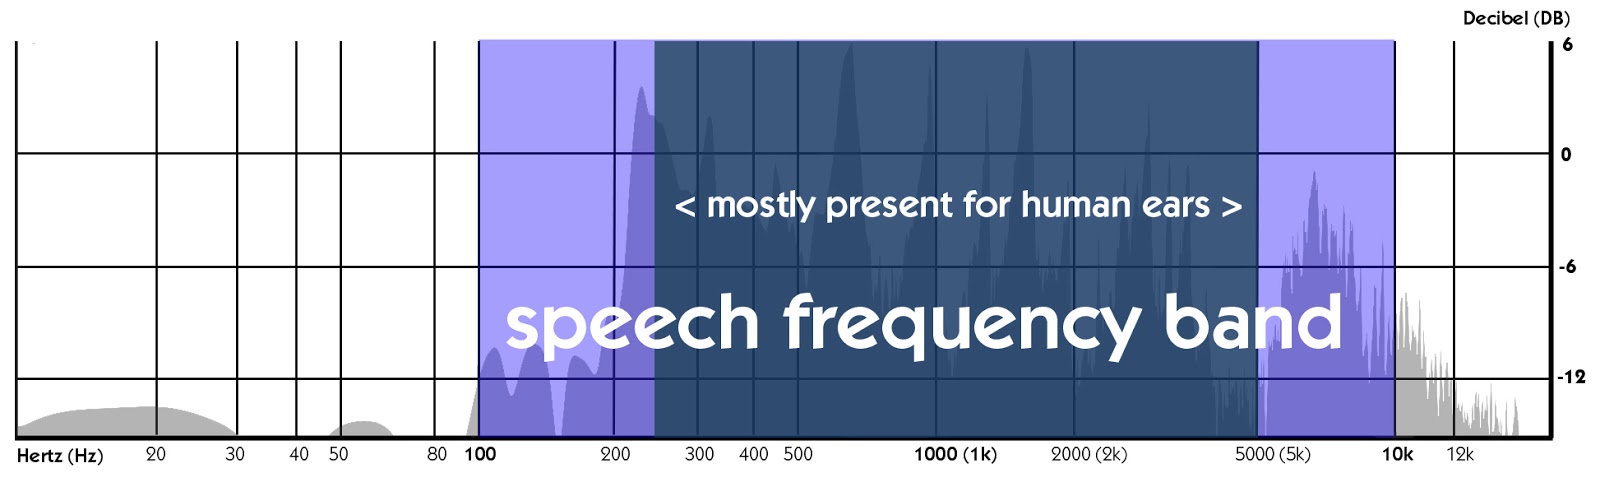
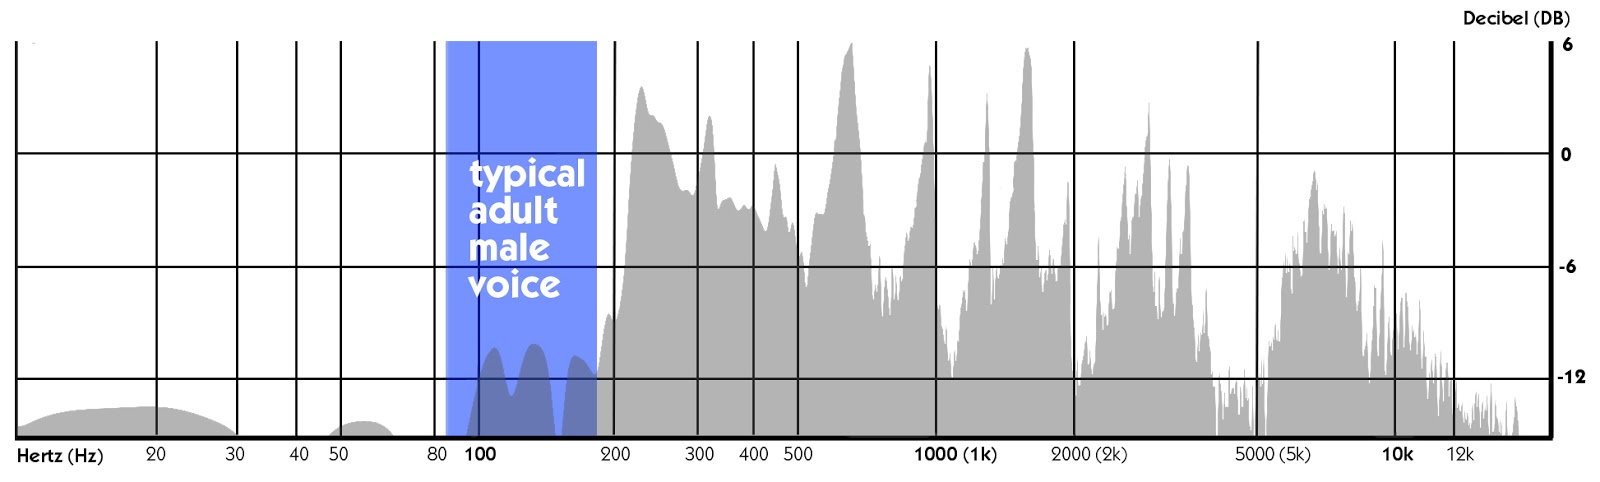
The human ear can hear between 20 and 20,000 Hz (20 kHz) but it is most sensitive to everything that happens between 250 and 5,000 Hz.
During a conversation, the fundamental frequency of a typical adult man ranges from 80 to 180 Hz and that of a typical adult woman from 165 to 255 Hz. Thus, if we look at these three images, the fundamental frequency of most speech falls below the lower edge of the “speech frequency band.”
Nevertheless, we can hear the missing keynotes that are mostly audible for us because there is enough of the harmonic series present to give our ears this impression.
But all of this is just about conversational speech and talking, so how does the human voice work in music? Let’s talk about that in the next section.
How to Professionally EQ Your Vocals
Well, it’s all about lows, mids, and trebles. When you listen back to your raw recorded vocal track for the first time before mixing it, you may find the sound of some words a little harsh, or think, or too dull to hear. This is where the art of the EQ comes in.
Here are some tips for EQing vocals, and how to identify what’s important to keep and what to minimize.
1. Use a Reference Track
Before you begin to move any knobs or faders, it’s always a good idea to listen to professionally mixed music that could act as a decent reference for what you’re trying to do with your track. In this instance, you probably want to use something with a strong and present vocal sound.
(*Don’t use your favorite song of all time if it doesn’t represent that sound quality you wish to hear in your own production.)
As soon as you find a fitting song, set up the vocal track volume in your DAW until it’s equal to the volume of the reference track that is coming out of your speakers. That way your prevent yourself from being fooled by energy differences caused by various volume levels.
2. Get Rid of the Rumbling Noise
If you find a diamond in the mud, you might not see its true sparkling beauty right away. You would need to get rid of all the earth, sand, and dust around it first. Your microphone records everything that is in front of it, and unfortunately that includes lots of noise (both in your voice and in the room). We ultimately want to achieve clarity and brilliance — a basic sound we can modify later however we want — so we need to clear off the dirt.
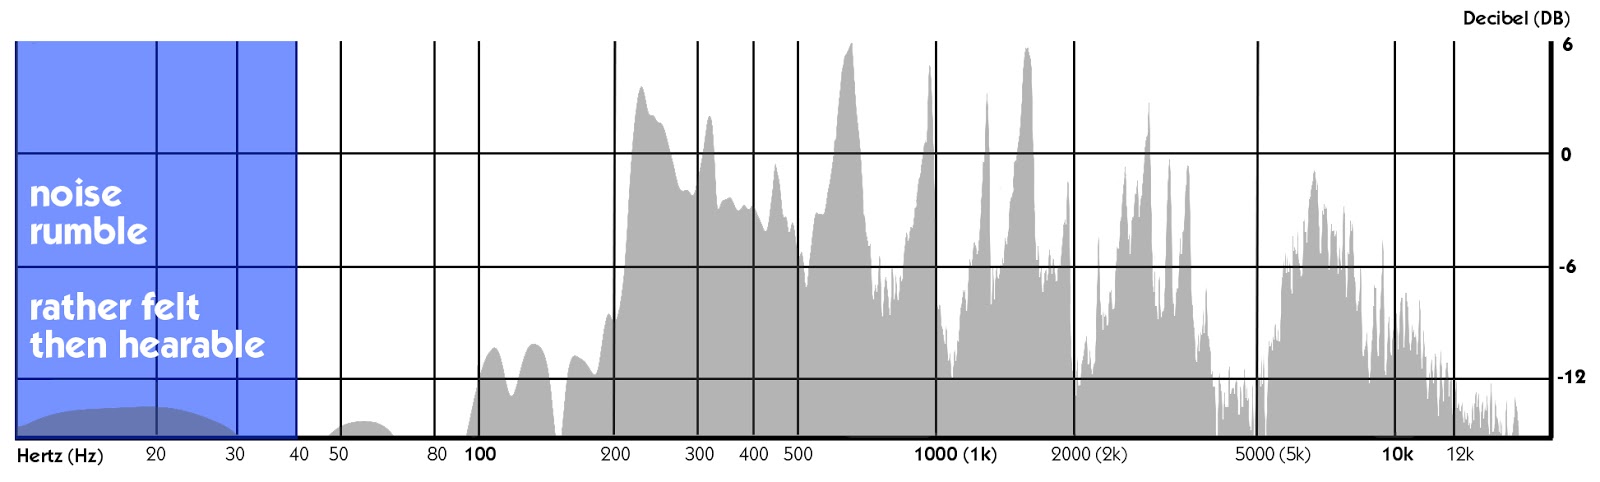
So the first working step of EQing vocals is always a basic “low cut.” Take away anything under 40 to 60 Hz. Because we rather feel than hear what’s going on there.
You don’t need to be too careful with the low frequencies in a vocal mix. As you can see in the following picture, I take away everything below 100 Hz (and sometimes below 200 Hz for female vocals) because — as we just learned — around 100 Hz is where the actual “speech frequency band” begins.
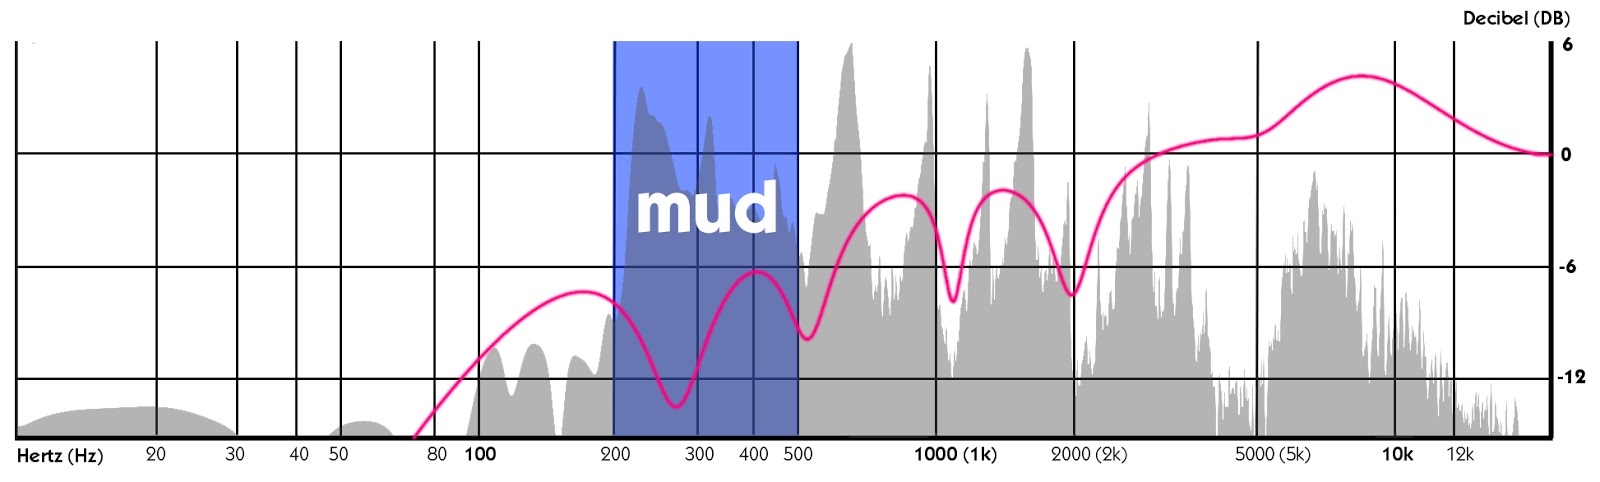
3. Even Out Energy Bumps
We have now removed the worst of the dirt. But our precious diamond still could use a little grinding. The area between 200 and 500 Hz is called “the mud” frequency range. There’s a lot of signal in my example above.
Why? Because most of the energy in a human voice takes effect around 250 Hz. As this point is located in the lower mid range of our EQ, it sounds really mushy around there. Don’t be scared to reduce the gain around this area by about 5 to 10 decibels (dB) if you have to.
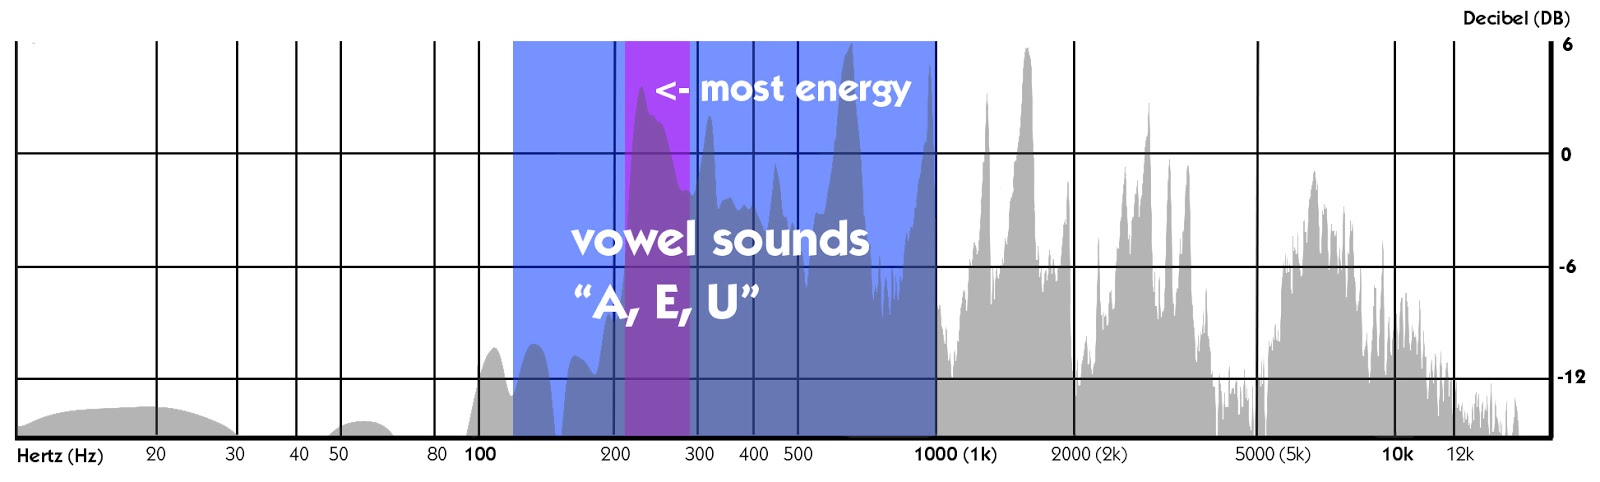
Talking about energy, between 125 and 1,000 Hz lies the area in which you hear vowel sounds such as: “a,” “e,” and “u.”
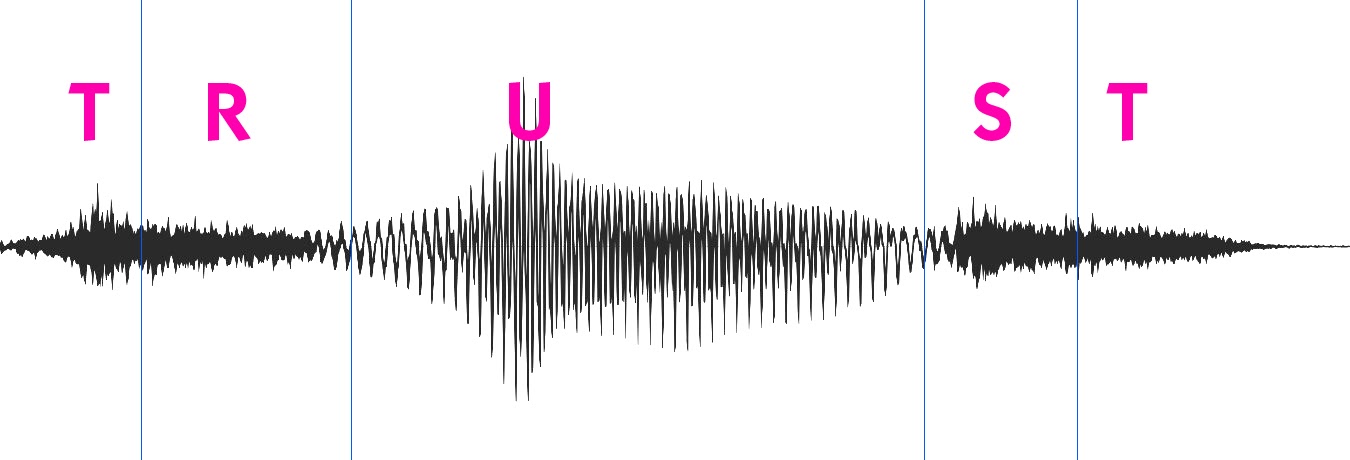
In the below example, we have a look at the word “trust.” We can see that the “uh” sound is much higher in volume than the attacked sounds of “tr” and “st.” If your vocal track has a lack of energy, that’s probably the frequency range you should keep your eye on first.
Now that we can actually feel the soft surface of our gemstone, let’s finally start polishing it.
4. Subtlety, or “Less Is More”
From here on we should operate a little more sensitively.
It’s always better to reduce rather than add signal. Increasing the volume of a specific frequency adds artificially created sound to our originally recorded track. So it’s always the smarter way to reduce frequencies that sound redundant instead of adding stuff that wasn’t there initially.
However you decide to treat a frequency in the end, make sure your vocals don’t start sounding unclear and robotic again. Whether you add or take away too much, you could end up with a lesser quality signal than you started; so less tends to be more.
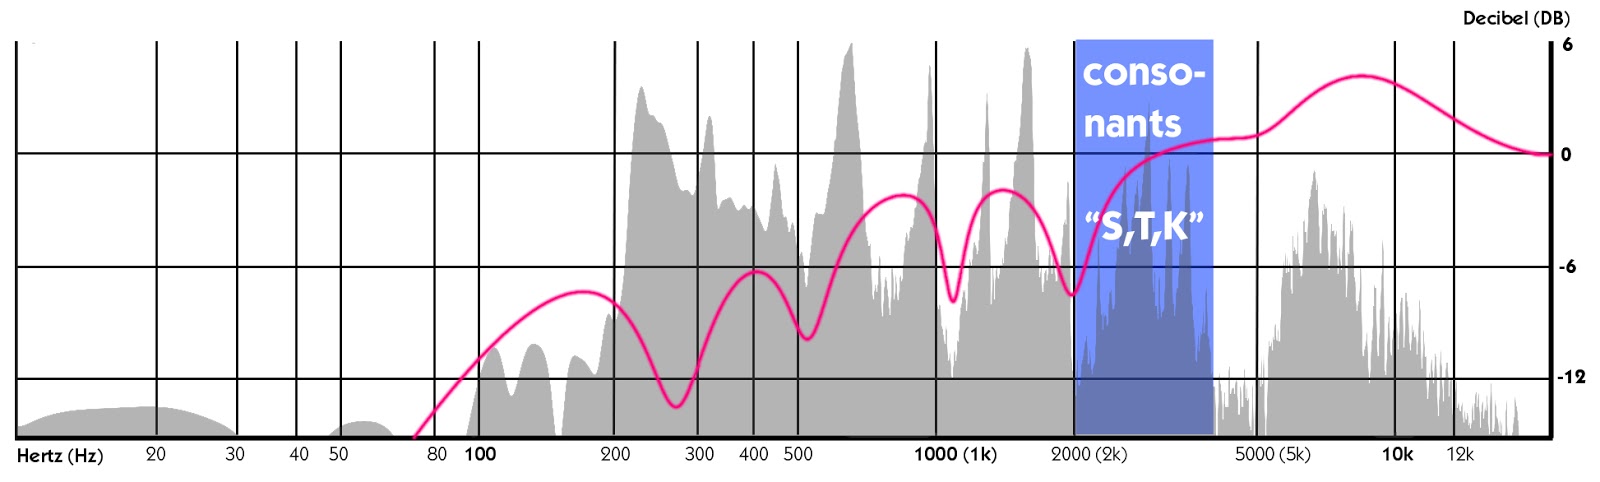
5. Find Unpleasant Areas
In my example, I took out -7 dB around 1 kHz and another -7 dB at 2 kHz. I found the vowel sound was too spiky at 1,100 Hz and a consonant at 2 kH was a little too harsh. Every noise we pronounce in our throat and mouth, or with our tongue and lips, an equalizer displays between 2,000 and 4,000 Hz.
Here we can see the frequency imprint of spoken letters like “s,” “t,” and “k” (the consonants). They create a harder tone, are much lower in volume than vowel sounds, and form the entry door to the spectrum of the high frequencies. They are also very important letters for identifying the meaning of the words audibly, so we need to preserve their clarity; otherwise words will lose identity in your track.
But how can we be sure where exactly something sounds harsh?
The easiest way is to sweep the frequencies using a gain of about 12+ dB, using a super small “Q” (which defines the filter width for the frequency area you want to modify). Just simply navigate slowly across the higher frequency section to look for the most piercing notes, and when you find the trouble frequencies, down-regulate those until they don’t stand out too much anymore.
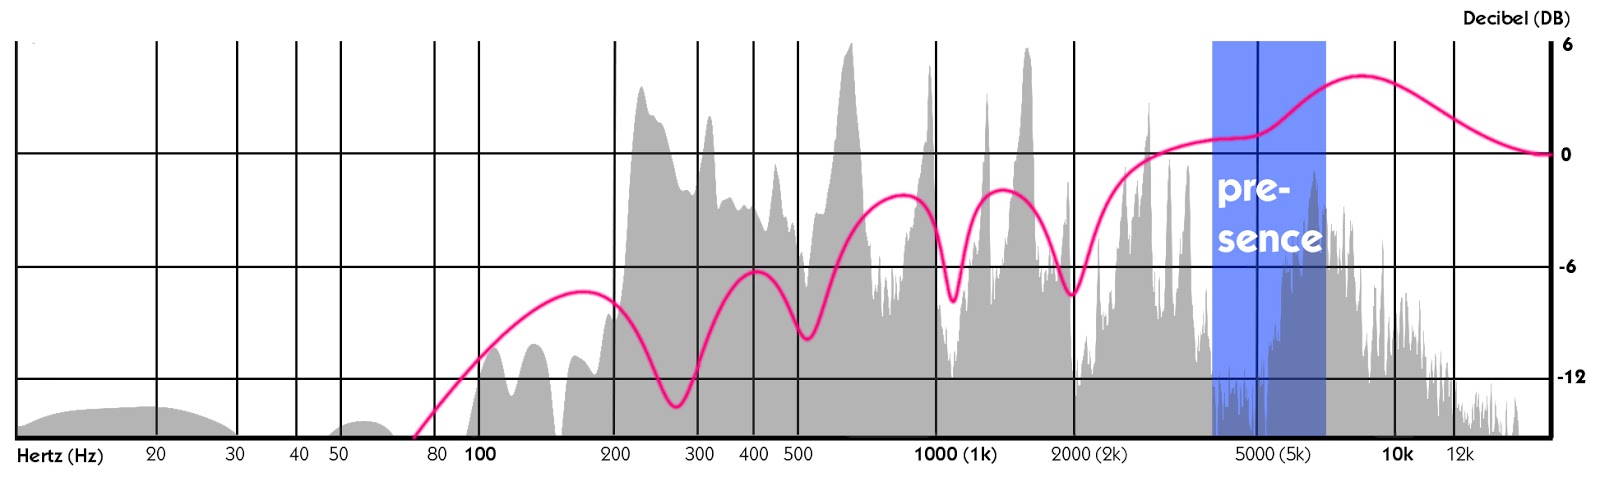
6. Polishing for Brilliance to Make the Vocals Shine
When you’re ready, you can highlight the frequencies starting from 5 to 12 kHz. You’ll find the most presence around 5 kHz. But be careful!
The sibilants are hiding around 6 to 7 kHz. Sibilants are the hissing sounds like “s” or “sh.” If you use too much gain they can quickly become very prominent. Usually a De-Esser (a compressor that chokes these hissing sounds every time they appear in a song) comes in handy. It’s a very common tool to work with in that case.
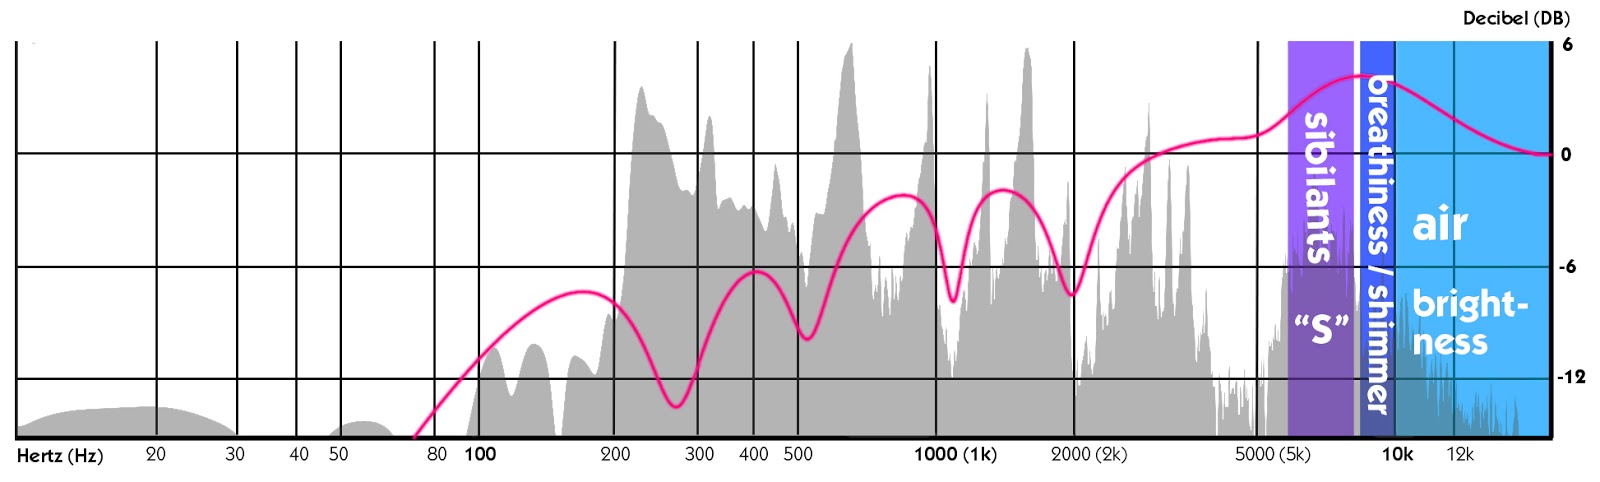
Between 8 and 10 kHz, you’ll hear the breathiness. Increasing the gain here by just 3 or 4 dB will let vocals appear a bit closer and make them shine through better.
Eventually you’ll find even more brightness and a feeling of air between 10 and 15 kHz. I usually try to level this section a little bit down as it sometimes contains smacking and swallow noises.
7. Compare
Finally, bypass your parametric EQ to compare its effect with the raw material to get a “before and after” impression. What a difference, huh?
Now go back to compare your equalized vocal track with the vocals of your reference track, and decide if you’re happy with the result. Season to your liking.
Don’t stop here!
Continue learning with hundreds of lessons on songwriting, mixing, recording and production, composing, beat making, and more on Soundfly, with artist-led courses by Kimbra, Com Truise, Jlin, Kiefer, and the new Ryan Lott: Designing Sample-Based Instruments.