+ Learn to craft more compelling beats and warped, broken rhythms with Son Lux’s Ian Chang. His innovative course is out now on Soundfly.
Ah quantization, it’s one of those terms everyone in music production talks about. So if you’re unfamiliar with how to use it, it might at first seem confusing and intimidating. But on the whole, it’s actually quite simple.
Basically, quantizing means moving notes recorded into a MIDI sequencer or DAW in line with the “grid,” which makes a rhythmically imprecise performance end up perfect. That sounds easy enough!
Let’s dive a little deeper so we can fully understand what this “grid” is, what quantization really does, and when it might be useful to either use or ignore. Ok, deep breath… and away we go!
+ Enjoy access to Soundfly’s suite of artist-led music learning content for only $12/month or $96/year with our new lower price membership. Join today!

Human Timing, BPM, and the “Grid”
It may not surprise you to learn that human timing is not perfectly uniform. If a drummer decides to play at a “medium” tempo, that’s actually a pretty arbitrary idea. Your “medium” could be my “way too fast,” and so on.
That’s why, in music, we assign numerical values to tempo to keep it pretty much standard. 120 BPM means there will be 120 beats over the course of a minute. One beat here is defined as one quarter note. At 120 BPM, a quarter note is precisely 0.5 seconds long.
When reading notated sheet music, we use a metronome to measure tempo, and when working digitally with computers, the same basic functionality applies. Only, with computers, you can view these beat divisions visually, and edit them in what we call the “grid.” The grid is not at all arbitrary. At a given BPM, quarter notes, eighth notes, sixteenth notes — every note you can think of — lines up exactly into a mathematically and graphically defined place in time.
But, even if we have a numerical notion of tempo, a human tempo could fluctuate over the course of a song; which is honestly often desirable, music that is exactly on time every beat for minutes on end can be exhausting. But a human will not hit notes exactly on those mathematically defined divisions.
If the player is great and the timing feels great, everything will sound great, but other times it can sound awful (say if a player is just off or inexperienced). What’s more, editing and mixing a bunch of musicians playing semi-arbitrary rhythms that aren’t “locked” to one another can be a pain. Enter quantization…
+ Read more on Flypaper: “10 Tips for Keeping Your Hip-Hop Beats from Sounding Stale.”
MIDI Quantize
Although most DAWs now have the ability to quantize actual audio, quantization is first and foremost a MIDI function, so that’s what we’ll talk about here. Just know that most of the concepts apply when quantizing audio, too.
Let’s say you play a simple drum beat with kick and snare into your MIDI sequencer while listening to a click track. When you play it back, you notice that the snare just doesn’t hit right in a couple of spots. Or perhaps you’ve laid down a piano groove or a bass line, but some notes aren’t quite right.
You could move each note manually with your mouse to lock them right up against the grid lines, or you could apply quantization to the whole phrase. Your notes are now magically aligned to the grid and your rhythm track is perfect. Boom, done, end of article!
Well, not so fast. The fact is quantizing can sometimes hurt your track more than it helps it. There are several ways this can happen; the first is by using the wrong quantization resolution. Let’s talk about that.
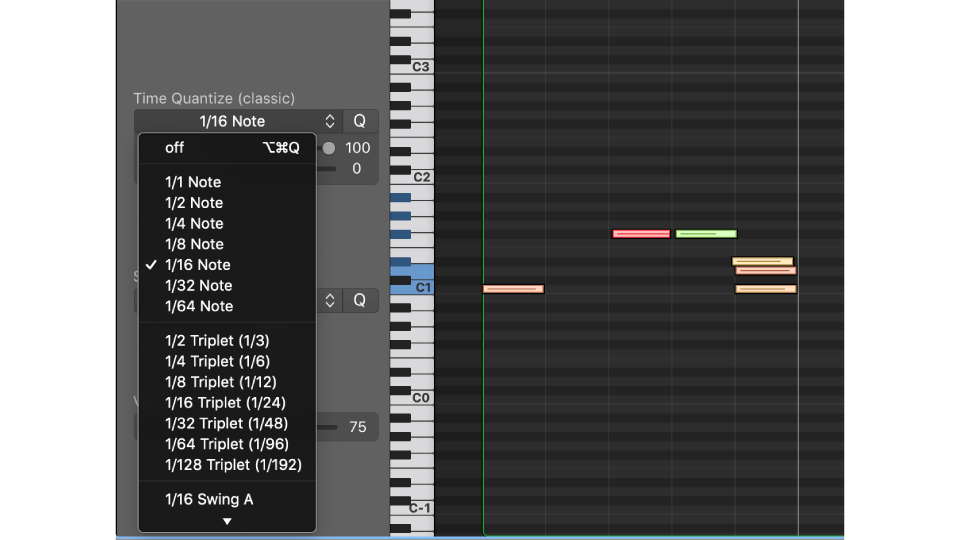
Time Quantize (Resolution)
A quick note to say that we’re using screenshots from Logic Pro X here, with one exception in the Groove section below. If you’d like to learn more about using Logic Pro X or Ableton Live, go ahead and follow those links to check out Soundfly’s online courses on those DAWs.
Quantize resolution tells the computer how fine the grid should be. For example, if you pick eighth note resolution, that means all notes will be moved to the nearest eighth note position. If you happen to have played a rhythm that includes sixteenth notes, your phrase will get changed in a way you didn’t intend.
If you use too fine a measurement, notes could be moved to the wrong grid space, changing the feel of the phrase or ruining it all together. A good rule of thumb is to quantize to the shortest note you’ve played; if the phrase features eighth and quarter notes, use eighth note resolution.
Keep in mind that many rhythms might actually use triplets, so you might try using a triplet resolution if things aren’t coming out right. Once you’ve got your resolution right, you may still notice the track sounding a little stiff and inhuman. If this is the case, you can play with “strength.”
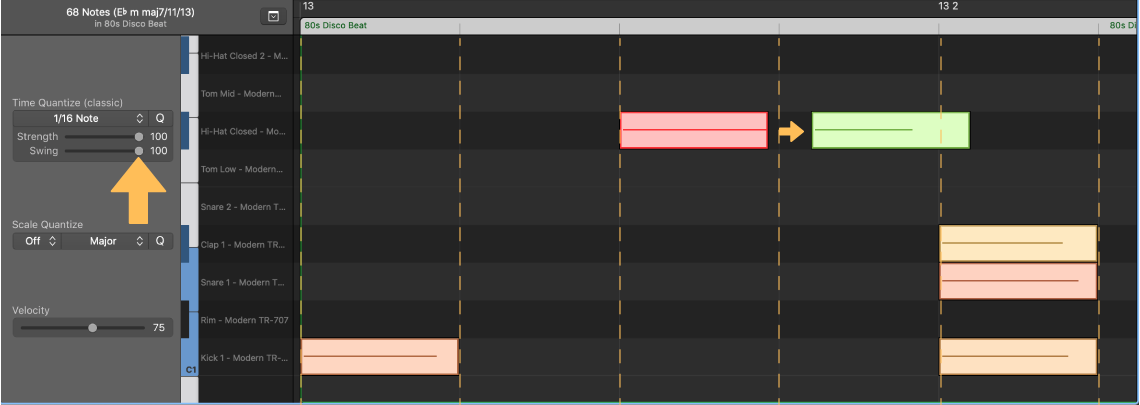
Quantize Strength (or Amount)
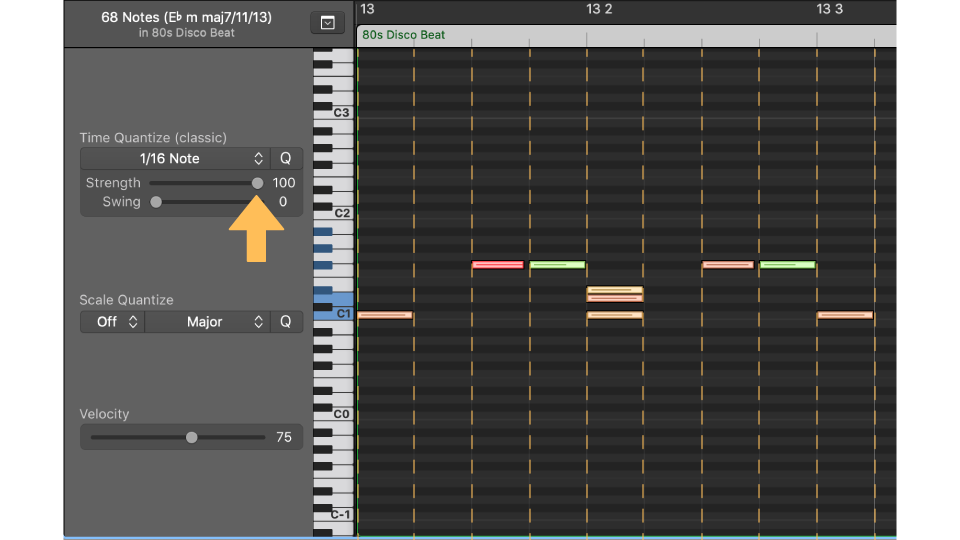
Quantize strength works like this: At 100%, it will move the notes exactly to the nearest grid point. To keep a more human feel, you can use strength to simply move notes closer to the nearest grid point, but not all the way there. For example, if a note is ahead of the beat by 60 ticks, 50% strength would move the note back 30 ticks — half of the way home.
A tick is simply a way to divide and measure “relative time” digitally in a rhythmic track. While our musical grid is divided into bars, beats, and smaller subdivisions, the notes we play in fall in between those specific moments in time. In our MIDI sequencers, the smallest unit of time we use to reference the position of a note is ticks.
Our sequencer resolution is defined by how many ticks exist per quarter note. In DAWs, this is often predetermined, but is sometimes adjustable. Essentially, the more Ticks Per Quarter Note (TPQN), the higher available resolution for capturing timing nuances within a performance (in Logic Pro, there are 960 TPQN or ticks in every quarter note).
This can help keep some of that human feel, while also tightening the groove up.
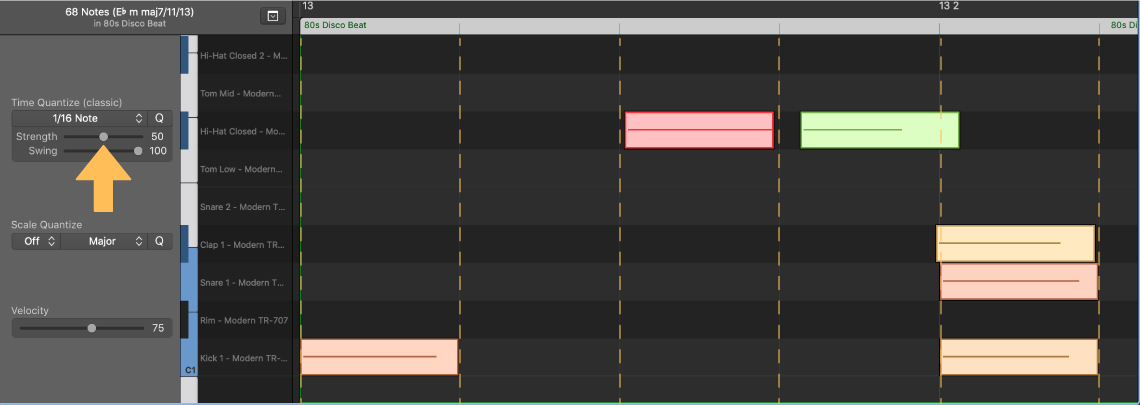
Swing
Another way to humanize a groove is to apply some swing (also known as “shuffle” feel). When a player swings a beat, they’re either making the first note of a pair a little longer (or shorter) than the second, or they’re altering their attack placement of those beats.
Swing distorts the grid so that each pair of notes is unevenly spaced. And with your quantization settings. you can actually automate this so you’re getting that more human feel without having to edit every note individually.
Swing parameters vary depending on your DAW, but using Logic Pro, it’s represented by percentage. At 50%, no swing is applied. Between 51-100%, you push the start time of the second note forward, or behind the beat, and between 0-49%, you pull the start of the second note back so it’s ahead of the beat.
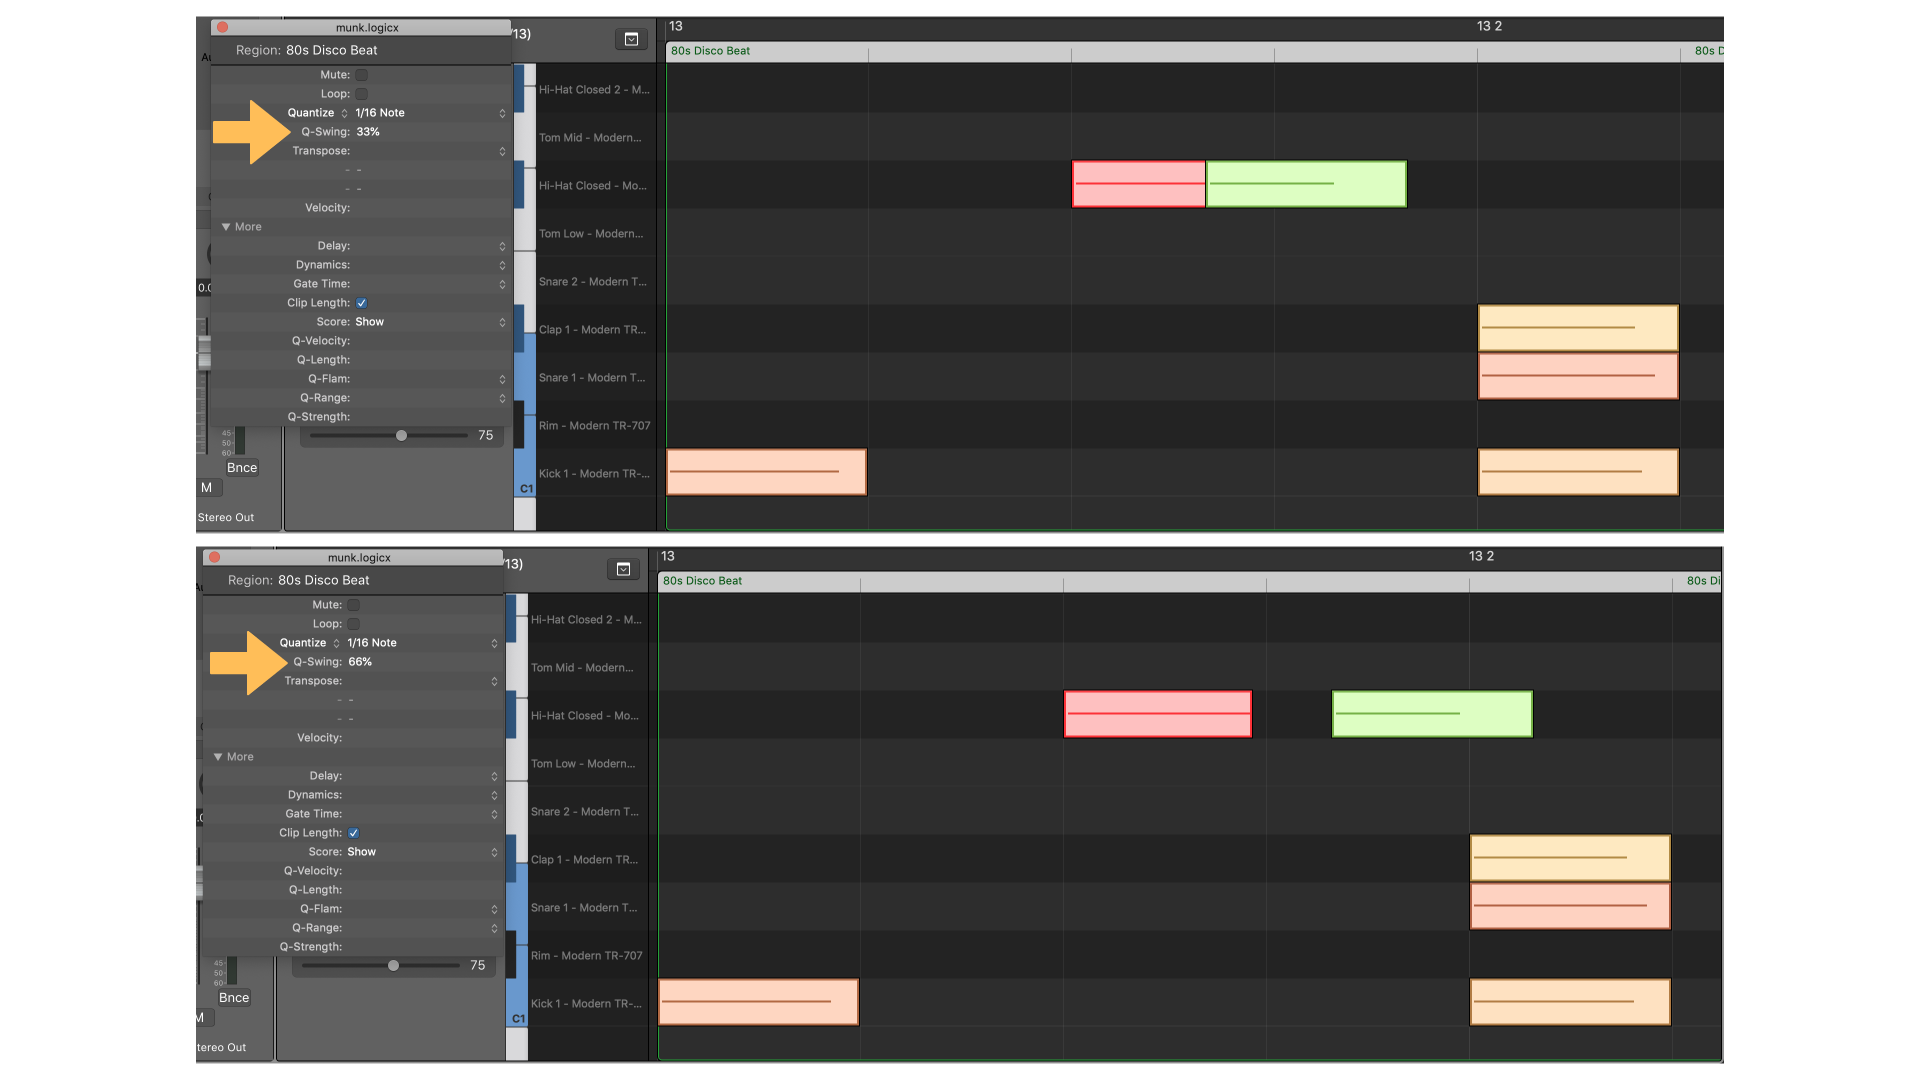
Swing can also be a great way to change the entire feel of a track by swinging a previously straight beat (or a beat featuring equal rhythmic value between each eighth note in the pattern). If you’re using samples from Splice or any other massive sample library, some grooves may already come with swing built in, so your settings on this parameter will always be changing and customized to the exact sound you’re going for. Play around with it to find what sounds good for you!
Groove Quantize
To this point, we’ve been talking about quantizing to a perfectly even grid, one that
doesn’t fluctuate. What if you could borrow the feel and groove from a live drummer or performance?
Groove quantizing allows you to quantize to a human groove, or a groove predetermined by software presets to make it sound “human.” This is particularly handy if you want to lock the grid to a live performance to make editing easier.
Here’s what that looks like in Ableton Live:
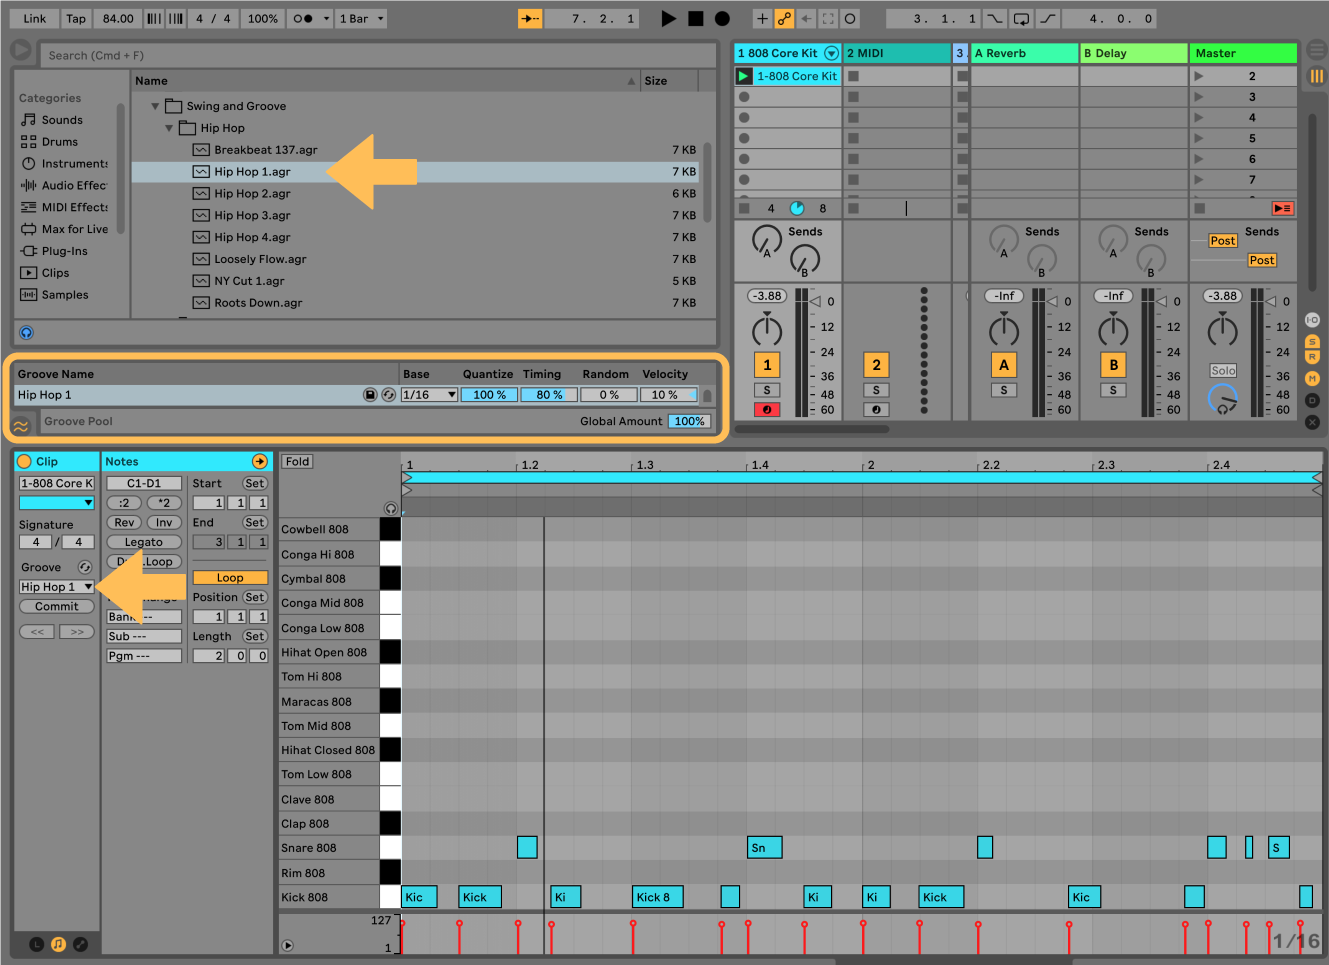
Groove quantize works the same as regular quantization, except the grid is defined by the groove source. You may still have to play with resolution, strength, and even swing parameters to keep the quantized parts faithful and dynamic however.
A bit of housekeeping: Soundfly’s got a brand new online course that teaches you all of the tools to get started making pro-level music and audio using Ableton Live, one of the most versatile DAWs out there. Check out Intro to Music Production in Ableton Live (10 & 11) here or sign up for our email list to stay up to date with new courses and offers.
When, Why, and Why Not
Quantization is a crucial tool for keeping your beats sounding tight and clean, but it’s not always appropriate. Here are a few times you’ll want to quantize and some you may not:
When to Quantize:
- MIDI tracks that need to be copied and pasted. The first note must be placed exactly on the one, or you’re in for a world of hurt when you try to paste a phrase to another measure.
- When tracks need to be super even and tight (such as in EDM). A quarter note kick drum, for example, really doesn’t do its job un-quantized.
- To tighten up a drum track, bass line, piano, or anything that forms the foundation of a song. Use strength settings to keep things from sounding mechanical, though.
When Not to Quantize:
- Any time quantization ruins the feel of a part. Undo!
- If a part already sounds fantastic. If it ain’t broke, don’t fix it!
- Parts, such as lead lines, which have a unique human character. Character is often about subtle rhythmic “imperfections.”
- Michael Jackson’s beatboxing. Never, ever, quantize the gloved one.
- Tight live ensembles — unless using groove quantize to adjust overdubs to the original group’s timing.
Lock It Down
There you have it. A quick look at quantization, and how you might use it to better your productions. Quantize is an essential part of any audio/MIDI toolbox, and it can work wonders and make your life easier. But like anything, it’s not for every situation. Use it judiciously, and most of all, use your ears.
Here’s to keeping the beat.
Keep on Grooving…
Continue your learning with hundreds of lessons on songwriting, mixing, recording and production, composing, beat making, and more on Soundfly, with artist-led courses by Kimbra, Com Truise, Jlin, Kiefer, RJD2, and our new The Pocket Queen: Moving at Your Own Tempo.